Friday, October 8, 2010

Picture Pawfect

My poor pooch has this drab corner of our house allotted for his food and water bowl. It is so boring, one piece of art work, a walking stick (used to hang his stocking on for Christmas) and that's pretty much it. Well, have a look for yourself.


I mean I love this print and all, but, Moose deserves a bit more than this I think.


Recently, I have been noticing how much I love the colored, mixed matched sized frames. So, why not make a little pet corner for the Moose? After all, these frames are cheap and fabulous--if you purchase them from Homegoods, TJMaxx, and Marshalls like I did!


First, I laid my prints on the floor to get an idea of space and how I wanted to place them. A little to "boxy" on this try. Don't you think? Plus I was looking to extend this project from the bottom to the top of the windows..this wasn't going to work.


Trial 2: Ah-ha! Perfect. An elongated version of the first try and hey look, Moose is even checking out how awesome he looks in all these photos.


Now, to start hanging them on the wall. I started from the bottom up just to keep my spacing in tact and to make sure everything would fit nicely. I was immediately excited after the first piece hung. (Why hadn't I done this before?)


I love this print (rt), a couple of years ago Moose was in Live Spa magazine and this was the photo featured..the cute robe was ours to keep!


Lastly, I quickly printed a greyhound coloring page onto scrapbook paper and wrote "happiness is a warm puppy," cut it out and placed it in the last frame for the finishing touches.


As you can see, everything fit just as exactly as planned! I also ran across the monogrammed M in that terrific green and had to have that!


Moose can now enjoy his dinner in style and I can enjoy looking at my new display of happiness...my love sponge!

Have a great weekend and check out other great blogs here!

The DIY Show Off


Read more...

Thursday, October 7, 2010

Eeek! A Pumpkin Project...

This project, though appropriately "Halloween-y," is embarrassing-ly simple. So simple, I won't even bore you with an overload of dialogue or instruction, I'll just let you take a look. Take from it any inspiration if you can, just remember to think of ALL the possibilities. (Had I found a bigger vase, I would have loved to have done our last name instead!)


Here was the first product: A little overdone.


Still, a bit much...


Ahh, now that fits us a little better.


And a special thanks to my little sweetie, who was so helpful at the pumpkin patch finding just the right materials for our project!


I'll be linking to these parties this week. Happy Thursday!

Read more...

Wednesday, October 6, 2010

Baby & Big Girl Room - Part 4 - The Other Walls


Okay, today I am going to share how these walls came together...


First up is "the sun" as Avery calls it. When I told her that the new paint color in her room would be like the sky, she asked if there would be a sun. I didn't think there would be until I found this treasure for $3 in the clearance aisle at Hobby Lobby. It just needed a quick change in fabric. I tore off the back, used the pink polka-dot material as my pattern, cut out the yellow fabric I wanted, and glued it on...


Super easy, cheap, and it was "the sun" that Avery had requested. It was a pin-up board that came with adorable crystal push pins. I personalized it with an old flash card, a newborn photo of me, a picture of my Mom when she was little, and then a bigger picture of my girls together...


Next up were the oval frames on the other wall. My Mom just had these oval beauties laying around her house. I love me some oval frames so I was thrilled. They were perfect for the girls' wall and free! I painted them black first. Then I used delicate white with pink dot fabric as my background for silhouettes of the girls. I used the 'ol print and trace method. I took pictures of the girl's profiles, printed them out the size I needed, traced them onto black paper, and cut them out.


I taped them to the fabric, popped the glass back in, and admired the finished product. The one of Mia just makes me smile...


The next mini project for the wall was the sisters sign. We have so much beadboard leftover from our nook project that I am always trying to find a use for it. I had used some for a giant ruler and now some would be used for a sign. I just had my husband cut a piece to the exact size I wanted. I looked through my stash of cardstock letters and found the perfect ones. I traced them onto the board in pencil, and then painted the letters black...


The final touch was adding pink ribbon with spray adhesive to the back for hanging...


I used the white shelf that had already been in the room under the sisters sign. I have a serious love of Little Golden Books and am lucky enough to have a few from when I was a little girl and sweet friends who give them to me as gifts. I found 3 that were just perfect for the room.

I added a pink hanky and some old blocks that I found at the Country Living Fair this year and it was complete...


So, that completed the other walls and now the room is shaping up quite nicely and almost ready to be fully revealed...


I'll be linking to these parties this week. Check them out for some serious inspiration!

Come back next Tuesday for the final part of this series. I can't wait to show you the rest of the details and the whole finished product. I'll let you in on the paint color and even tell you where those perfect little birdie decals came from just in case you are wondering...

Happy Tuesday!

Read more...

Tuesday, October 5, 2010

Baby & Big Girl Room - Part 3 - The Clothesline

Remember I told you these blocks were inspiration for the design of this room...


So, I bought two wooden circle plaques for $1.00 and spray painted them black...


I also bought an A (Avery) & M (Mia) knob from Hobby Lobby and had my husband put them into the wooden circles. He then screwed the wooden circles right into the wall for me. I attached a pink grosgrain ribbon to each of them and that became my clothesline...


My sister had given me a pack of old fashioned clothespins at one point that I was saving for just the right project. This was it.

I then found some simple and cute things to hang from the clothesline. I used a plain white baby t-shirt, baby bloomers, a cute burp cloth...


an old baby dress that was mine, and some leftover pink toile fabric...


I was so excited when I finally found just the right things to go up on the clothesline...


And the best thing about this part of the room is that can be changed at any time. I can put up different clothes, linens, or fabric. As they get older, I can replace the clothes with photographs and/or artwork they create. Gotta love a versatile decoration, especially in a growing kids room.

I will be linking up to these parties this week!

Happy Tuesday! I'll be back tomorrow with part 4 out of 5 in the series!

Read more...

Monday, October 4, 2010

Shut Up and Sew: Burp Cloths and A Giveaway!

How many of you feel like this about sewing? It's okay to be honest.

make-sew-jack-sparrow-costume-800X800.jpg

I used to be just like you. But secretly, I wished that I felt like this.

images-1.jpeg

I love the DIY world because it gives me the opportunity to attempt Pottery Barn or Pier One rip offs. But it's just that I have been seeing so many J Crew and Anthropologie rip offs, and my closet has started getting jealous of all of the attention that I am giving to my walls and my furniture.

When I made these Tie Appliques for my son a few months ago, I practiced with several different types of backing and fabrics to find the one that I liked the best. But I was left with several tie t-shirts with adhesive that wasn't going to last long, and I wanted those shirts. So the next time that I saw my mom, I took a bundle of shirts with me, sat down at the sewing machine, and had her show me what to do. I discovered something that I feel like the sewers have been keeping from us non-sewing DIYers.

IMG_4671.JPG

A little something called...short term gratification.

I'm not kidding. Not only is sewing not difficult, sometimes it's kind of easy! No really, it is!!!

I wish I could go back in time, listen to all of the excuses about why I didn't want to sew, and tell myself, "Just quit your whining and try it already!!" So instead, I'm offering that to you, my dear non-sewing readers. We can do it!! It's not that bad! Just come with me and we'll do it together, okay? Okay.


Twice a month, I'm going to do a feature called Shut Up and Sew. (Perhaps a little aggressive, but gets the point across well enough, right?) I'll be following along with an online tutorial and giving you my step-by-step from a "learners perspective."


New Sewers: Please follow along and let's see what we can pull off together!! We can crack into the secret world of sewing and take it by storm!!

Seasoned Sewers: Help us newbies out and let us know what we're missing. Have a tip to add? Please let us know in the comments! Then we can all learn together.


There's also a GIVEAWAY! Read on for more details.


Today's Project is an easy and sweet set of burp cloths.

IMG_7349.JPG

Before we get started, here are a few First Time Sewer Tips.

1. Thread the sewing machine so that the thread goes in the front of the needle and out the back. This matters.

2. Don't push or pull your fabric as you are sewing. You can lightly guide it so that it doesn't get crooked, but the machine will pull the fabric through itself.

3. When you reach a corner, leave the needle in the fabric, lift the presser foot, rotate your fabric, drop the presser foot and then continue your sewing. This will let you sew 1 continuous line down all 4 sides of the burp cloth.


 Ready? We can do it!!


Materials needed: 3 cloth diapers, 3 coordinating fabrics, sewing machine, pins, scissors, iron. (Moda's Fat Quarters or JoAnn Fabric's fabric bundles are perfect for this.)

I used the burp cloth tutorial from the Moda Bake Shop here.


Attempt #1.

I started off by ironing the diaper and decorative fabric. I started with 6" by 22," but it was a bit crooked, and when I tried to correct it (a few times), I cut off a little too much fabric, so that it just barely fit. Oops.

IMG_6397.jpg

I flipped the orange fabric over and ironed the raw edges down about 1/2 inch. I lined the fabric up over the center of the diaper and pinned it in place. I then got started on my stitching. I set my machine to a straight stitch, stitch length of 12, and tension of 5.

Picnik collage1.jpg

So far so good. But be aware of this happening.

IMG_7320.jpg

See that? The presser foot slid right underneath the loosely woven threads of the diaper! If i had sewn much further it would have either pulled those threads out of the diaper, or messed up my stitching. I stopped, left my needle down in the thread to keep my place, lifted up the presser foot just slightly and got it disentangled from the threads. To correct this from now on, I adjusted my needle position (you can do left, center, or right) so that the decorative fabric was underneath the whole presser foot as opposed to just half of it as before, and it was smooth sailing.

IMG_7316.JPG

I did have an "Aww, maaaan" moment with this burp rag though. Remember how I said I had cut the fabric length slightly too short? I didn't have enough material on the length to tuck the raw edge under and sew them down. So I improvised.

I sewed a straight stitch across to seal the opening, and ran a thin layer of fray check across the raw edge to keep the fraying in check.

IMG_7336.JPG

Attempt #2.

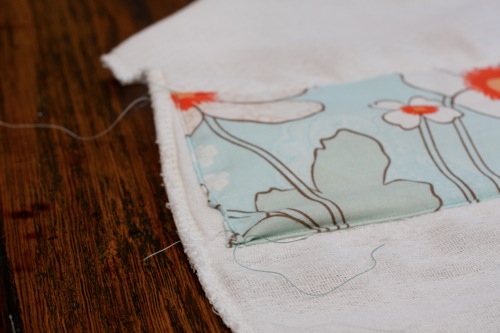
This one went a lot better than the first. I sewed all the way around the whole diaper! My sewing was a little bit jagged on the long stretches, but overall I was feeling so proud of myself!

IMG_7328.jpg

However, #2 was not perfect. Apparently I hadn't been smoothing out my fabric as I went because I ended up with a little pucker in the 4th and final corner, darn it! And it still was just a little bit short on the end. But overall, it was better. All 4 sides were more finished looking, and I didn't snag any of the diaper fabric as I was sewing.
IMG_7335.JPG

Attempt #3.

My best burp cloth yet. My lines were straight and there was no puckering.

IMG_7338.JPG

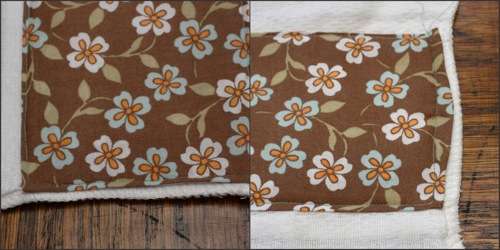
The ends of the burp cloth looked pretty good too. One was perfect (left), the other was not perfect, but it was pretty darn close.
Picnik collage3.jpg

Now here is the best part. I made all of these in an hour. ONE HOUR!! It turns out that ironing, measuring, cutting and machine sewing don't actually take that long. Coming from someone who is always waiting for stain to soak in, paint to dry, glue to dry, sealant to dry, etc, having project that went from start to finish in an hour was a joy!! If I did it, you can do it!!

IMG_7344.JPG

And aren't they cute?! I have to be honest, when I walked out of my craft room holding these, part of me expected to see cheering crowds. Okay, not really. (But kind of.) It was like the first night that my son slept through the night when he was a newborn, part of me expected someone to make an announcement about it at church the next day or something. :)

IMG_7362.JPG

Okay, let's review. These are adorable, fun, easily customizable for a new mom or mom to be, inexpensive to make, not time consuming, and if you make any little mistakes they actually add to the handmade charm!!

IMG_7355.jpg


Would you like to win a fabric bundle like the one I used in this project? Leave a comment answering one of the questions below for a chance to win.


For the new sewers,what do you think, would you give this a try? What other types of tutorials would you like to see from a learner's perspective?

For the seasoned sewers among you, what did I leave out? What was your first sewing project and how did it go?


I'll be linking this to these parties. Have a great week!!


E1025F317CFB5B8E9E5C526E5CC0F475 copy.png


Read more...

Friday, October 1, 2010

Lemon Tree Creations Contributors

I recently discovered that our profile picture links were not working, so my apologies to those of you who have been trying to contact us and were unable to do so. Sorry! We didn't know! (They are working now, and this post will be saved under the "contributors" heading at the top of the page, so you should be able to access our email addresses in either place.)

After I fixed the links I started thinking. Today is LTC's 7 month anniversary (or birthday, not sure what you want to call it). Each of the contributors did an introduction post the first week that we started the blog, but most of you have joined us since then, so you missed them. You've gotten to know us a bit through our projects, but would you like to know a little bit about us too? If so, here is a brief rundown.


Erin profile pic.jpg


I'm Erin. I'm in charge of Mondays and I give you the best that I can pull off in my little guy's nap time. :) I am trying a little bit of everything and learning about all of it as I go, and my newest venture is sewing! Gulp! I also try to squeeze in no skill required projects, like Easy, Easier and Easiest Displays. Check out my Book Page Egg Wreath or Express Necklace Knock-Off.

If you want to know a little more about me, see my introduction post here. You can also click on the ERIN label to see all of my projects.

Email Erin: erinkeith05(at)yahoo.com


Tiff profile pic.jpg


This is Tiffany, she's in charge of Tuesdays and never disappoints! She is oozing with sweetness, probably because she has 3 little sweeties at home with her, who are often the inspiration behind her charming and gorgeous projects. (I can't wait to see the rest of her Baby & Big Girl Room Reveal!) Check out her stunning Reformed Nook, or her variety of incredible Pillow Ideas.


If you want to know a little more about Tiffany, see her introduction post here. You can also click on the TIFFANY label to see all of her projects.

Email Tiffany: mrstiffanyjudd(at)yahoo.com


DSC_2434.JPG


Patrice is in charge of dazzling you on Thursdays. She has a fun sense of style that is always present in her projects and her adorable daughter often lends a helping hand, like in this incredible Hand Stitched Mailbox Set, as adorable daughters should! Check out her Book Art or her Frame Tray.


If you want to know a little more about Patrice, see her introduction post here. You can also click on the PATRICE label to see all of her projects.

Email Patrice: jpelkins(at)gmail.com


n789407654_770036_6454.jpg


Jessica joins us every other Friday and I wish it was more! She has fun, funky and original ideas (Eyeglass Family Tree, anyone?) and you'll be left begging for more. Check out her Mason Jar Band Wreath or her Craft Closet.


If you want to know a little more about Jessica, see her introduction post here. You can also click on the JESSICA label to see all of her projects.

Email Jessica: browneyedjes117(at)yahoo.com


Amy profile picture.jpg


Amy is no longer a regular contributor at LTC due to an incredibly busy schedule, but one glance at any of her parties (like the School Bus Birthday) will show you why we would quickly welcome her back if she has time to return in the future! She has such an eye for detail, you will be ogling her party pictures over and over. Check out her Flower Birthday Party or Alligator Birthday Party.


If you want to know a little more about Amy, see her introduction post here. You can also click on the AMY label to see all of her projects.

Read more...
Related Posts with Thumbnails