Wednesday, August 31, 2011

Classroom Inspiration

As I prepare for and welcome baby into our home I will have a few great friends posting for me over the next few months. I'll be back occasionally to share some things of my own, but am excited to have help from a few fun bloggers along the way! Today I have Casey from Life on Grand Avenue sharing some great 'teacher' related projects. As you might know I am a teacher too and always looking for fresh classroom ideas. While baby isn't here yet, I wanted to share her post a little early with all of my fellow teacher bloggers out there. Hope you enjoy the great classroom inspiration she has to share today!

Hi, my name is Casey! I feel honored to be a guest here at Lemon Tree Creations because normally this is the site I go to to be inspired. Today my projects are completely centered around the "back to school" theme but they are all very easy to do and could be used anywhere!
Our school year officially began on Wednesday August 17th and not without lots of normal classroom chaos and a flash mob! Yes, that's right...a flash mob! Our Crossroads Family decided to liven things up this year at our beginning of the school year assembly with our very own flash mob. I don't think ours will make it on Youtube (I really wish I had a video to post...) but the kids loved it and we all had a lot of fun dancing to The Little Mermaid's "Under the Sea."

Our theme this year (consistent with our dance) is "A Sea of Opportunity" and we have decked the halls (so to speak) and our classrooms to prepare for the first day with our students. I have changed things, added things, tweaked things, and changed things again (in true teacher fashion) to prepare for our big day. Here are just a few things I wanted to share that I have created this year to brighten up my classroom and continue my love for all things organized!

1. "Umbrella Wreath"
This project was SO super easy (just the way I like DIY projects)! The front door to my classroom hosts my student of the week (we call them the "fresh catch") and I needed a little something to dress it up. After seeing the incredible idea here I went to work.
Step 1: Find an old wreath at Goodwill (Mine was $3.00). It seemed to be the perfect size. It just needed a little bit of help.
Step 2: Pull all the old decoration off and prepare it for something way more fun than those crumbling fall leaves.
Step 3: Buy two different size parasols from the Party Source or Party City. They are very inexpensive and add a lot of color to the wreath.
Step 4: Start sticking them into the vines of your wreath randomly and voila! You have a very inexpensive and bright wreath for a classroom or even your home! I have a few more things I need to add to this door to dress it up a little bit but at least I have it started so my students know where their special "All About Me" Posters will hang.
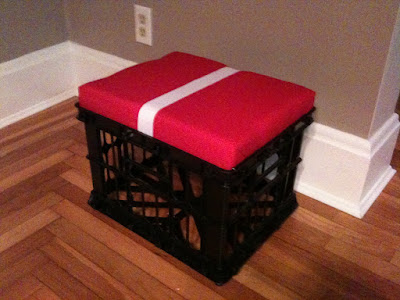
2. "Crate Throne"
This project is one of my favorites. I created a seat out of a crate, a small piece of wood, and some fabric for my "fresh catch" (or student of the week) to sit on while we are on the carpet in my classroom. I found this idea on Pinterest and would like to give all the credit to this wonderful blogger but I have also created a very simple tutorial at my site if you are interested. Check it out here! The "crate throne" has become my simple solution for making my student of the week feel very special while creating a holding place for my books while they are waiting to be catalogued and put into my classroom library.
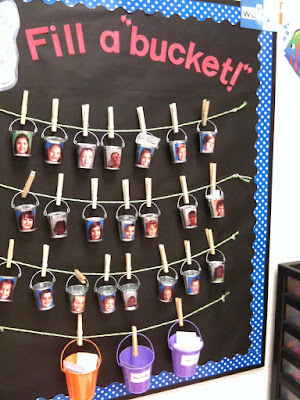
3. Bucket Fillers
The bucket filling concept is something that is ongoing throughout the year and my students always love it! At the beginning of the year we talk a lot about what it means to be good friends to each other. We always read a book entitled, "How Full is Your Bucket? for Kids" and the students learn about their invisible bucket. We talk about filling other people's buckets by saying and doing nice things for them and we also talk about how sometimes we can be bucket dippers. When we dip into other's buckets it hurts their feelings and it makes us feel bad about ourselves too. The entire year this is something that can be revisited and the students are reminded how important it is for them to be kind to one another. This is a simple way we display the buckets in our classroom and ensure that it is a focus throughout the school year.

4. Today's Password is...
This is something that I really love because it encourages my students to read! As a second grade teacher I know how important it is for my students to always, always, always read! Right by the door to my classroom I have a poster that looks like this...
The students in my class know that each time they come into the classroom in the morning they have to look at the word wall word that is posted on our sign and read it. But we don't stop there! The students also have to read the word to me when we leave the classroom sometimes. On our way out the door for specials or a bathroom break they whisper the word in my ear and once they read the word correctly they are permitted into the hallway. It is a great strategy to engage students and encourage them to read constantly!
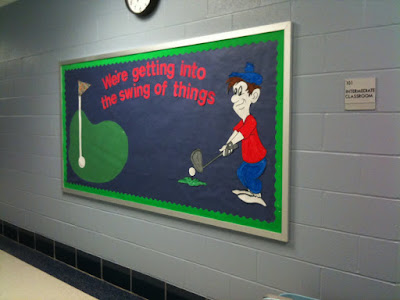
5. Bulletin Board Making
For all your teachers out there this may not be news to you but for some of you this may be something really neat to learn (especially if you have a teacher friend...you'll see why in a minute).
My husband is also a teacher and at the beginning of each school year he needs help in the "decorating" department. So his mom and I normally come to his rescue and help spice up his classroom before his students come the first day. This year they moved into a brand new building and they each have a very large bulletin board outside of their classroom. As soon as we saw it we went to work planning our attack. Since he is the golf coach for the high school he wanted his theme to have something to do with golf. So we decided we needed a very large picture of a golfer. Immediately I turned on my overhead projector in my classroom, pulled up a picture from the Internet, and started tracing! This is my go to resource when I need something blown up or something to look a little more professional than my "free hand" drawings. Here are a few pictures of the process and the final product.
Step 1: Find a picture and display it on my white board through the projector. Center a large piece of butcher paper on top of the image so that you are ready to trace.
Step 2: Trace your picture on the butcher paper. I made one for my classroom as well. This guy is going on my door with the new wreath...
Step 3: Once your picture is traced all you need to do is color, cut out, and put it wherever you need that extra sparkle!
I hope some of these ideas spark your imagination and help make your classroom (or home) a brighter place! Thanks Lemon Tree Creations for having me and I hope everyone has a wonderful school year!


Thanks Casey! What great classroom ideas. Makes me feel like I should liven up my classroom a bit even though the year is already underway.

Read more...

Tuesday, August 30, 2011

Fun & Simple Photo Card

I love how inspiration is at our fingertips constantly and left for us to interpret however we please.  It is an amazing thing how one idea can take off in twenty different directions.  Love it.  

I have a friend named Jody.  She blogs at Clean and Simple.  She is awesome.  She recently threw a party for her oldest daughter who turned 18.  The party was held outdoors and on their garage door she created a huge # 18 formed by 100 black & white photos of her daughter.  Genius, right?    


She shared the original photo that inspired this special feature at her daughter's party.  It came from Martha Stewart.  


I fell in love.  My niece was also turning 18 and I thought this idea could be used on a much smaller scale to create a birthday card for her.

I found a photo of her as a baby and a current photo.  I copied and pasted the photos into a word document on my computer, shrunk the pics to tiny, and printed off several rows of both pics.


I then cut out each tiny pic and glued them onto a folded piece of cardstock in my niece's favorite color in the shape of #18.


Super fun, simple, and completely personalized for the birthday girl!


Thanks, Jody { & Martha} for inspiring me! 

Check out these blog parties for a crazy amount of inspiration!

Happy Tuesday!

Read more...

Monday, August 29, 2011

Hannah's Airy Vintage Nursery

I have been talking about my daughter's nursery for months now it seems. I didn't mean to drag it out, it's just that "Operation Nursery" came to a screeching halt once I was put on bed rest, and stayed there during the haze of the newborn phase. But now it is finished and I am so pleased.

Allow me to take you on a short tour.

The Room

Nursery 5

My favorite thing about Hannah's room is that it gets the most beautiful soft light, and with the light gray walls it seems to glow. I didn't want to take away from that at all, so I splashed my color on the feature wall in this fun damask pattern, and left the others blank so that I could play with furniture, fabric and other decor.

Nursery 10

The dresser was a flea market find, re-painted and gussied up with some new Hobby Lobby handles. I filled the frames with some of my favorite pictures of us with our new little lady. The lamp, tray, blocks and frames were thrift store finds, and the lampshade is from Target.

Nursery 24

Hannah's crib and glider were a part of her brother's nursery. I was initially disappointed not to have white furniture because I just love that look in nurseries, so I decided that I would compensate by white playing a part in all of fabric in the bedding and the other details of the room. Now that the room is complete, I'm glad that the crib and glider have a maple finish. It adds large chunks of warmth to the color scheme and blends everything together nicely.

Nursery 9

Nursery 19

I wanted her room to be sprinkled with a few of her brother's things, since the toys now belong to "the kids" instead of just my son, But I also wanted a few things that were just for her. The stuffed animals, books, baskets and the well-loved wooden train that adorn the book shelf had each belonged to Jayce. But the art piece is just for her.

Nursery 22

The Details

I was on a tight budget when pulling Hannah's room together, so most everything was found at a thrift store or made by me.

Nursery 27600x400

This little shelf display warms my heart!

I made the family blocks for my son about a year and a half ago and I thought it was such a fun little display of our family of 3! I was so pleased to make a coordinating block with a picture of our newest addition for an updated family display! I had used the "It's a Girl" bunting on her vintage inspired announcement, with a picture from the doctor's visit where we discovered her gender, so I was pleased to have that little trinket in her room as well. The photo on the shelf is her birth announcement. The three components together bring all sorts of memories to mind of the "before, during, and after" of my pregnancy and her addition to our family. Is that corny? Regardless, it's still what I think when I look at it. :)

Picnik collagedisp

I love this quote because we are constantly reading in our house. I used fabric as a mat since the frame was an unusual size, and printed the quote onto photo paper so that you wouldn't see the pattern through the paper. The bunting is made from fabric scraps that match her bedding.

Nursery 20

I wanted Hannah's name displayed beside her bed, so I wrapped doilies around these chunky letters to add a bit of daintiness to them. I found a large frame that we cut down and re-sized so that it would frame her name perfectly. I love the wood of frame. It has beautiful details and is a lovely gold color, but was a bit a bit beat up. I really like the mix of it being both elegant and worn, so I did nothing to it other than re-size it.

Picnik collagesign2

The color scheme and inspiration for her room came from this puff quilt that I pieced together throughout my pregnancy.

Picnik collagepuff

I pulled a few of the fabrics from her quilt to use for her crib sheet and ruffled crib skirt. All of these were my first attempts at sewing anything even remotely complicated, so if you are a new sewer, you can do it! :) I was hesitant to make the crib bumpers myself because of the safety issues that can come with bumpers, so I had a custom set made for me from the talented Isla of IslaCorrine. The craftsmanship is beautiful, she was so sweet to work with, and I just love how it completes the crib! Perfect!

Picnik collagebedding

I made these hanging fabric doilies with the same fabric used in the quilt and other areas of the room. I strung them onto the frame from my son's old mobile for a colorful and sweet display.

Nursery 14

I had extra quilt fabric that I had cut on the bias, so it was in perfectly long stretchy strips. I wrapped these strips around a few of the baskets on her shelves, and wove the longer strips around a basket that holds blankets beside the rocker. This added a nice pop of color to these baskets and pulled them into theme of the room.

Picnik collagescraps

The blocks are my husband, son and I's initials. I am on the lookout for a coordinating "h."

Picnik collagelammpPicnik collagedresser

I made a few throw pillows with coordinating fabric for the glider. When we no longer need the glider in the nursery I plan to keep her quilt and these pillows in the same corner for a little reading nook. I won the owl bookend from a giveaway on KoJo Designs from the adorable Etsy shop I Sew Lucky.

Picnik collagepillows

I shared her My Girl inspired Nursery Subway Art on Lemon Tree last week. It is one of my favorite things in the room. Unless my little lady is in there.

Picnik collagepretty

Wouldn't you know that with all of the colorful elements in this room, Hannah's favorite thing to stare at is the white ceiling fan? Go figure. :)

Color 2

What do you think? It was definitely a labor of love, and I'm so happy with it. :)

I'll be linking my nursery to some great parties this week, so stop by to say hi!

E1025F317CFB5B8E9E5C526E5CC0F475 copy

Read more...

Saturday, August 27, 2011

Cutting Edge Winner!

The winner of this month's Cutting Edge Stencil is...

Congratulations Erin!! Email us for more information soon!

Read more...

Friday, August 26, 2011

Pennant Banner {take care of you!}

As most of you know, our dear Patrice here at LTC is expecting and is by far the cutest pregnant thing I've ever seen. Have a look see...

If you are an avid LTC reader I'm sure you have been following along with Patrice and her sweet babies story here and loved all of her precious room decor photos found here.

This week has landed my poor friend on bed rest once again, so my little gift is simple, yet just right for my crafty friend. xoxo my dear Patrice.

{What You'll Need}

Scrapbook Paper,

Flower & Pot,
2 Skewers,
Ribbon
Cut scrapbook paper in diamond shapes and fold over creating triangle {pennant} shapes.

Write message on scrapbook paper.

Adhere paper to skewers with mod podge and ribbon. Put skewers in potted plant.
Voila. A sweet way to let someone know you care.

Love you Patrice and Baby Burlew!
Happy Friday LTC!
Jessica 

Read more...

Thursday, August 25, 2011

Shabby Apple Dress Review

When I found out Shabby Apple wanted one of us LTC girls to review a dress, I was so excited!  I have had my eye on their dresses for awhile now.  It is no secret that their dresses are beautiful and I couldn't wait to get my hands on one.

Here is the one I chose after much deliberation...


Wonder what I thought of the dress?  Click here to find out.

Read more...

Wednesday, August 24, 2011

Polka-dot Laundry Room Update and a Stencil Giveaway!

Over a year ago we set to work organizing our laundry room to create a more inviting and productive space to get things done. If you've been following from the beginning you might remember the Sock Exchange and Laundry Room post found here?

Well, with a baby on the way, our laundry room is now doing double duty. We needed the old craftroom/ office for a nursery and there was simply no other room in our tiny house for my stuff to go! I decided quickly that if I was going to be spending even more time in this little nook of the house each day, I needed to jazz up the space a little bit.

It's no secret that we love Cutting Edge Stencils around here, so I decided to turn to them for help. I ordered the large polka-dot all over stencil, and it was just what I was looking for.
Before:
After:
With this stencil I also got CES Clip-on Stencil Level, and it made getting the first stencil position perfect.
It was a simple change, but it livened the space up just enough to make it fun.
Now, ready for a chance to win your very own Cutting Edge Stencil??

Click HERE for more details and your chance to win!!

Happy Wednesday,

Read more...
Related Posts with Thumbnails