Showing posts with label party. Show all posts

Tuesday, August 9, 2011

Pinwheel & Polka-Dot Party


We celebrated our baby turning one last week.  It was a perfect day.  Steaming hot and humid but perfect nonetheless.  I only get to go crazy for their first birthdays and this one was extra fun to plan and prepare.  I didn't want it to end.

You saw this invitation awhile back.  These were donated by The Pinwheel Press.  The invite set the tone for the party and I just love it.


I created a sign out of cardstock to let guests know where to find the birthday girl.


I chose pinwheels and polka-dots as the theme because they are two of my very favorite things.  Pink, yellow, and aqua became the main color scheme.  I wanted a soft vintage feel to the party and I was able to use so many things from around our home to accomplish just that.


One of my favorite things was the cupcake stand borrowed from my very best friend.  It was the perfect holder for the pinwheel and polka-dot cupcakes!


These adorable yellow and white cupcake holders were donated by PickFair, a completely amazing Etsy shop that is a must see!

For the toppers, I was inspired by the skewers used in the decor of another pinwheel party you can find here.  They turned Starburst candy into pinwheels.  Genius.  I fell in love with that idea and had to use it somehow.


The birthday girl had her own special cupcake, of course.  A simple yellow and white one with a candle in place of the Starburst pinwheel.


Of course there had to be a bunting.  I actually made a real one this time, no staples or glue involved.  A two sided beauty of a banner with double wide bias tape sewn to the top.  All fabric was purchased at JoAnn's.


The same fabric was used by Grandma to sew the birthday girl and her big sister special party dresses.


Then there was the food.  Very simple but yummy.


Balled watermelon was the one healthy snack available because you gotta have at least one.

There were pinwheel sandwiches made with the recipe found here.  I used turkey and ranch dressing mix rather than ham and italian.


There were also Rice Krispie treat balls and caramel popcorn.


The goody bags were filled with candy.  I made little paper pinwheels, glued tiny buttons to the middle, and then glued the pinwheel to a mini clothespin.  I was giddy over these things.  Possibly my favorite part of the party.  I got the idea from here.


The image on the goody bag tags is a freebie from Pretty Little Studio.


The custom Mia flashcard also came from Pretty Little Studio.


My birthday countdown frame made its way onto the table too.


The yellow gumball machine came from a garage sale and belongs to my niece.  Wish it was mine.  Isn't it great?  She was kind enough to let me borrow it.  I found the pink and aqua gumballs at a local party store.

The drink table is an old one that belonged to a great aunt.  My sewing machine usually lives on it.  It fit the lemonade, mason jar glasses, and soda bottles just right.

The pink and white polka-dot straws made sipping the lemonade even more fun.  They also came from PickFair.  I love paper straws so much that I am thinking about starting a collection.  Would that be weird?


You know those super cute soda bottles that have neat pictures on the label?  Well, our name happens to fit just right and some guests don't even notice that they are personalized.  I did the same labels at my son's first birthday party two years ago.


The birthday girl had the right idea staying by the bucket of ice since it was 90+ degrees outside that day.


I used an old stool from our living room to hold a frame, paper, and pens asking guests to write the birthday girl a note.  


My husband was updating the garden with a new trellis for the beans and I got to make use of our old one at the party.  It became a photo display with mini clothespins and black and whites of the birthday girl throughout her first year.  I was going to take off the chicken wire and hang the photos banner style until my Mom had a brilliant idea.  Why don't you just hang them on the wire?  Perfect.  Thanks, Mom.


I popped in a few little pinwheels throughout the wire for a pop of color and fun.  The pinwheels were donated by the Etsy shop aubabi78.  She makes beautiful mini pinwheels that actually spin in all kinds of fun colors and patterns.  Aren't they adorable?

  
We used Daddy's old highchair for cupcake time.  And of course the pinwheel bib I shared a couple weeks ago was ready and waiting.  


The birthday girl's cupcake had its own special place on the table.


And it was a big hit.  She loved it and was completely covered in icing in no time.


I used kid sized table and chairs from our home for guests to place their gifts.


The guests even got into the theme with their adorable packaging.  Love that.


 My parties are always done on a very small budget which makes it such a fun challenge!  It really is amazing what you can with stuff you already have around your home.


Thanks for checking out my party!  Now you can check out these blogs where I will be partying throughout the week.  

Happy Tuesday!

Read more...

Friday, July 8, 2011

I ♥ Pickfair

I love Etsy.  Who doesn't, right?  

Have you heard of Pickfair?  It's a gem.  Trust me, I know a good Etsy shop when I see one.  Shops like this don't come along everyday and I believe they should be shared with the world.     


I am in the midst of planning my baby girl's first birthday party and Pickfair is helping to turn my vision into reality for the special day!

While their party planning stuff is completely fun and just what I had been looking for, they also sell gorgeous pillows.  Hello!  Party planning & pillows.  Two of my favorite things.  If you know me, you know my relationship with Pickfair was meant to be!

Just had to share some of the current eye candy from their shop.


Two things that make me want to shop here above other shops that also sell paper straws?  The fact that the photography showing off the items for sale is perfect.  Also the words on the main photo of each item  got me.  The little phrases are funny, cute, and show the character of the seller.  I would frame one of their photos.  They are that cute.


So these are the straws for my girls party and the cupcake holders.  I can hardly wait to use them.  They fit the party perfectly and I am so thankful to Pickfair for helping to give the party that extra level of cuteness!


The packaging will make you smile when it arrives.  So perfectly cute and fun!  


Seriously, you will love the sisters that run the shop too.  So sweet, prompt, and easy to work with!  If you have a party to plan or if you need amazing pillows to pretty up your home, Pickfair is the way to go!

And speaking of partying, check out our first link party here!  We are so excited to check out what our readers have been up to!  

Happy Friday!

Read more...

Friday, May 20, 2011

Summertime Topiary

As the warm weather creeps up on us..and I know it's coming (fingers crossed). I get anxious for those sweet summer days lying pool side, drink in hand. Hence today's inspiration: The Summertime Topiary!

Supplies: topiary form, pot (I used a metal bucket) and some fun drink umbrellas (I bought a pack of 144 at my local party store which was plenty for this project)

I just randomly began placing the umbrellas half opened into the topiary.


Aren't these colors so fun! I was thinking this could be a great center piece for a Luau. Or just a great way to add some pizazz to your table if you are having a cocktail party.

Viola! Finished product. I love the colors and I decided to tie some ribbon around my bucket because well, we always need ribbon...right?


My table-scape. How fun is this! Stop back next time for a delicious citrus inspired recipe to top off your topiary!

Happy Friday!


Read more...

Tuesday, April 12, 2011

Party Decor Details

Last week I shared my daughter's fifth birthday party with you and today I thought I would share a couple of ways that the Hello Kitty party decorations came to be.

Well you know there had to be a banner at the party, of course.  I simply used pink & red polka-dot scrapbook paper, pink ribbon, and staples for this one.


It was the quickest and easiest banner I ever made and one of my favorites.  I just put the ribbon on top and stapled it to the paper.  I liked the staple look, it was quirky and not so perfect.


I made the mini banner the exact same way...


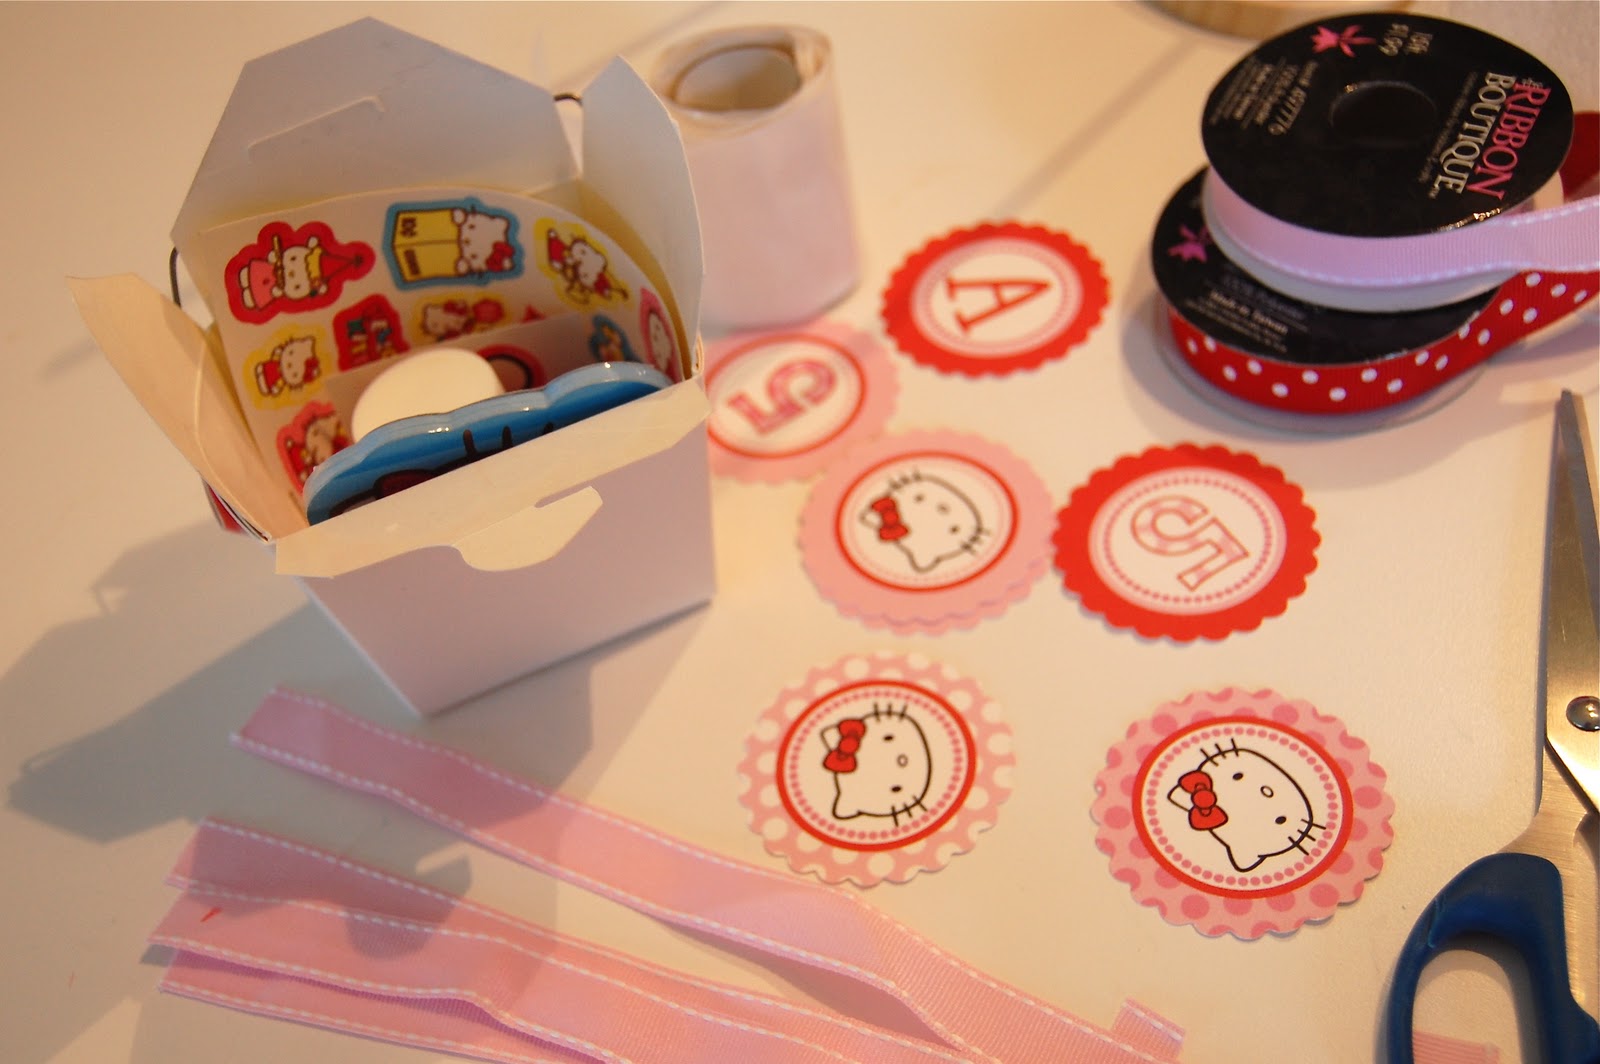
I found three other uses for the cupcake toppers since we weren't serving cupcakes at the party.  I printed them on white cardstock and used my scallop circle punch.

I added magnets to several of them to decorate the metal buckets that were used to hold food and drinks.


I used Hello Kitty ones for the pink food buckets...


and number fives to hold the mini banner on the drink bucket.


My daughter helped me glue some back to back on green popsicle sticks to create "flowers".  We added chunks of foam we found in the garage to the bottom of the silver buckets and then added green Easter grass to fill up the top.


We then planted our little flowers at various heights right down in the foam.


Our next use for the cupcake toppers was the goody boxes.  These mini Chinese take-out boxes are actually leftover from our wedding.  I even used them as favor boxes for Avery's first birthday party.  So glad I saved the extras because they really do come in handy!

We filled them with Hello Kitty goodness for the little guests.


We added ribbon and a topper to each box.


The red ribbon boxes were filled with boyish fun and the pink ribbon boxes were filled with girly fun.


Then there was the adorable Hello Kitty drawn, colored, and cut from posterboard that I asked my sister to make for me.  She did a fabulous job and copied a bunch of cute bows in different colors for the kids to "Pin the bow on Hello Kitty".  So fun.


I had a ton of fun making the giant Hello Kitty to be used as a photo op.  This project was quite a process, but very rewarding at the end.

I started off just drawing an outline with pencil.  I erased lines a hundred different times trying to get it right.  I then went over the pencil with a thick permanent black marker.


I painted the white first and then went on from there.  We glued white paper polka-dots to her clothes and paper flowers around the outside.  The grass was the last addition because it just needed a little something more.


Then I used a knife to cut some sort of oval that would fit little faces.


This was a big hit at the party and made for some very cute pictures.


The final project was the doughnut holders.  I didn't want to just set them out any ol' way so I decided to use dowel rods and plain wooden circles from Hobby Lobby.  My husband helped me out with this by drilling the holes and cutting the rods to be 12 inches.


I enlisted some help to paint the doughnut holders and my son was more than happy to participate in this part.


I loved the way they turned out!


I set the holders on little red plates and they looked almost too cute to eat!


Hope you had fun checking out the party.  Thanks for stopping by!  

I will be linking to these parties this week!

Happy Tuesday!

Read more...
Related Posts with Thumbnails