Showing posts with label Jewelry. Show all posts

Friday, September 9, 2011

T-Shirt Up-Cycle

With school back in session and fall fast approaching, I am quickly going through my old tees and realizing I have a ton of old shirts that I hate to get rid of.
Luckily, I found this great Up-Cycle idea..the t-shirt necklace. Check out the tutorial here.


After making several variations of colors, I finally realized an easier way to make them without having to tie the knot in the back was to grab some of my fiances old tees {the fitted tees in the above shot just weren't big enough}. So this is the style I came up with {and you can wear and many or as few as you would like}.


I've also been noticing some people braid their tee's {which I must try}. Check out the braided tutorial from I Still Love You

I just love the chunky look these necklaces offer and the vintage style which I adore.

Won't you share your T-Shirt necklace with us..I'd love to see it on FLICKR or FB!
Happy Friday LTC!

Jessica

Read more...

Wednesday, June 1, 2011

Beautifully Elegant Giveaway and Discount!

***This giveaway is now closed, but the 10% off discount is available throughout the month of June. See the end of this post for the promo code.***

I wanted to take the opportunity today to introduce you to one of our newest sponsors, the gorgeous Etsy shop Beautifully Elegant!

Iusb 760x100 8470025

Beautifully Elegant is all about unique one-of-a-kind pieces that you will not be able to find anywhere else!

There is a huge variety of necklaces, like this beautiful Leaf Teardrop Necklace,

Il 570xN 234925917

this Small Blue Charm Necklace,

Il 570xN 240143011

this simply lovely Figure Eight Necklace,

Il 570xN 244293949

this bright and beautiful Hadley Necklace,

Il 570xN 240146587

this colorful Amanda Necklace,

Il 570xN 240295080

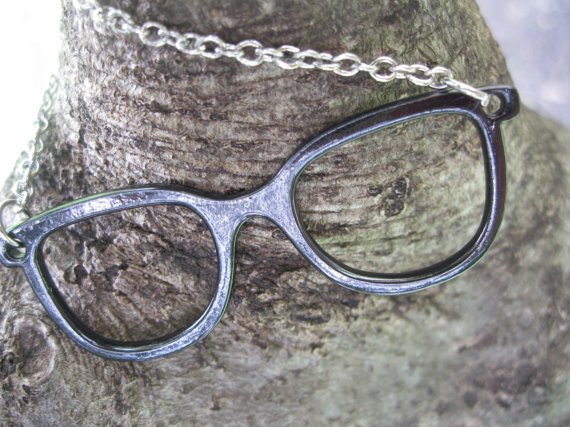
or these incredibly fun Nerd Specs.

Il 570xN 246159481

She also has beautiful earring! I just love these Feather Earrings,

Il 570xN 244286931

or these Amanda Earrings.

Il 570xN 244273630

She also carries a few vintage items as well, such as this stunning Vintage Turquoise Ring.

Il 570xN 237147459


Aren't the designs gorgeous?!

Elegant Designs is offering a 10% discount on all merchandise this month, simply use the code JUNEDISCOUNT at checkout!

As a special treat, Elegant Designs is giving away this turquoise necklace, a $20 value, for free!!

Picnik collagetur

You have 2 chances to win this beauty.

1.) Head on over to Beautifully Elegant to see all of the lovely jewelry, comeback and let us know what your 2 favorites are.

2.) Follow Beautifully Elegant on facebook here for upcoming giveaways and news.

The giveaway will close Friday at midnight and the winner will be announced Saturday morning.

Good luck!!

E1025F317CFB5B8E9E5C526E5CC0F475 copy

Read more...

Friday, November 26, 2010

The Perfect Girly Gift

For this week of gift giving at Lemon Tree Creations I wanted to share with you a simple and inexpensive, yet fun gift for your favorite girly girl.For this jewelry set, all you need is your favorite thin ribbon, hair clasp, pearl beads, elastic and non elastic beading thread, a needle and some bling.First, I made the bracelet to practice. I wanted to know what I was doing when I got around the necklace. First, I threaded the ribbon, then alternating ribbon and pearl, accordion folding the ribbon as I went. (So now that it is obvious that I don't know exactly how to write the perfect tutorial for this...here are some pictures!)Next, I made the necklace using the same method, except I left the ribbon ends long at each end to tie the necklace with.Finally, I made a hair clasp that could clip onto the necklace, or be worn separately. For this I cut 5 strips of ribbon, but only used 4, and hot glued them into mock bow shapes. Then I hot glued them together in a circular pattern. To finish, I glued the crystal bead onto, and the clasp onto the back. Voila! That easy.
Together, the pieces make a perfect pair. What little girl, or grown girly girl, wouldn't love this set in her life? I originally made it as a little gift for my 2 year old Lola, but am already coveting that necklace for myself!What homemade Christmas gifts have you come up with this year? I'll be linking to these parties and hope you will too!

Happy Friday, hope you had a fab thanksgiving!

Read more...

Friday, November 12, 2010

Beaded Bracelet

I'm always wondering around craft stores dodging the bead department for a reason (I haven't the patience or the knowledge of how to create all the wonderful pieces to be had).

However, I did find a way to make a simple bracelet and feel like I wasn't leaving the bead department in the dark or my wallet asking questions.


All you need is some beads and some elastic thread.


Once the beads have been threaded secure your knots with a dab of glue to prevent the knot from coming undone.


Next I created a flower/broach from ribbon which can be worn with or without your bracelets. The jewels were in the $1 section of the craft store as well (there were several in a pack).


To attach the pin on the back I secured the ribbon to a trusty nickel (I was out of button covers) and used the gorilla glue to do the rest.


Wall-ah! A nice little addition to my vintage collection. I think this will spruce up my cardigans nicely

Have a great Friday. I'll be linking up to these parties..won't you stop by for some inspiration.

Read more...

Monday, August 16, 2010

Long Necklace Holder

2010_02_08_6418_thumb[1].jpg


I had a cute necklace holder a few years ago that broke, and a new one has been on my shopping list ever since. I have looked at several in different stores but never found one that I like or that would accommodate my looong necklaces. Those are the ones that have been tangled up in my drawer and really need to be managed in the first place, so that’s the priority. Last week, Chris ended up detangling a knot of necklaces while I finished getting ready to leave the house, and I decided that I would just take matters into my own hands and make one for myself.


I made it a priority to get to the thrift store on the day that the artwork was 50% off, and walked home with this cool frame for about $5. I removed the glass, picture and matting and pulled out some old foam board that I had never used. I cut the foam board, wrapped it in some heavy burlap, and hot glued the edges around the back.


2010_02_08_6434_thumb.jpg


I picked up some padded hooks from Walmart for about $1. They started off white, which was just a little too stark for the frame, so I spray painted them beige and then rubbed on a little wood stain. This was a better color but left them tacky and messy, so I put a coat of matte Mod Podge and they sealed up nicely.


2010_02_08_6390_thumb[1].jpg


I wanted the hooks to be exactly 2 inches apart, so I got out the measuring tape and marked the back of the foam board in pen before I twisted the hooks through. I put 2 smaller hooks at the end of the row for shorter necklaces, and 2 at the bottom for bracelets.


2010_02_08_6427_thumb.jpg


I love it! Of all of the things that I have made, this was certainly the easiest. A perfect combination of cheap, fast, functional and pretty. A+. I'll be linking it to these great parties.


2010_02_08_6432_thumb[1].jpg


Also, thanks to everyone who gave me such great feedback a few weeks ago about my Barn Wood and Stencil Art!! You guys are too sweet! I just found out today that it made it into the Top 12 over at the The DIY Club, and I'm so excited about it!


IMG_5001.jpg


If you have the chance, head on over to The DIY Club and check out some really cool projects. And if you feel like voting, check out #32, the Barn Wood Stenciled Art. Just a suggestion. :)


Have a great week and I'll see you next Monday!!


E1025F317CFB5B8E9E5C526E5CC0F475.png


Read more...

Friday, June 25, 2010

Book Page Necklace

Now that I've gone through all of my parties so far, I thought I'd try my hand at a necklace. I love statement jewelry pieces. I find any occasion to wear them.


During recent travels, I saw this antique necklace worn by historic royalty. I thought I could definitely try my own version.


I found the 1 1/2 inch and 1/2 inch wooden beads along with satin ribbon at Hobby Lobby for 40% off, so I knew this was the project for me! I had tissue paper at home along with spray paint. I stopped by Half Price Books to find a fashion book on the clearance rack to use the pages. I pulled out my Mod Podge and got started.


For the book page beads, I used Erin's tutorial for her book page egg wreath. That was very helpful in knowing the best way to attach the pages to the beads. It was somewhat of a tedious process, but well worth it. I glued the center of the pages to the beads, then cut slits on both sides, and wrapped each piece trying my best to smooth them down.


As for the accent beads, I wanted to use a bold color. I love all things turquoise, plus I had turquoise tissue paper on-hand, so it worked out nicely. I ended up spray painting the beads a blueish color first just so the wood part wouldn't show through since the tissue paper was so thin. I wanted to add the tissue paper pieces to give more texture. After cutting the tissue paper into small, random pieces, I used Mod Podge to glue them on. I used a gloss Mod Podge at the end to coat both the accent and book page beads to give a shiny appearance.


I spray painted the 1/2 inch wooden beads black to use as spacers. I laid out the beads making sure the words on the book page beads were all facing out, so they would be the same direction when wearing the necklace. I used black satin ribbon to string the beads together and left the ends longer, so I could tie a nice bow in the back. You may notice I ended up with fewer book page beads than I originally laid out--this is because once I strung them together, the necklace seemed quite overwhelming. I took out a few beads to make it more of a choker-style (or as my husband refers to it as "Wilma Flintstone" style).


It was definitely a fun project to do and now wear. I'll be linking to these great parties this week. Check them out and see you in 2 weeks!

Read more...

Monday, May 17, 2010

Express Necklace Knock Off

2010_04_27_8792.JPG

One bad thing about successfully knocking off a product that you saw in a catalog or store, is that you start to feel this sort of power over everything, and start looking for other items that you want and can make yourself. I had just such a situation on my hands a few weeks ago when I was strolling through the mall and saw this.

18880857235_ORIG

I saw this long necklace and immediately started thinking about how much cuter all of my summery tops would be if accompanied by it. I remembered seeing Vanessa of V&Co spray paint some wooden beads on SYTYC, and I already had the perfect color of spray paint, Mediterranean by Valspar. I had a few wooden beaded necklaces that I took apart, and used Vanessa's method of threading one bead onto a toothpick, with a little tissue paper inside to keep it from falling down.

2010_04_15_8269

I sprayed one side and let it dry for a few hours, and then flipped the beads and sprayed again. It took 2 coats on each side to make sure that every last spot was covered, but I did a 3rd coat to cover one round of impatience, and the fingerprint evidence of someone who didn't give the beads enough time to dry before trying to flip them to the other side. :)

2010_04_15_8274

I ended up with a handful of gorgeous, shiny, perfect-summer-blue beads.

2010_04_19_8283

I didn't want my necklace to be exactly like the Express version, which only used medium sized beads, because I like the look of having a few larger beads in the middle and slightly smaller beads towards the ends, so that is what I did.

2010_04_20_8328

I laid out the beads as I wanted them on a towel so that they wouldn't roll away, and then threaded them on some silver beading wire. Luckily I had a pearl necklace that wouldn't miss one of it's large beads, and I liked that aspect of the original Express necklace, so I added it as well.

2010_04_20_8343

I got a long gold necklace from a thrift store for $1, cut one of the chain links so that I had a long strand, tied off the end of the silver beading wire and then aligned it with the wire that was holding the beads and twisted it around several times so that it wasn't sticking out.

2010_04_20_8346

One of the wooden necklaces originally had these tiny gold beads on it as well, so I threaded the excess wire through that before the wooden beads make the knot "disappear."

2010_04_20_8353

I looped the chain and bead strand over my neck until it was the length that I wanted, and then cut the chain at the desired length, and tied up the second end the same way that I did the first end. I then slipped it over my head and burst into song. I chose, Is This Love by Whitesnake, because I think you can’t really beat 80s ballads for a moment like that, but this part is really your call.

2010_04_27_8837.JPG

What do you think? Wouldn’t you have sung too? Admittedly, it’s not quite as gorgeous as Express’ version, but now I don’t have to try to justify spending $40 on one necklace.

2010_04_27_8869

I ended up with a lot of leftover beads because it turns out that when you paint 2 necklaces worth of beads, you have enough to make…you guessed it, 2 necklaces. My second one I put on a silver chain and included a few of the silver beads that were originally on the silver strand just to dress it up a bit.

2010_04_29_9031.jpg

Also, I have some fun news that I am incredibly excited about...I now am the very proud owner of an etsy shop!! Allow me to introduce you to Blues and Branches!

blue1

Over the past few months of participating in the DIY and crafting community, I have had numerous people make comments like, “I really like that, but don’t have the time/patience/energy to make one for myself.” To those people I now can say, “Well, since I’ve already worked out the kinks, I’ll just make one for you.” I’m pretty nice like that. :)

Picnik collage 1.jpg

I filled my shop with a few of my favorite items that I have shared here, a few of the items that people asked me the most about, and also a few other little gems that I’ve been working on, including these necklaces! I would be happy to discuss a custom order with you as well. Please take a look at my tiny little corner in the world of Etsy here, and let me know what you think!

Picnik collage2.jpg

And as always, I’m excited to link my little necklace to some incredible parties this week. Please check out a wealth of ideas at the links listed here, and the CSI Project.


Visit thecsiproject.com

Read more...
Related Posts with Thumbnails