Showing posts with label Displays. Show all posts

Friday, August 5, 2011

"to do" list {endless options}

Some of us are approaching the first day of school; so why not jot down those last minute things you want to do before getting back to the grind?


{Materials}
  • 11 3/4 x 36 inch frame
  • sharpie
  • scrapbook paper


{Let's Go to Work}

  • Place the scrapbook paper inside the frame behind the glass.
  • Tape the scrapbook paper together {I used three 12X 12 pieces}
  • Trim off any edges. {approx 1/4 in}
  • Use the marker to write down any "to do's" you have.
  • Check them off once you have completed them.
PS. The marker comes clean with Windex:)


Wouldn't this be fabulous for multiple lists? I can't wait to start on my Christmas list {stay tuned for that posting}.

Thanks for stopping by! Happy Friday LTC Readers;)
Jessica

Read more...

Monday, April 4, 2011

Book Page Eggs

One of my favorite spring decorations for my home are these fun book page eggs. It's easy enough to make a handful of them, so they are sprinkled around in a few different displays in my home.

Il 570xN 210653887

I also made a bunch last year and made them into a wreath, which I shared in my Framed Book Page Egg Wreath post. I just love it!! It's my favorite way to say "spring" or "Easter" without screaming it. Isn't it fun? Want to make your own?

2010 03 01 6964 thumb

I started off with a bag of tiny Easter eggs from Hobby Lobby for $.67 each, and there were about 25 in a bag.

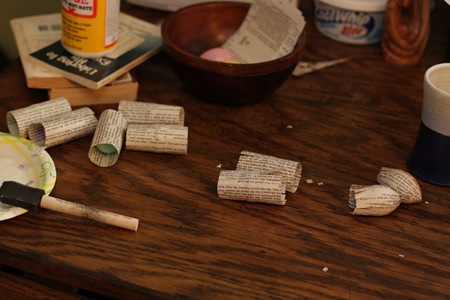
I picked out a few old books with varying degrees of page yellowness, tore out some pages, cut the length a little longer than my eggs, and the width just long enough to wrap all the way around the egg. I used Mod Podge to glue the paper around the eggs and then set them aside to dry for 5 minutes or so. (I learned the hard way, that if you try to glue the paper on the whole egg all at once, the egg slides around in the paper and you get air bubbles. Don’t do this, you will become annoyed very quickly.) I had a little assembly line going with my eggs, which was a good way to give the eggs a little time to dry in between the steps, and helped me not to waste any of those precious naptime minutes.

2010 02 28 6905 thumb1

Once the middle section was dry and could be a sturdy base, I cut slits on each end of the paper, and pushed them down so that one side of the egg was exposed.

2010 02 28 6863 thumb1

Make sure that when you are pushing down the slits, that you peel them down just a bit further, ripping the paper a little. This ensures that they will lie flat when you are smoothing them down against the egg, and there won’t be any air pockets.

2010 02 28 6884 thumb1

Otherwise it will look like this in the end. Not so pretty.

2010 02 28 6900 thumb1

Once the paper is pushed down, smear the top of the egg with a good bit of Mod Podge. I used the Matte finish, so it didn’t matter if it got all over the top of the paper. Use your thumb to push down a few of the pieces at a time, smoothing them so that they lay flat and overlap a little.

2010 02 28 6910 thumb1

Top with more Mod Podge, and smooth down the next few strips, working your way around the egg.

2010 02 28 6911 thumb1

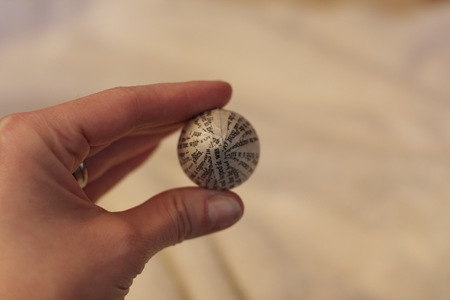
You will end up with a nice little overlap, and if you’ve been smoothing it out with your thumb as you go it will look great!

2010 02 28 6847 thumb2

And there you have it!! Make enough to sprinkle them around your home. They're neutral enough to go with any type of decor and add a bit of fun whimsy to your Easter decorations!

Il 570xN 210653880

Il 570xN 210653881

I'll be linking to these fun parties this week, so check them out!

Also, I'll be posting on Tatertots and Jello this Wednesday, so drop by to say hi to Jen and see what fun project I'm sharing there. And I'll see you back here on Monday!

E1025F317CFB5B8E9E5C526E5CC0F475 copy

Read more...

Monday, January 31, 2011

Empty Frame Gallery

Last week I shared my 10 Tips to a Perfect Empty Frame Gallery, and this week I want to show you mine. Are you ready?! I hope so, I love this!! Hope you like it too!

frame-7.jpg

frame-5.jpg

frame-14.jpg

Almost a year ago I started collecting lots and lots of frames. I got some big and some small, some ornate and some basic, some wood and some metal. You get it, I wanted a variety. It took me over a year to get together a little collection from various thrift stores and garage sales and I just kept setting them all aside. (Which is also why I often start off a post saying, "I've had this frame for a while now, but I just finally...")

Dec-1.jpg

We got all of the frames together in the basement, and I started grabbing my favorites and laying them out to get a general idea of which frames would look good together and what groupings would work best.

We then primed and painted them. I was insistent on priming because I had several metal and plastic frames, and I wanted to be sure that the paint would stick. However, I was painting them a dark color, so the white peeking through ensured that the frames each needed 2 coats of color. Ugh. So many steps when I was just so anxious to get them on the wall!!

Dec-3.jpg

We took the painted frames upstairs and laid them out on the floor again. There were 2 gorgeous golden frames that I chose to leave as they were and went with a monochromatic color scheme for the rest.

frame-96.jpg

When it came time to make the templates for each frame, I decided to use something that I had plenty of laying around - Christmas wrapping paper. It was so thin that it kept tearing as I cut it, so I switched to a thicker roll of brown shipping paper. Let me just say, DON'T DO THIS! Both types of paper immediately rolled up after they were cut, as pictured above. Trying to make paper lay flat on the walls that just wants to roll up is INCREDIBLY annoying, and it took several pieces of tape to secure down, which ruined the ease factor of being able to move the templates around on the wall. Save yourself the trouble and find some flat paper to use as a template (paper bags, newspaper, etc). You will be much happier.

frame-97.jpg

My sister helped me take the paper to the wall and started taping it up until we found the layout that we liked best. We hammered nails into the templates, removed the templates and started hanging the frames one by one.

frame-98.jpg

Now, a note on the layout that I chose for my walls.

I have always loved the look of framed photo galleries, but one of the major things that held me back from starting one in my home is my darling little 2 year old. I was nervous about him bounding down the stairs one afternoon, running his hand lightly along the wall, hitting a frame, and it (and possibly others) tumbling down on him. Sharp edged-picture frames, pictures matted behind glass, glass that could crack or shatter, the potential domino effect of knocking down one in a series of frames...you can see why I never moved forward with this. But an empty frame gallery, without the potential danger and weight that glass panes would add, that was much more up my alley.

frame-99.jpg

That said, I still decided to hang my frame gallery entirely on the top half of the wall. This would remove the temptation for my little guy to touch the frames every time that he walked past. Out of sight out of mind, right?

frame-9.jpg

Also, my home has an open floor plan, so as soon as you walk in, you see this.

preg-20.jpg

I didn't want all of my beautiful frames and arranging efforts to be hidden behind a sea of white spokes. Hanging the frames above the line of the railing kept this from looking too busy and cluttered from the downstairs, and added some much needed color and interest.

frame-6.jpg

I wanted to maximize the look of the frame wall up close in addition to the view from the rest of the room, so I focused on bringing out the great details in each of my frames.

frame-4.jpg

The color of my frames is Green Bay by Sherwin Williams. I loved the fun turquoise color, but on the walls and amidst the color scheme of rest of the room, it was just a bit too bright. So I turned to one of my favorite things, Valspar's Antiquing Glaze.

frame-3.jpg

I added a light layer to each of the frames and then wiped them off with a dry cloth. This darkened the color just a bit and added some depth. I used an old terry cloth rag which gave even my plastic frames the slight appearance of wood grain - just perfect!!

frame-10.jpg

I also used it to draw out the details on some of my more ornate frames. I brushed it on heavily, let it settle into the recesses, and then very gently wiped it off.

frame-94.jpg

For the more ornate frames where the details were fairly prominent, I highlighted them using this gorgeous DecoArt Metallic Glaze in Olde World Patina. I dipped the edge of my cloth into the glaze and lightly ran it over the details. The color is similar enough that it doesn't take away from the newly darkened color, but there is just enough shimmer that it catches the light perfectly and helps the details pop.

Dec-9.jpg

I used a similar technique on the gold frame with DecoArt's Metallic Glaze in Luminous Gold. See how the little details pop?

frame-12.jpg

I was in love with the look of my frame wall, but decided to take an extra step for some additional security. I pulled out my 3M Command Strips and trimmed them into 1 inch strips. Starting from the bottom of the gallery, I applied my strips to the bottom 2 corners of each frame. I leveled each frame, and then pushed the bottom corners until they were secured to the wall. Then I let out a big happy sigh!! This satisfied my "Mom Paranoia" about the frames falling on my little guy, and my perfectionist side that I was sure would always be standing back looking at the frames, trying to determine which of them were crooked. Now I could be assured that they were all level, and wouldn't shift if a troop of 2 year olds came bounding down the stairs.

preg-15.jpg

Sigh! I'm so happy with it! What do you think?

frame-8.jpg

Have any of you braved hanging a similar gallery? We'd love to see it!! And if you put up one of these beauties in your home, be sure to add it to our Flickr page so everyone can enjoy photos of the fruits of your labor!!

I'll be linking this to these great parties. Swing by and say hi!

Have a great week!!

E1025F317CFB5B8E9E5C526E5CC0F475 copy.png

Read more...

Monday, January 24, 2011

10 Tips to a Perfect Empty Frame Galley

I finally tackled something that has been on my to-do list for almost a year - my empty frame gallery!!

And I totally totally love it.

I'm not going to share it in it's entirety today, but do you want just a little peek?

Frames-2.jpg

The end result is perfect!

However, pulling the whole project off was a lot more tedious than I had been anticipating. My sister and I said the words, "If I ever do this again, I'll make sure that I don't..." more times than I would like to admit. And as I was putting this tutorial together, I realized that it's a bit too much for just 1 post.

So today I'm going to share my 10 best tips for tackling an empty frame wall project, complete with lovely photos of other frame walls for inspiration.

Next week I'm going to show you the detailed break down of how I did mine, with lots of lovely pictures to egg you on in the process. Sound good? Here we go.

frames7.jpg

(source here)

1.) Visualize (generally) what you want in an end result. Do you want a design that is clean and symmetrical, or a bit more random and whimsical? Do you want the frames to match precisely, coordinate, or be completely mismatched? How much of the wall do you want to cover? Floor to ceiling, just the middle of the wall, or something in between? Get some idea of what you want the end result to be before you start buying materials.

frames1.jpg

2.) Start collecting frames. You'll want to get lots of frames for this project, but don't invest too much on any one frame. Gathering the materials for this project will take some patience: check thrift stores, garage sales, the dollar store, your parent's basement, your basement...you get the idea. I even took a few frames from around my house that were ho-hum in their current location. You'll need some variety when you're putting this together and you don't want to get halfway in and have to stop to run out and look for the perfect frame. You get the picture, gather your materials first.

il_570xN.187504806.jpg

3.) What should I look for in a frame? You'll want some variety as you are pulling your frame collection together. Get some really large frames, some average sizes (8x10 or 11x14) and some small frames. Look for different textures on the frames: some smooth, some patterned, some rounded, some boxy, some plain and some really intricately designed. Additionally, grab different shapes of frames: basic rectangles, squares, ovals or circles, and some long and skinny frames. As with all thrift store shopping, try not to be distracted by a strange print, an ugly color or any cosmetic imperfections that can be easily managed with a little glue or paint.

Foyer-Wall-21.png

(source here)

4.) Measure your spaces. Measure where you want to hang your frames, and mark out a space that is the same size on your floor where you can play around with different layouts. Arrange and re-arrange until you get a good feel for what you are looking for. Snap pictures of any possibilities that you really like, and then re-arrange just a little bit more until you find one that is perfect.

080609-frame02.jpg

(source here)

5.) Bring a friend and plan on a break. After you are looking at frames and constantly re-arranging and re-evaluating, you will start to feel like you are going cross-eyed. Enlist a friend to come over so that you can bounce a few ideas off of them. Even if you completely disagree with their opinion, it may help you to solidify exactly what you like. It's good to get some opinions under your belt before you start putting lots of little holes in your walls. Also, plan to take a break where you don't look at the frames at all for a few hours. When you come back you will feel surprisingly refreshed and be ready to make your final cuts.

empty-frames-3.jpg.png

6.) Get your frames ready. If you need to do any repairs on your frames, now is the time to do it. Remove any glass, pictures, staples, backing, etc from your frames. If you want to paint the frames, now is the time to do it. If you are painting plastic frames, don't forget to use a primer to help the paint stick to the frame.

empty-frames-on-the-wall.jpg

7.) Make a paper template for each frame. Lay each frame that will be going on the wall on a flat piece of paper and cut it out - now you have a template for your frames! Take these templates and tape them to the wall in the arrangement that you like. This will allow you to see the arrangement on the wall and make any adjustments before pulling out your hammer and nails.

5342917044_366b81d313.jpg

(source here)

8.) Start in the middle. When placing the templates on the wall, start with the frame that will be at the center of your arrangement and center it on the wall. (Sounds obvious, I know, but doing this first will (hopefully) prevent you from having to shift the whole arrangement 3 inches to the left, or something like that.) Ask me how I know! When you have the center frame exactly where you want it, then add your other frames to the sides.

2518237977_e6a1850bd8.jpg

9.) Add nails. With the templates still on the walls, hammer a nail into each template to correspond with the hanging gear for that frame. You're almost there!

421.jpg

10.) Hang and smile. Take down the paper templates, and hang up each frame. Spend a considerable time patting yourself on the back. Invite friends and family over to admire your frame gallery and be modest about how long it took you to pull off. But they might figure it out for themselves when you decline to come assist them with galleries of their own.

Be sure to come back next week when I do the big reveal of my empty frame wall gallery! I took a few extra steps on my wall and I can't wait to show you how it all turned out!

Have a great week!

E1025F317CFB5B8E9E5C526E5CC0F475 copy.png

Read more...

Tuesday, January 18, 2011

Sparkly Valentine Banner

Blog-15.jpg

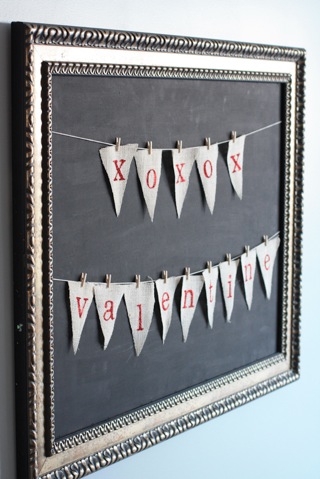
When I showed you my Chalkboard Christmas Card Display last month you knew it would be appearing again, didn't you? If so, right you were! My new favorite item in my kitchen couldn't be neglected for long, especially when there is another sweet holiday around the corner. So I made this beautiful sparkly Valentine's day banner.
Blog-20.jpg

I started off with some creamy white burlap, a little flag template, and one of my favorite new tools, my Silhouette Cutting Machine, to make the stencil.
Blog-1.jpg
Before I had my Silhouette, I was a big fan of the pencil transfer method of getting letters and numbers onto my projects. But obviously that doesn't work for something like this, I am DREADFUL at doing such things free hand, and it is such a time (and sanity) saver to let the Silhouette cut out my stencils for me. I need all of the time and sanity that I can get, so purchasing this machine was a small price to pay! :)
Screen shot 2011-01-13 at 1.09.32 PM.png

I picked out a basic font in the Silhouette Software, adjusted the size of the letters to fit my flags perfectly, and a few minutes later I had these great stencils! But you could easily cut these stencils out by hand or use any store bought letters to get the same effect.
Blog-2.jpg

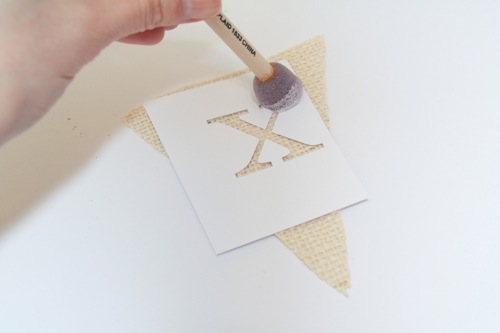
I made sure to use a piece of card stock for my stencils that had a glossy finish so that it didn't get soggy in the middle of my stenciling. I soaked my foam brush in Elmer's glue, and stenciled the glue onto the burlap.
Blog-3.jpg

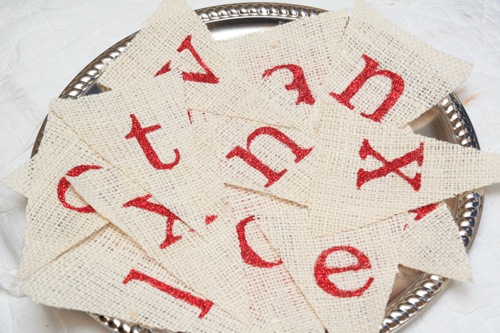
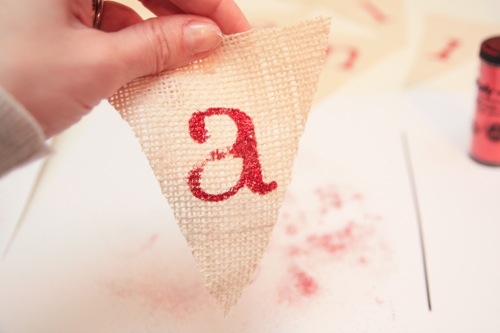
Keeping the stencil in place, I covered the glue in a small pile of fine red glitter, shook of the excess and set each flag aside to dry.
Blog-5.jpg
Blog-7.jpg
A few times I put on too thin of a layer of glue, but if you do this, don't worry!
Blog-8.jpg
I used a toothpick to apply a little more glue to the gap on the letter, added some more glitter...
Blog-9.jpg
and it was perfect!
Blog-10.jpg
Once you have a fun pile of sparkly lettered flags, hang a string and clip them on! I'm using mine on my chalkboard, but they would look gorgeous across a mantle, window, or just along the wall!
Blog-21.jpg
I was originally thinking that I would glue my flags to the string, but since Valentines Day is still almost a month away, I know I'll switch it up and rearrange it a bit in the meantime. More than likely I will add a few photos of my valentines in between the x's and o's.
Blog-16.jpg
Look how perfectly the letters came out thanks to my Silhouette stencil!
Blog-17.jpg
Sharp lines and fun little detailed fonts, with swoops and tails. Just what I like!
Blog-18.jpg
I put one of these Valentine banners in my Etsy shop, so click here if you'd like one just like this.
Blog-23.jpg

I'll be linking my banner to these fun parties, so swing by for some more fun Valentine's Day ideas!


And I'll be back on Monday as usual. Have a great week!

Visit thecsiproject.com
E1025F317CFB5B8E9E5C526E5CC0F475 copy.png

Read more...
Related Posts with Thumbnails