Wednesday, March 31, 2010

What I like Wednesday: Felt play food

I am just catching on to the felt play food scene. It was love at first sight when I saw these babies...


Are you kidding me? Felt cinnamon rolls. That has got to be one of the cutest things I have ever seen. The genius behind that cinnamon roll is Maggie from Smashed Peas and Carrots. If you have not been to her blog, you MUST go. Her felt food is amazing. She is just awesome in my book. The tutorial for this perfect roll can be found here.

Next, I saw this blueberry muffin with removable liner. Seriously? Her tutorials are so wonderful that you actually feel like you may just be able to do it yourself. (I don't feel like that too often.) You can find the tutorial for this little treat here.


She put together this gift idea that I thought was truly one of the cutest things I had seen. A breakfast basket of felt food.


The way she did the eggs almost put me over the edge. She puts them inside a white plastic egg so the kids can "crack" them open. How stinkin' cute is that?


So, after seeing all that, I knew that I was going to be making these for gifts. I searched for a simple doughnut tutorial next and found this one here. Cindy from Skip to My Lou had an awesome and easy to follow tutorial on how to make this cutie...


So, this little set of play felt food was one of Avery's birthday presents this year. I used pink and white polka-dot felt for the muffin liners. I also used white puffy paint that was "icing" on the cinnamon rolls for sprinkles on the doughnuts. They aren't as cute (with the lack of stitched-on colored sprinkles), but Avery was thrilled with them and Tyson tried to actually eat one so I guess it worked. It is super fun and addicting once you see the end result. I can't wait to make more.


Thanks Cindy and Maggie for your awesome tutorials and wonderful ideas! Be sure to check out their blogs if you haven't yet. Such wonderful inspiration and so much fun to be had!


Read more...

Tuesday, March 30, 2010

numbered jars

This project all started with these numbered beauties...

{photo courtesy of Pottery Barn}

I saw them at a Pottery Barn store awhile back when we went to the mall on a rainy day. I could not stop thinking about them (I have a bit of an obsessive personality). I thought I had to have them and was not going to stop until I figured out a way. They were $12 a piece in the store and $39 for all 3 online. We are not in need of anything, but with me staying home, I cannot justify spending $40 on some jars, you know what I mean? Well, with the jars up front in my mind, I went to some yard sales with a good friend and found these treasures for $3 a piece...


So, I spent $9 for 3 jars and knew almost immediately what I would fill them with and where they would go. I had told my sisters and Mom about the jars that I was in love with so I was excited to tell them that I found the same kind of jars for cheap. My sister, Beth informed me that she had glass paint in several colors, one of them being black. Score. The glass paint would have been the expensive part of the project, but I got it for free. I was so excited...


The first thing I did was to find the font I wanted and print the numbers off on printer sticker paper. I cut out the numbers and used the outline sticker as my stencil...


I applied the paint and when I took the stencil off each time, this is what I would get. Yeah, the stencil was not full proof. I had a lot of toothpick scraping to do with each number to get it back in shape. That was the hard part and it took some time. I also dabbed the numbers with a paper towel while they were still wet to give them some texture and make them appear not so perfect...


But eventually, I had my 3 number jars that I had been dreaming about...


I knew that I wanted to fill them with dice, scrabble tiles, and dominoes. Well, I remembered that I had a huge bag of dice in one of my many teacher containers in the basement so I went searching and found them. Score again. Free dice. Then I just used the scrabble tiles that we had from our game that we never have time to play anymore...


I could use some more dice, scrabble tiles and I still don't have dominos but all in good time, right? I had dreamed about them on the mantel in front of the barn picture and I am very pleased with the end result...


So the total cost of the project was $9. It's so fun to see an idea you love and figure out a way to make it yourself. Where this is a will...there is a way.

Please click here and check out these parties I am linking this project to this week. Thanks for visiting. Happy Tuesday!


Read more...

Monday, March 29, 2010

Wiffle Ball Rosette Mobile

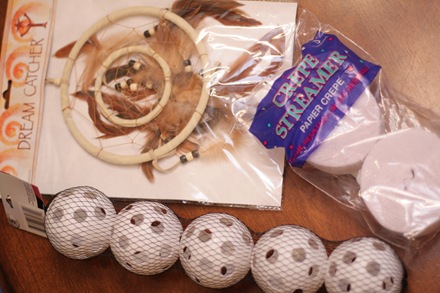
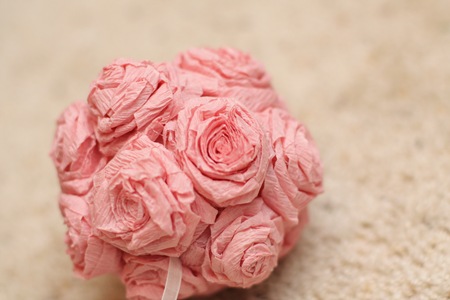
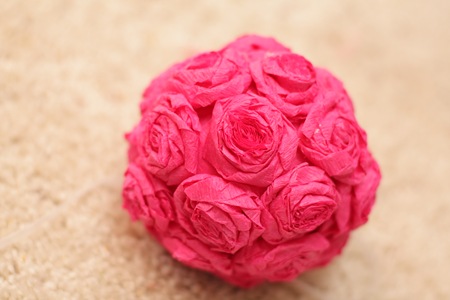
My sister-in-law has a little girl due at the end of April, and I have been wanting to make something for the baby. I know what you're all thinking, but I was trying to think of something that didn't involve any sewing. When my mother-in-law mentioned that she hadn't been able to find a mobile that worked with her crib, the wheels started spinning and I thought of these rosette balls. So I took a peek at my craft stash, and headed out to Dollar Tree. They didn't have any styrofoam balls, but they did have wiffle balls, which I thought would do just perfectly. I also grabbed some white crepe paper, and a dream catcher because I knew I'd need some sort of hoop, and you can't beat one for $1!

2010_03_07_7086
I trimmed all of the ornaments off of the dream catcher and re-wrapped it in white ribbon.
2010_03_13_7209
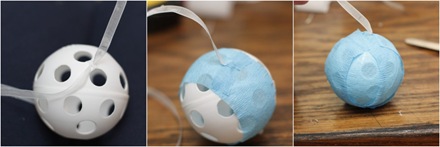
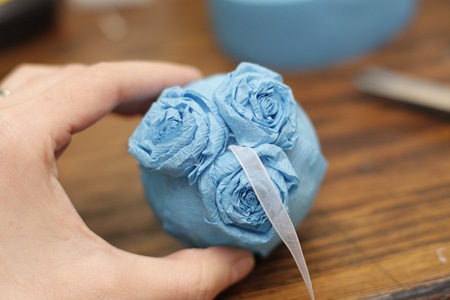
I then took one of my wiffle balls, looped some ribbon through 2 holes and tied it up, with a little hot glue under my knot to keep it secure. (I don't want my niece to get knocked on the head by a rose-covered wiffle ball while she’s trying to sleep!) I knew that a little bit of the ball would be visible between the roses, so I wrapped the balls in crepe paper first, by taking 3 short strips, wrapping each one around the ball, and hot gluing the ends of the paper down. It didn't lie completely smoothly, but it was a good foundation to stick the roses onto and covered up the wiffle ball evidence.

wiffle
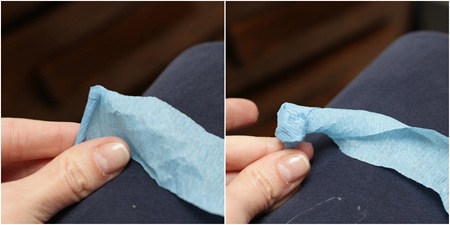
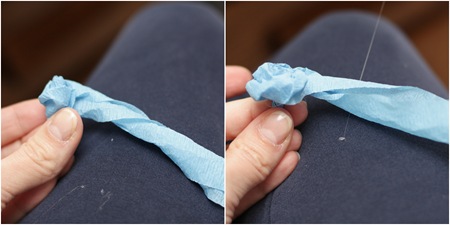
House of Smiths gives a great illustration on how to make these roses, and was the inspiration for this idea. But basically, you make a base for the rose with a little line of hot glue on the end of a strip of crepe paper (mine were about 14 inches long). Fold the paper over the line of glue, and from there, you simply roll the base of the rose, while twisting the excess crepe paper. I varied wrapping the paper tightly and sometimes wrapping it a bit more loosely to give the rose a nice blossoming look, and stopped periodically to add a drop of glue to keep the rose from unraveling. This may seems a little confusing, but it is super easy and after a little fumbling, you can fly through making them. (You will get hot glue gun strands everywhere though, as you can see in these pictures.)

rose 1rose 2
I trimmed the stem off the bottom of the roses, and then glued them onto the balls, starting with 3 around the ribbon strand, and then worked down from there.

2010_03_09_7185

The nursery is painted a lime green color with this Geo Girl bedding from Target, so I wanted to use crepe paper colors that coordinated with the bedding: light pink, dark pink, blue, purple and white. I couldn't find any purple crepe paper at Wal-Mart, so I just got purple tissue paper and used that instead. The end result is similar, but it is certainly more slippery to work with. I just lined the tissue paper up on my cutting board, cut the width into 1 1/4 inch strips, and started rolling and gluing.
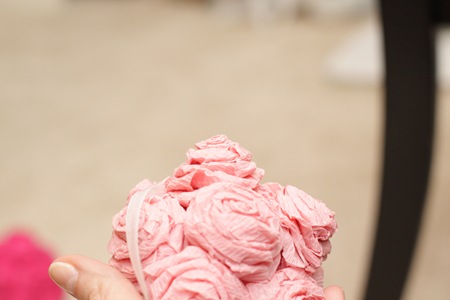
2010_03_11_72052010_03_13_7207

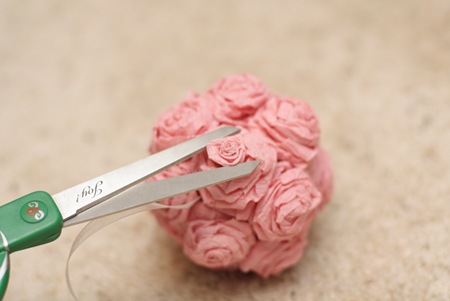
Once my roses were glued down to the balls, I noticed that the center of the blooms was really prominent and the balls almost looked like they had little points all over them. So I got some sharp scissors and snipped off the center of those blooms. It gave the flowers a nice little ruffled effect in the middle, so I ended up doing this with each of the roses on all of the balls. It made for a flatter, more rounded surface on the balls as well.

2010_03_09_7142 2010_03_09_7153 2010_03_09_7154 2010_03_09_7161 2010_03_09_7187
I ended up with 4 rose wiffle balls, and covered 1 four-inch styrofoam ball with white roses, so that she would have a few options as to which balls to pair with the crib.
2010_03_13_72112010_03_13_7215
I can't wait to see it hanging in our niece's little nursery!!

I'm linking this mobile to the CSI Project here, so check it out!

Also these rosette balls are available in my etsy shop here, with the colors customized to your preferences.


Visit thecsiproject.com

Read more...

Friday, March 26, 2010

Eggshell Herb Garden

Spring is here folks! The flowers are blooming, the grasses are greener, and the sun is shining (well on most days). So, onward we go with our week of Easter crafts using none other than the good ole Easter egg.


Today's craft is an oh so simple herb garden. Some suggested materials are in the picture above. Various ideas can be used here; that's why I like this project so much! Any herb will do, and the sky is the limit on decorating eggs. That's pretty much the project in an eggshell (ha!)


The first thing you want to do is blow out the eggs and decorate to suit your fancy. I kept it simple this time. Once you've blown out the yolk, start chipping away the shell creating your vase. A good way to add extra support to this fragile craft is coating the entire egg with clear fingernail polish once you've finished chipping.


Next you'll want to fill the "vase" with 3/4 dirt (use a tsp or something similar in size). Once the egg is full you may use herbs from your garden or fresh herbs from the grocery. I am using basil for this particular egg.


To complete this herb garden I found this bird cage at the Peddlers Mall ($5.00) which I spray painted yellow. The bird on top was $1.00 (which I couldn't resist) and some shredded wood fibers for $1.49 (from Micheal's) for my "nest" and support of my eggs. Inside my garden you will find basil, mint, and both curled and flat parsley. This project ran me about $9.00!


This garden would make an excellent center piece...I'm thinking Easter dinner. But, please note this is not something that will keep very long and I am not encouraging or suggesting growth here..this is pure decoration folks.

I'll be linking up to these parties this week. Stop by and check them out!

Read more...

Thursday, March 25, 2010

Holiday Picture Holder (the Easter edition)

When trying to narrow down an Easter treat to share with you all today, I had the hardest time picking what I wanted to share. I LOVE all things holiday. I am a tradition fiend who fills every possible nook and cranny in my house with small holiday surprises. And I must say, Easter is one of my absolute favorite holiday's of all! (Though I am fairly certain I say that about almost every major holiday, so just you wait!)

If you were to visit us, here are some of the things you might have seen laying around lately...


Almost all of these decorations require one thing that is very near and dear to my heart: the hallowed egg. Every year my family has spent time blowing out eggs and decorating them. The ones you can see personalized lying around my house are from many periods throughout my life. I love being surrounded by the memories every year. The project that you are about to see incorporates some of these hollowed eggs in a year-round picture and trinket holder I made for this upcoming Easter.

The first thing I did to make this picture holder was buy a set of dowel rods and block holder. I bought them at my local craft store for $1.99.


I wanted to jazz up the rods a bit, so I went to an old standby...type writer wood numbers. They were only $0.69 each and I can never resist a cute number! I simply hot glued the wooden number to the dowel rods in a mismatched fashion. (I chose to vary the height of some of the dowel rods, I wish I had been a bit more dramatic with the height differences now...)


Once I had the numbers in place, I painted the entire set black, and antiqued the numbers edges with white paint. I used acrylic paint for both. It was much easier to paint AFTER gluing the numbers on the rods. The dowel block worked as a great paint drying rack!


To hold the pictures, I used miniature clothes pins which I also bought at the craft store for $1.50 a pack. I painted them black to blend with the dowel rods. I attached two to each dowel rod on opposite sides of the numbers with hot glue after the paint had dried.


The finished product was very neutral and matched the house perfectly, which is exactly what I wanted for something I am planning to use year round.


When I finished the picture holder, I moved onto the accents. First, I transformed some hollowed eggs I had from last year into garland by sticking floral wire through the holes and hot gluing the ends to the egg. I then added crepe paper and ribbon skirts to the eggs for a little pizazz.


I also cut out some current easter egg hunt photos of my daughter and glued them onto scrapbook paper and ribbon accents with fun spring colors. Lastly, I cut some bunnies left over from last week's page flower wreath that I thought I could throw in the mix somewhere. This left me with a nice assortment of fun easter things for my new holiday holder.


I am quite happy with the way it all turned out. It was a very quick and easy project. I love the fact that I can use it year round by simply updating the clothes pins with seasonal images and goodies. It also works well in every room because it is so neutral, so I won't get tired of it too quickly!


I'll be linking up to these great parties this week. Stop by and check out all of the great things I am sure we will find there!

Read more...
Related Posts with Thumbnails