Showing posts with label Numbers. Show all posts

Monday, May 30, 2011

Baby Age Photo Prop: Fun Fabric Letters & Numbers

It's no news that with 2 weeks until our little one arrives (or less!), I have baby on the brain in a major way! There is a really good chance that I'll be taking lots of pictures of the baby. There also is a very poor chance that I'll be on top of editing those pictures enough to remember how old she was in each picture, so I wanted a cute way to mark her age that will be in the picture with her. Which is why I was SO excited to get started on these!

Letters 6

I saw a project like this on Chez Beeper Bebe, (check out her bright fabric letter header), but I wanted my fabric to coordinate and be neutral enough that I could use it now, and again if I was photographing a baby boy at some point in the future. I wanted it to be delicate enough to use in the pictures those first few weeks when the baby is so tiny and innocent, but still sweet for a photo of a big, rambunctious 10 month old.

Iusb 760x100 7392353

I found the perfect fabric bundle at Raspberry Creek Fabrics here. Diana is so sweet and helped me to get exactly what I needed, she even has a discount available if you're an Etsy seller!! So great!

Il 570xN 235328873

The designs are perfect! Sunny, sweet, playful, and have a bit of a fun vintage feel to them.

Screen shot 2011 05 12 at 12 29 38 PM

I went to my Silhouette to do the dirty work, cutting out all of the letters and numbers from card stock to use as templates. If you don't have a Silhouette you can easily cut some block letters and numbers by hand. You could do the whole alphabet if you'd like, but I just did the letters and numbers that I will be using for the baby's age: DAY, WEEKS, MONTH, and 0-9.

Mayweek1 9

I had some 4" by 4" muslin squares leftover from a quilt project, so I decided to use those for the backs of my letters. Since the muslin would be on the back of the fabric letters, I lightly traced the letters backwards with a pencil. (You'll see why in a second.)

Mayweek1 10

I then cut my various fabrics from my fabric bundle into little 4" by 4" squares, along with some cotton fabric batting.

Mayweek1 11

I then pinned the fabric pieces together to be sewn. The traced letter/number was on top, then 2 layers of cotton batting, then the patterned fabric on the bottom, with the pattern facing down.

Mayweek1 12

I took it to the sewing machine, and using a straight stitch, sewed along the traced pencil lines.

Mayweek1 13

I was surprised to discover that this was actually a pretty fast project! When I sat down at my sewing machine I had all of my little bundles already pinned together, and the letters that were all straight lines (A, L, E, etc.) were finished in a pinch!

Mayweek1 15

But the ones with some curves were a bit more difficult. This is the first project that I have done that has required sewing that wasn't in a straight line, so I would just advise you to take it slowly. I had been sewing on a fast speed and it was difficult for me to shift the fabric around quickly enough to stay on the lines.

Mayweek1 17

So I started sewing my curves on a slow speed and that made a huge difference. I even hand-cranked the very small circles inside the 8 and 6, and it was still exceedingly faster than hand sewing!! There were a few where I had to pick out the stitching and re-sew the crazy looking lines (like the 2 above), but there were others that I left slightly flawed. It adds character, right?

Mayweek1 14

Here are the backs of some finished squares (above) and the fronts (below.) Fun, right?!! I filled my bobbin with a dark brown thread, so that is the color that outlined my letters and numbers.

Mayweek1 18

I cut them out, and was so pleased!

Letters 5

I chose to do all of my numbers one pattern, and used the other 4 patterns for the letters. I love it this way. :)

Letters 9

You may notice that there is no 9. It turns out that you don't need it if you've done a 6. Or vice versa. But I realized this after I had already sewed the 6 and 9, so I just kept the one that looked best. :) But I made two 2s and 1s, so I could celebrate the baby's age on days like this (below) as well.

Letters 11

Once everything was cut out, I used a bit of fray check along the edges.

Letters 17

As the fray check dried it curled up the edges a bit. But once they were all dry, it was nothing that a warm iron couldn't take care of.

Picnik collageletter

And then they were perfect!

Letters 7

I got some craft magnets with sticker backing to use if I want to temporarily attach them to something metal, and some little velcro circles if I want to attach them to fabric.

Letters 16

Here is the whole set.

Letters 14

I just love them, they're so sweet and versatile! My son keeps picking them up and playing with them as well, telling me the numbers, letters and sounds. I guess I could make a few more to spell out his and baby's name. It was easy enough that I really wouldn't be opposed to doing so.

Letters 15

So what do you think? Are you more likely to use this as a teaching tool, a fun addition to your kid's room, magnets for the fridge, or a photo prop? Try them out, they're so easy, so cute and have lots of short term gratification as you're going along. (That always seems to help me stay on task.) Every time that you finish a letter you're so proud of how cute it is, it makes you want to try another!! At least that's how it was for me. :)

Thanks to all of you for all of your sweet comments and suggestions last week about my being on bed rest! Baby and I are both doing well, not long to go now! :)

Hope you all have a great week! Check out the following parties where I'll be sharing these fabric letters this week.

Happy Monday!!

E1025F317CFB5B8E9E5C526E5CC0F475 copy

Read more...

Monday, May 9, 2011

Shut Up and Sew: Ruffled Crib Skirt & Fabric Discount

Crib skirt 1

The next step in my quest to get the baby's room ready and perfect was to find the right crib skirt. I had a bit of a sewing high from my successful crib sheet making experience, so I decided to find some lovely fabric options and make the skirt I wanted. I couldn't find a tutorial that I liked, so feeling confident and ambitious, I decided that I would just make my own pattern from my son's old fitted crib skirt and go from there.

Brandmark

I started off browsing around the beautiful shop, Skye Reve Fabrics. Natasha has the best selection of fabrics, so I wasn't surprised to discover that she is actually a freelance fashion designer. Pretty cool, huh?! I sent her several emails enquiring about colors (is this an aqua blue, sky blue or turquoise blue?) she responded quickly and helpfully, and sent me a few swatches to help me narrow down my options. Really, she is the cream of the crop, and one of the people who has converted me to shopping for my fabric online from an individual whenever I can!

(She's also been sweet enough to offer a discount to Lemon Tree Creations readers, so scroll down for more details!)

In the end, I went with this incredibly fun and bright polka dotted fabric, Ocean Ta Dot by Michael Miller, which you can find here.

Fabric 1

Measure your crib

First I measured it at the highest mattress setting. I needed my skirt to be 13" long so that it would rest on the floor. (I didn't want my ruffles dangling in the air, I wanted them pooling on the floor a bit.) I added 1/2" to the top and bottom for seam allowance, which brought me to 14". I needed 6 panels to cover all 4 sides of the crib: 2 for each long side, and 1 for each short side. I used some muslin that I had on hand for the center panel of the skirt (the part that would be under the mattress and not seen.)

Cut the fabric

I wanted to ruffle my crib skirt, but many of the tutorials that I was looking at for a ruffled cribs skirt called for 5-6 yards of fabric, and I didn't want to use that much. I had a little over 3 yards of fabric and decided that I would give my crib as much ruffling as 3 yards could give me. Luckily it turned out to be the PERFECT amount! :)

Cribskirt 1

Each of the panels needed to be 26" x 14", so I cut the panels to be 44" x 14" so that I had enough extra fabric to ruffle them. Cutting the fabric was a piece of cake since my 3 yards of fabric was already 44" across! I simply washed and ironed my fabric, folded the 44" length in half, in half again and cut. I'd been told that a sharp rotary cutter can easily cut through 4 layers of fabric and it did perfectly.

Cribskirt 2

The the fabric covered most of my cutting mat and made it kind of hard to see the numbers on the sides, so I marked where I needed the fabric to start and stop with little post it pieces.

Cribskirt 3

Then I could line up the little ruler more easily and make sure that each piece was perfectly straight.

Marchw2 6

Iron and Hem

Once I had my 6 panels cut, I ironed the bottom and sides down 1/2", and hemmed them. If I was making this for someone or being paid I would have folded and ironed twice before sewing it down, but since no one would ever know the difference on this item I was happy to take a little shortcut. :)

Marchw2 9

Ruffle

And now for the ruffles! Some sewing machines will have a basting stitch that is solely for this purpose, so if you have one of those you are set! My machine doesn't have this stitch option, so I simply set it to a straight stitch, at the longest length, and the strongest tension.

Marchw2 19

I sewed a straight stitch about a half an inch from the edge of the fabric. I left a long length of thread at the each end of the fabric and did NOT back stitch. (Most people will recommend doing 2 lines of stitching beside one another, just in case the thread from one of them breaks when you are pulling on it. I tried both methods and this just so happens to be the one I took a picture of. )

Marchw2 20

I then grabbed the excess string one of the ends of the fabric and tugged gently until the fabric started to gather.

Marchw2 21

Attach Panels

I laid the panel right-side down on the center of my crib skirt panel, adjusted it until it was flush with the side and middle of the panel, and pinned it into place.

Cribskirt 4

I then sewed it onto the muslin. ***BE SURE TO CHECK YOUR SETTNGS BEFORE YOUR START SEWING!*** You don't want to attach your panel and then discover that you have sewed it on using your "basting stitch settings," and then have to pick out your stitches and start again.

Ask me how I know! :)

Cribskirt 8

When sewing your ruffled panel to the main body of fabric, try to take it slow. It's easy for the fabric to bunch a bit in front of the presser foot (above), so whenever this happens, just stop, lift the presser foot (below), tuck the gathered fabric under the presser foot, put the presser foot back down,

Cribskirt 10

and sew on.

Cribskirt 9

Sew to the end and backstitch to secure your stitches. And then you'll have lots and lots of beautiful ruffles.

Marchw2 11

Continue to do this with each of the other 5 panels.

Marchw2 12

Add to Crib and Pat Self on Back

You did it, you made a crib skirt!! I'm so happy with mine! :)

Crib skirt 8

Not bad, huh?

Crib skirt 4Crib skirt 7

In other incredibly fun news, Natasha at Skye Reve Fabrics has a new site full of beautiful fabric like this and is offering a 10% discount to you lovely Lemon Tree Creations readers!! Isn't she sweet?!

For 10% off of your order, simply enter the code BLUESANDBRANCHES at checkout.

Have a great week!!

E1025F317CFB5B8E9E5C526E5CC0F475 copy

Read more...

Monday, April 11, 2011

White Thrifted Shelf

Thanks for all of your great comments on my Thrifty Re-Do Roundup a few weeks ago! (If you missed it, you can find Part 1 here and Part 2 here.) I enjoyed looking back through the old projects so much that I jumped onto another.

Picnik collageshelf

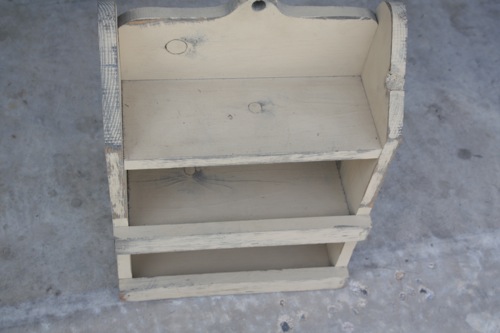
I saw this shelf at the thrift store and thought it was pretty great alone, but with a little love it could be perfect.

IMG 5054500x333

I debated keeping the yellow color and just aging it with a little stain, but at the last minute I decided to go white instead, and I'm so glad that I did.

Shelf 7

A whitewash, to be more specific. I got a small bit of white paint, added some water, and dry brushed it onto the shelf allowing some of the yellow and brown to peek through.

Shelf 8

I then dry brushed some plain white paint on top so that there were some bright white streaks in the paint. I wanted it to look only slightly aged, so I very lightly ran a lightweight sandpaper along the edges.

Shelf 11

One of my favorite parts of the shelf was this fun, knotty, bead board that was nailed to the back of the shelf. I layered on my white paint here as well, being sure to let some of it settle into the cracks, and brush some of it out to help the lines pop a bit more.

Screen shot 2011 04 10 at 5 36 33 PM

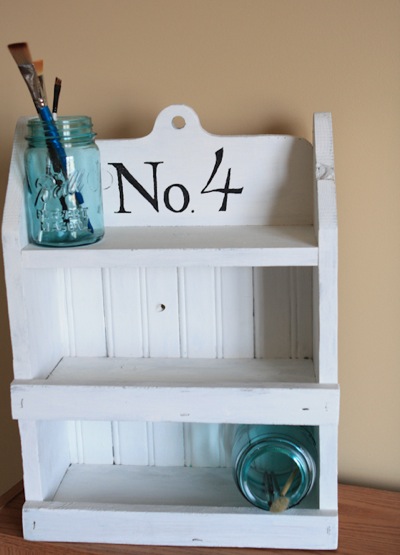
It was really pretty and clean looking, but it needed something else. (And you know where I'm going with this.) So I pulled out my trusty Silhouette, found a good font and made up a little number stencil.

Shelf 4

I taped my stencil in place and used a dark black coat of acrylic to paint on "No. 4." Why 4? No good reason, other than I thought the 4 was the coolest looking number, so I went with it. If the shelf lands in the baby's room I'll say it's because she's the 4th member of our family, but if it lands somewhere else who knows?

Shelf 10

It's pretty though, right?

Shelf 9

I typically go for a much more aged look with lots of sanding and aging with a glaze, etc., but I'm loving this clean look for now. And my weary 3rd trimester body appreciates a few less steps as well.

Shelf 2

What do you prefer in terms of aging your paint jobs, more or less? I'd love to see any new re-dos so feel free to link them up in the comments section!

In other fun news for this week, I'm so excited to be participating in a new series of Knock Offs this week over at KoJo Designs called The Sincerest Form of Flattery.

Flatteryheader

Everyone loves a great knock off, right?! I'm excited to see a few weeks worth of projects in this category and am so flattered to be guest posting alongside a list of incredible bloggers (check out the all-star line up here)!! Really, I'm dying to see just what everyone has come up with!! Also, Jess at Craftiness is Not Optional is co-hosting and will has a slew of guest bloggers contributing projects on her site as well, so there will be lots of great knock offs to choose from. Check out KoJo Designs on Thursday to see my project. (I actually like it even better than the original and it was way cheaper, how lucky is that?!)

As always, I'll be sharing my project this week with some great hosts, to please stop by these parties to see what everyone has been working on!

E1025F317CFB5B8E9E5C526E5CC0F475 copy

Read more...
Related Posts with Thumbnails