Tuesday, January 18, 2011

Sparkly Valentine Banner
Blog-15.jpg

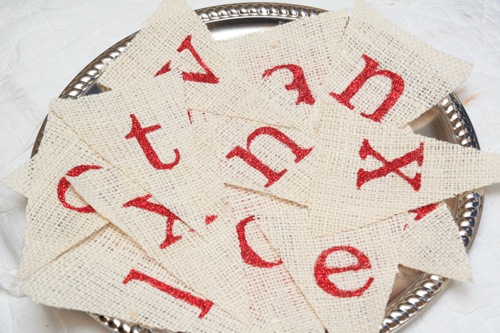
When I showed you my Chalkboard Christmas Card Display last month you knew it would be appearing again, didn't you? If so, right you were! My new favorite item in my kitchen couldn't be neglected for long, especially when there is another sweet holiday around the corner. So I made this beautiful sparkly Valentine's day banner.
Blog-20.jpg

I started off with some creamy white burlap, a little flag template, and one of my favorite new tools, my Silhouette Cutting Machine, to make the stencil.
Blog-1.jpg
Before I had my Silhouette, I was a big fan of the pencil transfer method of getting letters and numbers onto my projects. But obviously that doesn't work for something like this, I am DREADFUL at doing such things free hand, and it is such a time (and sanity) saver to let the Silhouette cut out my stencils for me. I need all of the time and sanity that I can get, so purchasing this machine was a small price to pay! :)
Screen shot 2011-01-13 at 1.09.32 PM.png

I picked out a basic font in the Silhouette Software, adjusted the size of the letters to fit my flags perfectly, and a few minutes later I had these great stencils! But you could easily cut these stencils out by hand or use any store bought letters to get the same effect.
Blog-2.jpg

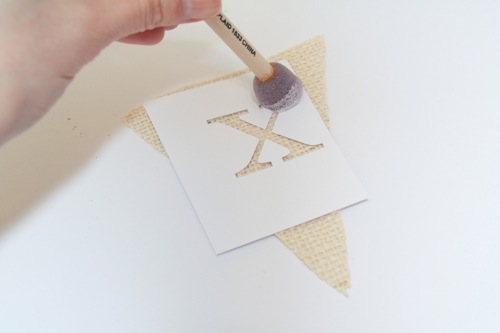
I made sure to use a piece of card stock for my stencils that had a glossy finish so that it didn't get soggy in the middle of my stenciling. I soaked my foam brush in Elmer's glue, and stenciled the glue onto the burlap.
Blog-3.jpg

Keeping the stencil in place, I covered the glue in a small pile of fine red glitter, shook of the excess and set each flag aside to dry.
Blog-5.jpg
Blog-7.jpg
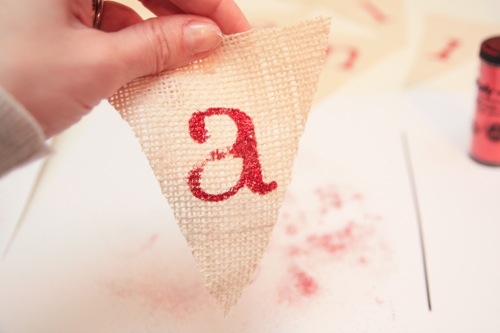
A few times I put on too thin of a layer of glue, but if you do this, don't worry!
Blog-8.jpg
I used a toothpick to apply a little more glue to the gap on the letter, added some more glitter...
Blog-9.jpg
and it was perfect!
Blog-10.jpg
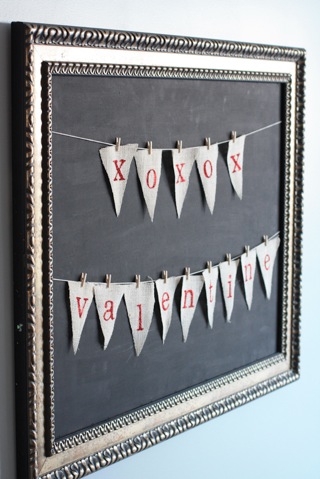
Once you have a fun pile of sparkly lettered flags, hang a string and clip them on! I'm using mine on my chalkboard, but they would look gorgeous across a mantle, window, or just along the wall!
Blog-21.jpg
I was originally thinking that I would glue my flags to the string, but since Valentines Day is still almost a month away, I know I'll switch it up and rearrange it a bit in the meantime. More than likely I will add a few photos of my valentines in between the x's and o's.
Blog-16.jpg
Look how perfectly the letters came out thanks to my Silhouette stencil!
Blog-17.jpg
Sharp lines and fun little detailed fonts, with swoops and tails. Just what I like!
Blog-18.jpg
I put one of these Valentine banners in my Etsy shop, so click here if you'd like one just like this.
Blog-23.jpg

I'll be linking my banner to these fun parties, so swing by for some more fun Valentine's Day ideas!


And I'll be back on Monday as usual. Have a great week!

Visit thecsiproject.com
E1025F317CFB5B8E9E5C526E5CC0F475 copy.png

Read more...

Monday, January 17, 2011

Silhouette GIVEAWAY & Easy Valentine's Project

**this giveaway is now CLOSED***
You WILL NOT believe what we have in store for you this week!!!!
That's right, we are hosting a GIVEAWAY for a fabulous Silhouette Craft Cutter! This is one of the most versatile crafting tools I have ever come across. I mean truly, the possibilities are endless.
I just recently received my Silhouette SD in the mail. I am sure those of you who read LTC often can expect how this machine might just change my crafting life! The amount of options right at my fingertips was unreal. The first thing I made was this sign...
I am sure the idea seems so simple, but you cannot imagine the amount of time using the Silhouette saved me. Before, I would have been stuck with my go-to option of tracing and painting my design onto the wooden board. I am sure I would have resorted to the use of one or two basic paint colors, leaving the sign a bit drab. And on top of that, you know it would have taken me over an hour to design, trace, paint...etc. Now, with the Silhouette, all I had to do was click on the design I wanted from the design store, put it all together using the great software, load in some gorgeous scrap book paper and let the Silhouette go to work. It was that simple! I was completely in love with the simple results. And what a stress free process it was!
Look at just a few of the other great things this little machine can do:
custom clothing using heat transfer paper
the CUTEST signs and such using vinyl and premium vinyl products
etch glass using vinyl and etching creme
custom cards and stationary using your own fabulous paper and designs from the Silhouette Online Store

and a million more paper, magnet, tattoo and other crafts....You can always find many great ideas on the Silhouette store website, or on the Silhouette Blog.
Now, I am sure if you didn't know it before now, you just HAVE to have one of these amazing machines.

NOW IT IS YOUR CHANCE TO WIN A SILHOUETTE OF YOUR OWN!
Here are 4 easy ways you can enter to win...

1)Be a Lemon Tree follower
2)Visit Silhouette Online Store and tell us what you want to create.
3)Visit the Silhouette blog and become a follower.
4)Leave a comment on one of your favorite Silhouette Blog posts.

****Be sure to come back and leave a separate comment here for each thing you do for up to 4 chances to win! GIVEAWAY CLOSES FRIDAY AT MIDNIGHT, STOP BACK BY SATURDAY THE 22nd TO SEE WHO THE WINNER IS!

Now for even more exciting news...Silhouette is also offering two great promotions this week (January 17th-22nd.)

*The first will be a machine promotion. Using the promo code LEMON,
our readers will be able to purchase a machine for $225.
This package will also include 2 rolls of premium vinyl, 1 roll of transfer, and the HomeDécor CD. This is $395 value for $225!

*The second promotion will be for the premium vinyl. Using the promo code LEMON, you will be able to purchase any premium vinyl at 25% off!

Haven't heard of the premium vinyl yet? It is another great Silhouette product with endless possibilities. Premium vinyl has a stronger adhesive for indoor and outdoor use. It's gentle enough for most indoor walls, but resilient enough to withstand the sun and weather.

So, good luck on the giveaway, AND be sure to head on over to Silhouette with the promo code LEMON to take advantage of some great deals today, through January 22nd!!

GIVEAWAY NOW CLOSED...Check here for the winner!

Happy Monday!

Read more...

Saturday, January 15, 2011

And the winner is..

# 51


CountryBelle!


Congratulations!  You have won a Cutting Edge Stencil of your very own.  Just send us your information and we will pass it on.


Thanks to everyone who entered!  If you didn't win this time around, hang in there because Lemon Tree Creations has MORE wonderful giveaways coming soon!  


Happy Saturday!

Read more...

Friday, January 14, 2011

Slow Cooker Apple Butter

It's always fun to make little homemade gifts for people. I especially like edible ones!

This one is a super easy Apple Butter recipe (which I found somewhere online). And the best part is that it's all done in a SLOW COOKER!


The simple steps are written below.


Once the ingredients are added to the cooker..you are pretty much a master at the whole cooking part and that's exactly how I like to cook.

So now for the fun decorating of the jars!


I had some old fabric, some cute ribbon, fur looking twigs and buttons!


Before!


After!


Cut fabric in to small squares depending on the size of your jar lid. Next I hot glued the ribbon to the rings of the jars. Add and embellishment to the top if you like.

This batch of Apple Butter made 24 4oz. jars! That's a lot of gifts! Add to some hot biscuits, toast, scones, or just eat out of the jar when no one is looking!

Have a great Friday!

Read more...

Thursday, January 13, 2011

A Sweet and Simple Birthday Party

Sometimes I begin to immediately feel overwhelmed when I think about hosting any sort of celebration in my own home. My house doesn't scream comfortable, when filled with 20 guests! So, when planning my 2 year old's birthday party this year I went with the "Less is More" approach. Take a look at some quick, concise and easy decorations we used for this simple birthday party.

First, seeing is how its all about the birthday girl, I first designated a birthday chair. I just took my school desk redo, and put it in a place of honor. Dressing it up slightly, you know, for the occasion...
Next, I tried to keep the majority of the decorations to one small area, the dining room. Since you can see the room from the front door, I put up a simple banner with the birthday girl's name.We pushed the dining room table back to make extra space and adorned it with the usual party gear...hats, balloons, flowers, cake, etc.

One special addition to the table decor came from a great idea Jessica will share with you some other time. It was the perfect way to personalize the party decor and remind people of last years festive celebration. Look how much that little sweetie grew in a year!Finally, since most of the guests were adults, we kept the party favors simple with a little sweet treat for the road. We just printed off baggie toppers, added a little sticker, stapled them to our treat baggies and VOila! A simple little thanks to you.I would say that no matter how done up the party room was or wasn't, this little girl had a great day, and fun was had by all!
I'll be linking to these parties this week.


I also wanted to let you know that I will be visiting you on Monday next week for an exiting giveaway! I hope you will be checking back next week to see what Lemon Tree Creations has in store for you then!!!

Happy Thursday everyone!

Read more...
Related Posts with Thumbnails