Monday, June 20, 2011

Sweet Pink Side Table

Hey everyone! Today's guest post comes to you from Camilla at First Lady of the House.

Firstlady

First Lady of the House is an adorable blog with the musings of a mother of 2 sweet girls, crafty round ups, and fun tutorials. You may have seen Camilla (or her adorable projects) floating around blog land already. I just love her yummy yellow Placemat Pillow, her sweet St Patty's Day Shirt & Hair Bobs, and this incredible Formula Can Up-cycle!
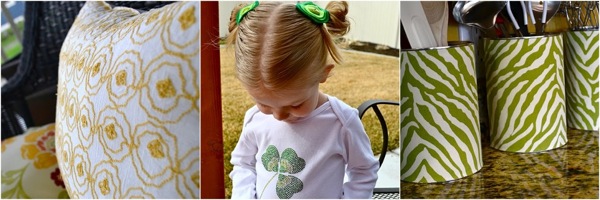
Picnik collageflth

You can follow along with Camilla and her great projects at her blog here, or like First Lady of the House on Facebook here.

Thanks for sharing with us today Camilla!!


I'm so very excited to be guest posting over here at Lemon Tree Creations!

I'm Camilla from First Lady of the House.

I love to create new things and I love to blog about creating new things!

I ruminated over what to do as a project and finally I decided that I had this little side table sitting around for far to long in it's old ugly original form for way to long (bought at a local thrift store for $10 about 2 or 3 years ago). It was doing nothing for my daughters room with the way to dark color on it.

But, I loved the detail on it!

After:


Before:


I tried to sand it down a bit but I think it has veneer on it. The legs sanded pretty good though.

Then I used Krylon White Primer Spray Paint.

Couple coats of that.

Then Krylon Satin Ballet Slipper pink for the top coat.


This is when it was done with Spray paint, before any stencil or distressing.


Bought the Stencil at Hobby Lobby. I just used a white craft paint and just dabbed, rather than brushed.

I just wanted it in the two opposite corners from each other.


It turned out a little sloppy even though I 'dabbed' the foam brush. But I sanded it down a little.


THEN, I got out the little hand sander and went to work distressing it! That is the funnest part.


Ok, So I put this picture in because even though the table is so pretty out on the green lawn with cute flowers on it, the reality is that is will go in my daughters room to be used for who knows what. To have plastic kitchen food line up on it, All the farm animals from the Little People set corralled there, Stacks of books piled on top. So I'm just keepin' it real for you and just threw in the naked baby for kicks!


I hope you feel inspired to check out your local thrift stores and yard sales, and when you look at a piece think to yourself if you would like it if it had another color on it?!

Thanks to Erin for letting me guest post here at Lemon Tree Creations!

What a beautiful and inspiring blog!

I sure hope you will all come over and check me out at First Lady of the House.

Ciao!


Thanks Camilla!

***Just a reminder, we are now accepting projects for guest posts on Lemon Tree Creations.*** Want more details? Check out this post, or email submission ideas to ltc.guestposting@gmail.com

Read more...

Friday, June 17, 2011

Hammer Applique [Dad Style]


For a last minute add on to my Dad's car kit package that is filled with lots of car cleaning supplies and snacks [Shammy's, ArmorAll, sponges and things] I decided to go back to one of our earlier tutorials from Erin and make some of these simple no sew appliques.

Simply click here to see the full how to.


All you will need is a few supplies:

1. Shop Towels [found at your local auto parts store]
2. Fabric
3. Heat N' Bond [found at Hobby Lobby/Michael's]


Cut out my hammer template and began to work. [This could work with any design, I got so excited after I found out just how simple it was and how cheap the entire project was]


Viola! Shop towels for my Dad this Father's Day! What a fun way to let him know that you are thinking of him...in a crafty way;)

Enjoy your Father's Day Weekend. Thanks for stopping by! I'd love to see your appliques on our Flickr page!

Jessica

Read more...

Thursday, June 16, 2011

A Board and Batten Nursery

 I know, I know, I am about 2 years behind on the board and batten love phase. When we were trying to decide what we needed to do to convert our {tiny} guest room into a nursery, I knew I wanted a big impact. After some diy research, I decided that board and batten would give me just the look I was going for. So, before I reveal some nursery projects and the final makeover, I thought I would share with you our board and batten attempts.

We had already removed our guest bed to make room for an office, so our space started mostly like this...

After we added our board and batten, it looks a little more like this!
The light colors of the space really brighten it up and do a lot to make the room look bigger! We followed a great tutorial and a few easy steps to create our room. I got most of my design tips and measurements from the Decor Chick. You can follow her easy steps here as well.

The short version is this:
1) We purchased lattice strips from Home Depot, for around $.66 a foot. For the 'board' or shelf part, we used door molding for around $2.00 a foot. 
2) My husband cut the lattice strips and molding for me. We chose to cut them about 4.5 feet long, and measured the molding to fit our specific wall measurements.  (We did not pre-paint or prime the strips or molding.)
3) We taped off and painted the room first. The top color we used was Martha Stewart Whetstone, the bottom was Behr Ultra White. (Semi-gloss)
4) We measured off and taped up our lattice strips. We chose to space them around 12 inches apart, but altered some distances to avoid corners. When you step back without a tape measure, you really can't tell at all!
5) After we taped off our strips, we used a stud gun to attach them quickly to the wall. We then hung the molding over the strips. 
6) Once everything was secured in place, we caulked till our hearts content!
7) Finally, we painted about 4 coats of Behr Semi-gloss Ultra White over everything.
I am so very happy with the outcome. The room is feeling great already, and I can't wait to get the furniture all in place! I would love to get this whole nursery complete and checked off my list before school starts again in the fall. Now I am just hoping that this pesky pregnancy fatigue doesn't get in my way!!
Be sure to check out the Decor Chick for some more board and batten inspiration. Trust me, this is a project anyone can do, and the impact is incredible. I will be linking to these parties this week. Happy painting!

On another note, we are still looking for guest posters for Thursday's coming in July. I am already excited to share with you the great projects we have had submitted so far, but can't wait to see what you have as well! Find the details here.

Happy Thursday,

Read more...

Monday, June 13, 2011

Fun Garage Hooks

KoJo designs asked me to be a part of their "Gifts for Guys" series awhile back.  I was beyond excited when those great girls over @ KoJo asked me to be a part of it until I realized that it meant I actually had to come up with a cool guy gift. What? This made me nervous.  I can come up with a hundred girl gifts on the spot but I always struggle with guy gifts.

I thought now would be a great time to share this with you since Father's Day is this weekend.  What?  For any last minute gifters out there, here is an idea that just might work for ya...

I present you with The Handy and Manly Garage Hook System...

It all started with this bad boy. Do any of the men in your life own one of these? Mine did back in the day. I didn't want to tame his wild heart too much so I consented to the purchase of a motorcycle. Soon enough life took over and diapers became more important. He sold it and has wanted another one ever since.

I thought I would be a good wife and preserve his "glory days" for him by creating a hook system using the very license plate that graced the back of his precious bike.
I used these "tools" to get the job done. The license plate, a piece of pre-cut wood from a local craft store, screwdriver, screws, washers, black & white acrylic paint, weathered wood crackle medium, paint brush, and tacky glue.
I had been looking for a reason to try out the crackle finish on something. This was perfect. I was hoping for a look as rustic and manly as I could get.
I simply followed the directions just as they are written on the back of the bottle. I put a coat of black paint on my wood first. After it dried, I applied a coat of the weathered wood stuff. After that dried, I applied a thin coat of white paint.
After it dried, it looked like this. So easy and so fun.
Next I glued washers to the bottom two holes on the license plate simply for aesthetics.
I placed the license plate down where I wanted it and lined up four washers across the bottom where the hooks would be. I glued each washer in its place.
Then I inserted a screw into the center of each washer. I was going to use cute little hooks but in keeping with the manly theme, I chose basic screws instead.
I stopped screwing the four bottom ones right before they poked through the back. They were nice and sturdy and still had room for hanging things. I used 2-inch screws, but this will vary depending on the thickness of your wood.
And there it was all ready to be hung in the garage.
I unscrewed the two at the bottom of the license plate a bit and screwed them back into the wall in the garage.
Now my man can remember his first motorcycle each time he enters the house through the garage door.
He keeps a notebook with records of car maintenance as he does most of it himself so I got him a new one to hang from his little hook system. And I realize that most people don't hang their keys in a garage but you get the idea, right?
My man is all about function and practicality so he was pretty happy with his new hooks!
Thanks for stopping by Lemon Tree today!  Oh, and did you happen to notice the changes that are coming?  Yep.  We are going to start throwing a party once a month and we are inviting guest posters like YOU to contribute on Lemon Tree!  I am super excited.  

If you are interested, e-mail your project ideas and some information you want us to know about yourself to ltc.guestposting@gmail.com to apply.

I'll be at these parties this week!

Happy Tuesday!


Read more...

Tips for Photographing a Newborn

I'm so happy to introduce you to today's guest poster! Allow me to introduce Kirstin, from KoJo Designs!

Kojowaves

I am such a big fan Kirstin and Jordan!! They do a beautiful knock off, like this Anthro-Inspired Knotted Bedding, transform trash to a treasure (have you seen how they up cycled a plastic stroller into a "Vintage" Baby Buggy), and have an incredible eye for detail when throwing a party. I've been keeping an eye on their sewing projects ever since I got my sewing machine and have been thrilled to try a few out already, their ideas are just so cute!! Really, I can't say enough good things about these two, so you'll have to check out their blog and see for yourself.

Picnik collagekj

Thanks Kirstin!!


Hello friends at lemontree! I'm so excited to be here today... I couldn't be more thrilled for Erin's bundle of joy and love having the chance to be a part of her 'Maternity Leave.'


I am Kirstin, half of a sister team that blogs over at kojodesigns. Jordan and I write about all sorts of crafty ventures- sewing, repurposing, taking pictures. Erin is in good company- both of us have had baby girls in the last nine months. Which makes babies (and making things for babies! and taking pictures of babies!) one of our favorite subjects.


A quick disclaimer before I launch into my tips for taking pictures of newborns- I feel more than a little underqualified to write this post. I love taking pictures, but I am not a professional photographer by any stretch of the imagination.


However, after taking thousands (I wish I were exaggerating) pictures of Piper Jane, I have learned a few useful things about taking pictures of babies in the last nine months. And I thought I'd share my most useful tips with y'all!


A few rules of thumb for taking pictures of newborns-

Tip 1- A good set-up makes all the difference.
Things that make a good set-up-


-a white down comforter
-a heating blanket


-big baskets, buckets and containers (ones that a newborn baby can fit in... a drink bucket filled with a blanket is one of our favorites)
-a boppy (to prop the baby up)


-a white sheet hung as a backdrop


-fabric (also to use as a backdrop)


-hats, hairbows and plain white diaper/white bloomers are all great 'props'

Tip 2- Make sure the baby is as comfortable as possible.
Basically, keep her warm and well fed. And if your baby has a 'happier' time of the day, schedule your photo session accordingly.


The heating blanket (placed under the down comforter or whatever you're having her lay on) will do wonders in making her nice and warm. And cranking up the thermostat (or turning down the AC) will help as well, especially if you're taking pictures of her just in her diaper (or less!).

Tip 3- Keep things simple.


Babies are absolutely beautiful. Minimize distractions from their newborn loveliness by keeping things simple. Your darling little one, sleeping on a simple white blanket will make for some absolutely gorgeous pictures.


Tip 4- Take TONS of pictures.


funny outtakes


In order to actually 'get the shot,' I end up taking a ridiculous amount of pictures. This tip is especially pertinent as your baby gets older (and more mobile), or if you're trying to take pictures while you're newborn is awake. There are just so many weird eye rolls and mouth puckers and squirms- quantity covers a multitude of quirky shots here.


Also, switch up your position often, taking pictures from all sorts of angles and vantage points. Often, the pictures I think are going to be my favorites don't turn out at all, and the ones I took 'just to switch things up' are the best photographs.

TIP 5- Get the family involved.


If your peanut has older siblings, be sure to involve them in the photo shoot! Later, you'll love having a record of their sweet (or not-as-sweet) beginning.


Likewise, you'll love it later if you can get in on the action and have someone take a picture of the two of you snuggling.

Those tips just scratch the surface, but they're a good place to start! Happy Baby Picture Taking, Lemontree friends. And thanks again for having us, Erin!

ps- The pictures I used as examples that I didn't take myself were taken by my sister, Jordan!

Read more...

Friday, June 10, 2011

Changes for Lemon Tree Creations

Over here at LTC we have been brainstorming some changes. We love every second of what we are doing, but after a year or more of finding our groove, we are ready to mix it up a bit! After much thought here are a couple of changes you can expect to see coming in July...

{Monthly LINK Party}
 If you never noticed before, we love link parties! And, we love them so much we have decided to throw our own once a month. The 1st Thursday of every month jump on over to LTC and link up your favorite projects of the month!
{Guest Posting}
We would like to invite you to guest post for LTC. Every Thursday after the 1st Thursday of every month we will be having a featured Guest Poster. Projects should not have been posted previously on your own personal blog, and we ask you wait one week before re-posting. If you are interested, email your project ideas and some fun information about yourself to ltc.guestposting@gmail.com to apply. I know we are going to have too much fun looking through all of your fun projects 

We will begin both our link party and guest post features in July. Starting the week of July 3rd, I will begin sharing my regular posts on Wednesdays and we will be ready to party July 7th. We can't wait to see you there!
 
Happy Friday!  


Read more...
Related Posts with Thumbnails