Friday, September 10, 2010

Halloween Paper Tree

Ahh...my favorite time of year is fast approaching...Halloween! In order to prepare for the festivities, I have started to bring out old decorations and make a few new things in preparation for the upcoming celebrations.


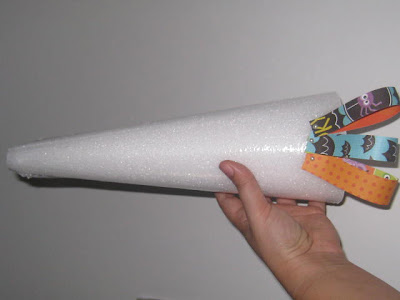
Any type of styrofoam shape could work for this craft; wreath, cone, balls, topiary (that would be super cute...hmm) etc. 2-sided scrapbook paper, pearlized stick pins and some scissors.


First, trim your paper in small strips around 5 to 6 inches long; you will need quite a few (hundreds..depending on the size cone you choose to buy)


Simply curl the paper over (do not bend) press the pin through both pieces of paper.


Start approx. 1 inch from the bottom of the cone and begin trimming your tree with paper by pressing the pin in the foam.


Once you get the hang of it continue working, alternating patterns of your choice.


Continue this process until the entire cone in covered and you are satisfied with the results.


I found this pack of Halloween themed paper at Michael's Craft Store. I adore the patterns and characters.


Once I finished my piece, I sat it on an old tray, brought out one of my old pumpkins to spruce it up a bit...and I always have to throw in a monogram of some sort. :)

I also thought this would be great for Christmas (which I will most likely do), even the Yo Yo Pin would be a cute addition to the cone.

I can't wait to see some of your photos show up on Flickr. Check out these great blogs as well, see you next time.

The DIY Show Off


Visit thecsiproject.com

Read more...

Thursday, September 9, 2010

Mini Makeover- Sneak Peak

A few months ago, in a week long series we did on nurseries, I shared this room with you. It was my daughter's nursery.


Today I am going to give a little sneak preview of my toddler's "big girl" room. We are preparing to move her into a big bed soon, so of course for me that meant it was time for a little makeover. I have to admit, when I look back at pictures, I LOVE the pastel, calming feel of the old nursery. It screamed baby girl to me in a way only lavender could. However, the more my baby girl's personality grew, it no longer screamed "Lola." Therefore, I have set out to make a toddler room that is as colorful as she is!

The first thing to change, which you will be seeing today, was an update in artwork and wall hangings. First up, the feature wall.

I decided to base the colors and fabrics from this room on my daughter's first birthday invitation. It is a whimsical frog-fairy-dancer-skater-princess, of course!

The invite kept the lavender elements in play, but added so many fun and whimsical colors. I quickly found Amy Butler fabric that worked well with it, which I also framed and mounted on the walls in different areas.


Next, I took out some of the baby pictures from the room and added more classic elements. I realized I wanted this to be a room to grow with my child, and since MANY more baby pictures are scattered throughout the house, they just weren't as necessary here. So, I added a little chair silhouette to a covered canvas. I also painted a simple plaque that reads "lullabye," which keeps a touch of the nursery feel, and is also a knickname my husband has for our daughter.

The next thing I changed were the pictures above the bookshelf. I had two vintage Barbie sketches I had done in high school that I was just dying to implement into the room. So, I made space for them, along with a travel print and another framed fabric sample.


The pillows and throw below give you a hint of what the fabric choices in the room are going to be.

The final wall I have to show you is a shelf that is located on the other wall. I tried to keep the use of color going across the room. For this space I simply painted a little yellow canvas, framed one of my favorite magazine covers of all time, and tried to somewhat recreate Jen's (from tatertots and jello) famous rosette topiary.


And that was it! It is certainly not the world's more amazing makeover, and very incomplete, but it is feeling more and more like the little girl who belongs to it every day. I think anyone who has met her would agree, she is certainly the sweetest little spitfire your will ever meet. And every bit as over the top as the room she lays her head to sleep in every night.

I'll be linking to these parties this week, stop by and take a look.

Happy Thursday!

Read more...

Tuesday, September 7, 2010

ABC Baby Shower

Let me just say that if I worked at Dunder-Mifflin, I would definitely want to be a part of the Party Planning Committee. I love to plan parties and showers. I got the honor of planning my sister-in-laws baby shower that was over 2 years ago now. I had so much fun! It was their first baby and they did not know what they were having. I am inspired daily by the many creative blogs I read, so I thought I would share some ideas that might possibly inspire someone else.

Here are a few ideas for an ABC themed shower planned on a dime (most of these ideas could also work for a kid's birthday party too)...

Let a few balloons just let hang from the ceiling to add color and fun to the room...


Menu: Alphabet Pretzels, colorful fruit salad, cupcakes with sprinkles, cheese and crackers

Decor: Alphabet blocks, pictures of the mom and dad to be, cut-out letter stickers scattered on the table, balloons, letter stickers on plain white cups


Favor: ABC cookies (sugar cookie ready made dough cut into letter shapes and colored icing out of a baggie corner to outline the cookies)

Packaging: I printed off a little message for the top of the bag on regular printer paper. I cut the top of a baggie off and then stapled the paper onto the bag, punched a hole on top and there you have it...an easy to carry take home treat for guests...


Drinks: I purchased some colorful bottled sodas (all caffeine free for the mom-to-be) , placed them in a silver bucket, and put magnetic letters on the outside to continue with the theme...


Game & Prize: I placed a letter "H" (the first letter of the baby's last name) on the bottom of one of the plates. The person that got that plate received a black stamp pad and a set of rubber alphabet stamps tied up in a ribbon. The stamp pad was cheap and I used a 40% off coupon at Michaels for the stamps.


It was a fun and simple baby shower...just food, gifts, and conversation. I always love to hear great party ideas, so please do share!

Happy Tuesday!

Read more...

Monday, September 6, 2010

Classic Low Back Chair

Over the next few weeks, I'm going to show you some of the furniture that I've re-done for my craft room. I'll eventually have my big reveal, sorry to tease you with it but the truth is, It's not all the way finished yet. :) So for now you'll just have to settle for a few little tastes.


The first of which is, my pretty new low back chair!

It never ceases to amaze me how a little paint and a great fabric can completely transform something. This chair was dumpy and forgettable, and now it's classic and stylish, I love it!!


Picnik collageba.jpg


The before, blah all around.


IMG_5536.jpg


I removed the cushion and gave the frame a good scrub and a light sanding.


IMG_6380.JPG


Then a little primer...


IMG_6381.JPG


and Ivory spray paint by Valspar.


IMG_6383.JPG


The cushion that was originally on the seat was completely compacted so that it was now far from cushy. So I decided to cover the oldest layer of fabric that was holding this stuffing in with a new layer of foam and a new fabric. I didn't have a staple gun, so I opted to nail it down. If you're thinking to yourself, "That's now really the easiest way to go about that," let me just say that I agree with you wholeheartedly! It got the job done, but this may be a better option for people who aren't perfectionists.


IMG_6387.JPG


I don't know, how do you feel about a little bit of a scalloped edge? I couldn't handle it very well, decided that this would not be the project that would cure me of my perfectionist tendencies, and borrowed a staple gun from my neighbor asap to try to rectify the situation.


IMG_6392.JPG


I then just re-attached the cushion to the frame and was done.


IMG_6458.JPG


I opted not to roughed up any of the edges for the shabby chic look that I usually go for, and tried to keep it just chic. But if I change my mind, that look is only a few minutes with a medium grit sandpaper away. It's good to have options.


IMG_6472.jpg


Again, with my before and after. SUCH a big improvement!!


Picnik collageba.jpg


Did you notice I used the same color scheme and fabric as on my clothesline photo display? But you already knew that was in my craft room so I'm not giving much away.


IMG_5100.jpg


I'll be linking this up to these great parties, check them out!!


Happy Labor Day! See you next Monday!


E1025F317CFB5B8E9E5C526E5CC0F475 copy.png

Read more...

Friday, September 3, 2010

Yo Yo Pin Tutorial


Yoyos have been around forever...I think. My mom taught me how to make them and her grandmother probably taught her how to make them. Craft stores sell round plastic guides but this method is less complicated and cheaper. You will want to put a yoyo on everything once you see how simple they are to make.

What you will need for this project: 3 different sizes of circles to trace, 3 colors of fabric, scrap felt, pin back, 3 pearl beads, needle & thread, glue


To get started you will need to trace your 3 circles of various sizes to use for the yoyos and cut them out. Also, you will need to trace 2 more circles onto the scrap felt, this will be used for the back of the pin. I make those circles slightly smaller than my smallest yoyo circle.


Now you should have 3 circles to make your yoyos out of and 2 felt circles. We will start with the largest yoyo circle first. You will need a needle and thread now. I try to choose a thread color that matches the fabric so that it will not stand out. Knot the end of your string and start with your needle on what will be the inside of your yoyo circle.


At this point I make another knot around my first knot so that when you pull your yoyo tight your original knot won't come through the fabric. This will be the inside of the yoyo so make sure you can see the knot on this side. Continue this in and out method until you reach where you started, with the thread coming through this side.


Now pull your yoyo gently but making it tight. Once your yoyo looks like this put your needle right through the center to knot what will be the back.


Take one felt circle to attach your first yoyo. You can go through the center of the yoyo a couple of times to secure it to the felt. The other 2 yoyos are smaller so I typically don't leave much room on the felt for them and the yoyos will overlap that way.


Now you can add your first bead. The bead wholes are not very big so I just put the thread through it twice to make it more secure on the yoyo and knot the back.


Now you are ready to continue the same process for the medium and small sized yoyos. For the second and third yoyos I make a small stitch underneath to secure them to the bigger yoyo.


Once you have attached all three yoyos and pearl beads you will need to attach the pin to the back. All I do is start with the middle whole and work around the pin back until I have put my thread through each whole twice to secure it.


The back of your pin probably looks very messy at this point...hence the second piece of felt! I usually lay the second felt circle over the pin to determine where to cut my wholes for the clasp part of the pin to go through. Open the pin and apply some glue before you attach your second piece of felt. This will give the back of your pin a more finished look.


You should now be left with a chic yoyo pin that your friends will be begging you to make for them.


Here are a few other ideas you could use, if pins are not your thing...


Thanks for stopping by!

~Kristen from Ruffled Feathers

Read more...
Related Posts with Thumbnails