Tuesday, September 21, 2010

Baby & Big Girl Room - Part 1 - The Banner

Hello, friends of Lemon Tree! I am so happy to be back. I hope you enjoyed the great guest posts by Wendy & Kristen and the archives from my family blog. I have been busy with this little lady and loving every minute of her newborn sweetness...


We did not know that she was a girl until she came out and we were thrilled. I was secretly (or not so secretly) hoping for a girl and had already been dreaming of plans for making over Avery's room since they would be sharing. I posted about this room awhile back here and since then it has undergone a pretty serious transformation that I cannot wait to share with you all...


A lot of love and thought went into this room so I can't just share it all in one post. So this will begin my baby and big girl room series...

The main inspiration for this room came from these blocks and specifically this one piece of scrapbook paper I used to make these blocks. I shared these blocks on my family blog because I made a boy set and a girl set as I eagerly awaited the arrival of baby #3. I just loved the colors used to make the girl blocks and I loved, loved, loved this scrapbook paper with a clothesline and birdies all over it. It made me smile.


I went on a super fun trip to Hobby Lobby and Jo-Anns to find the perfect fabric for the room. Somehow I found exactly what I had in mind. Things just kind of fell into place the whole time I was designing this room and who doesn't love when that happens?

Part 1 of this series begins with one of my favorite features in the room...the pennant banner made from this beautiful fabric...


I have seen banners all over the place and I am a big fan. I have seen so many different versions. Here is how my simple little banner came to be...

I cut out a paper triangle, pinned it to my fabric, and cut it out with pinking shears...


So, I had these beautiful triangles that were just pretty to look at...


I had some pink grosgrain ribbon that I folded in half and ironed to keep it that way...


I layed out the triangles in a pattern that I was happy with and slipped them inside the ribbon and pinned them in place...


The final step was to zig-zag stitch the ribbon to the triangles to create a banner...


It was originally going to hang on the crib but then I found an even better place for it...


I cannot wait to show you every detail. I had too much fun with this baby and big girl room. I kind of wish I was the one sleeping in it!

I will be linking up to these parties this week! Hope to see you there!

Also, don't forget to enter the Cutting Edge Stencil Giveaway here!

Oh, and stay tuned for Part 2 of the series!

Read more...

Monday, September 20, 2010

Thrift-Store Blocks Re-Do

2010_02_22_6774_thumb.jpg

I came across these old blocks at the thrift store a few months ago and I knew exactly what was in store for them.

2010_02_08_6404_thumb.jpg

I popped off the wooden letters, painted the front black, and printed off some letters in various fonts.

2010_02_17_6556_thumb.jpg

I liked the way the black letters on white looked so much that I painted white over the black background. I then traced the backs of the letters in pencil, put each letter on a block, and rubbed the front with a lead-less mechanical pencil to transfer the letter outline onto the block.

2010_02_18_6608_thumb.jpg

I got some Craft Smart paint from Michaels that almost doubled my painting time (on the right). Do not get this stuff if you are trying to do this project, it covers like watercolor, so it makes an already time-consuming project take a lot longer. Luckily I had some of the Liquitex (on the left) leftover from another project, and that filled in the letters easily with only 1 coat.

2010_02_22_6752_thumb.jpg

I then sanded the letters and corners, painted over the whole thing with an antiquing glaze and wiped it off. Ta da!

2010_02_22_6787_thumb.jpg

I realize that glazing flirts with the fine line between making your project look antiqued, and making it look just plain dirty. I'm hoping my technique will continue to improve with time.

2010_02_22_6789_thumb.jpg

The black paint under the white background paint ended up coming in handy, because when I sanded the edges and corners, the black just popped right out. It didn’t even need the glaze.

2010_02_22_6791_thumb1.jpg

What do you think? A pretty good thrift store re-do, right?

I'll be linking up to some great parties at these links, so check them out.

Have you entered the Cutting Edge Stencil giveaway yet? If you need some inspiration, check out Patrice's post here, or click and leave a comment here to enter. You don't want to miss it!

See you next Monday!!

Erin

Read more...

Friday, September 17, 2010

Cutting Edge Stencil Giveaway


Today we will be doing another giveaway from the fabulous Cutting Edge Stencils. If you didn't check out yesterday's post, I shared with you a stencil I used from their Allover Wall Stencil line here. I could not have been happier with both how easy this stencil was to use and how great it turned out. I kept thinking, "I am going to mess this up!" "I am not smart enough to figure this out!" But then, the stencil was up on the wall, I did one roll with their awesome foam roller brush, and I was hooked. It seemed nearly impossible to mess up, making it the PERFECT product for the 'do-it-yourselfer' and especially me! And on top of that, it looks very professional and chic on my accent wall (which I can promise you had a lot more to do with the product than me.)


A few of their other stencils I am just dying to try are these:
Trellis Allover

Acacia Allover

You can just imagine the possibilities, right??

That being said, now it is your turn to try one of their fabulous stencils, FOR FREE! Here is how you can do it:

1) Head on over to Cutting Edge Stencils and pick out two favorites.
2) Come back to LTC and leave a comment on this post letting me know you 2 favorites for one chance to win.
3) For a second entry, you can 'like' us on Facebook or Follow us on Twitter, then come back to comment, letting me know what you did!

Good luck! You'll have until next Wednesday to enter. Stop by for next Thursday's post to see who the lucky winner is!

THIS GIVEAWAY IS NOW CLOSED. PLEASE STOP BY TOMORROW FOR THE WINNING RESULTS!

Read more...

Thursday, September 16, 2010

Stenciled Accent Wall

After Erin debuted her craft-room wall stencil from Cutting Edge Stencils a few weeks ago, I couldn't help but get caught up in a stenciling frenzy. I decided that what my living room makeover really needed was an accent wall, and I found just the right stencil over at Cutting Edge. For my first stenciling project, I took on their Allover, Hourglass Stencil. I loved it! Please check out my step by step picture tutorial, and be sure to stop back by tomorrow as I review this awesome product and do a giveaway for your very own stencil from Cutting Edge.

Take a look at the before and after: Can you believe how 'blah' it looked before?


This project was quick and easy. It took us about 2 hours from set up to tear down. Here is how we did it:

1) Tape the stencil in place. After you level it once, it levels itself the rest of the way through!

2) Roll over the stencil with a great foam roller from Cutting Edge to acheive your desired darkness.

3) Use the built in leveling tools to do it all over again, until you've covered your wall!

4) Admire how quick and easy the project was.


I really do love how clean the lines came out. We chose a very geometric pattern, and it seems to give our living room just the boost it needed! We also used a semi gloss paint, and I love the way the light bounces off the accent at night. Even my husband is in love with this project, which means it is a real keeper!

I'll be linking to these parties this week, so be sure to stop by and join me.

Be sure to stop by tomorrow for a great Cutting Edge Stencil Giveaway, they are sure to have something perfect for your home too!

Read more...

Tuesday, September 14, 2010

Home Frame

I have been working on the area in our upstairs that we call "the loft". It is my craft and computer area and it has always been neglected. There are still several things that I want to do, but I am taking my time and enjoying the process. I wanted it to be fun, happy, and inspirational so I am throwing in several of my favorite colors such as green, orange, and of course there had to be some pink and here is where that comes in...


This frame was not being used and just sitting in the basement so it got brought back to life with a fresh coat of black spray paint first. I then took away the glass, added some pretty pink scrapbook paper (from my stash), a photo of our home with a white border, and a label (from the stash). I typed the word home in a typewriter font, cut it to size, and slipped it inside the label. It sits on my supply shelf and I LOVE it! It was super easy, cheap, and adds just the right "homey" touch to the loft.


Personal and simple, just the way I like it!

Happy Tuesday!

Read more...

Monday, September 13, 2010

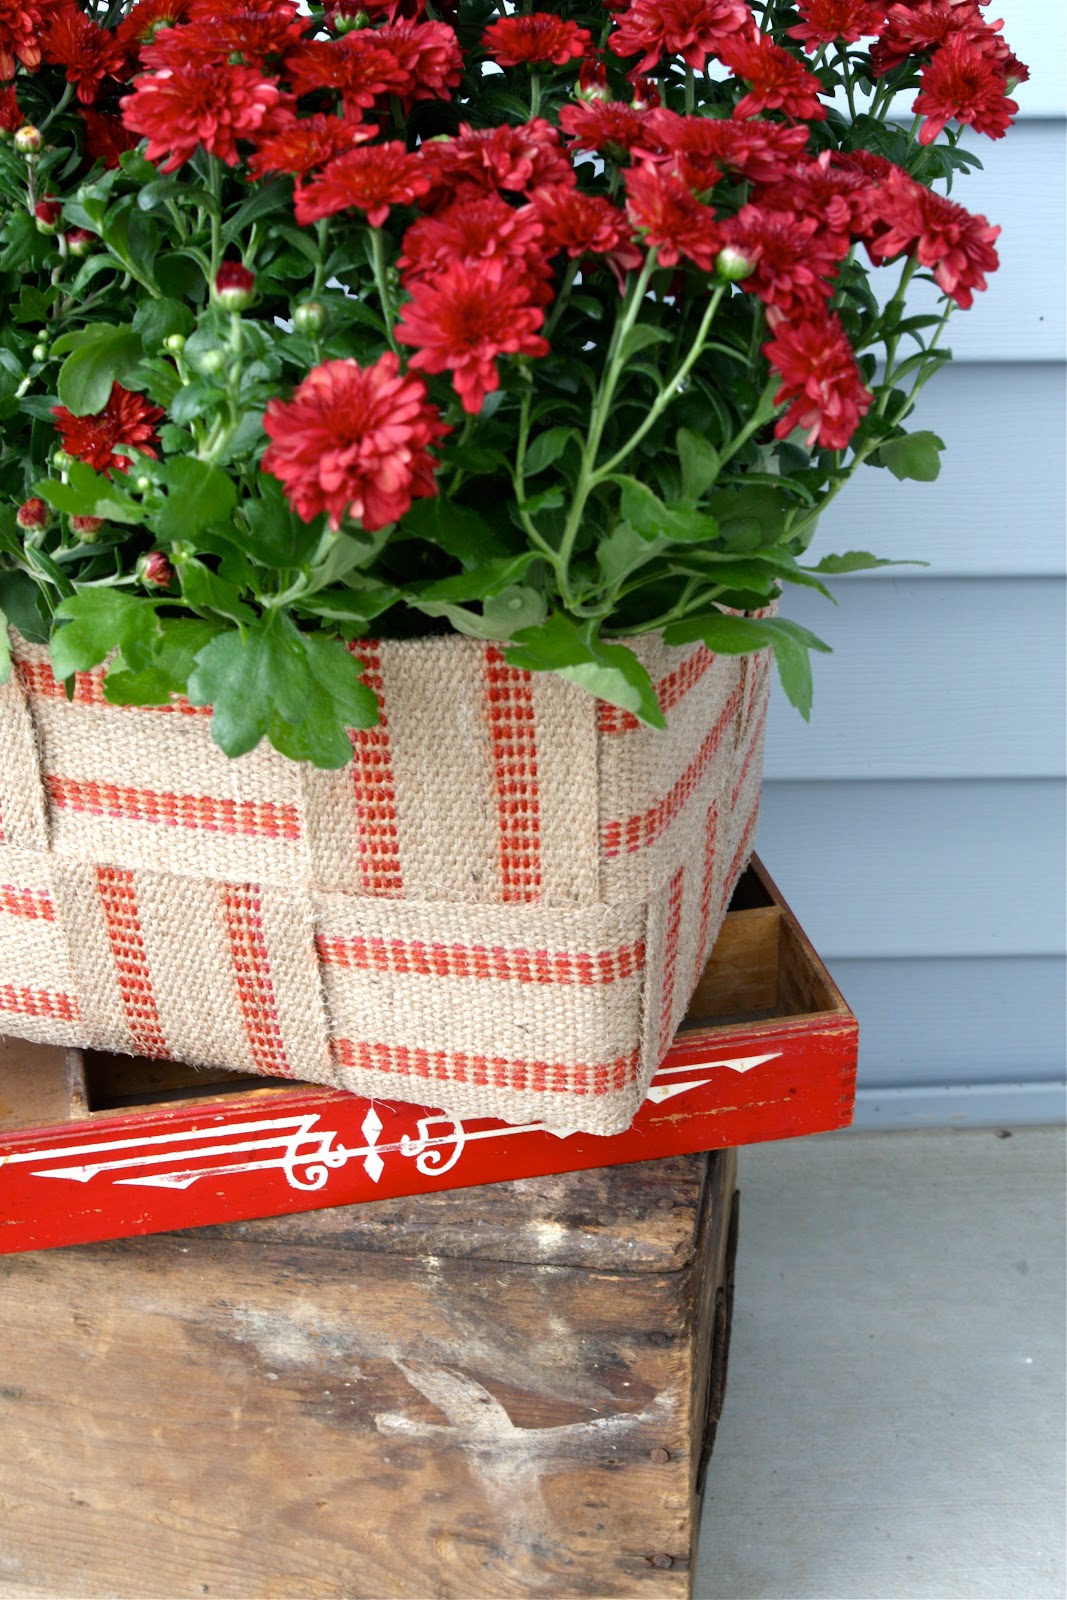
Jute Webbing to Fall Planter

I apologize to those of you who thought you might find more craft room projects today, as had I promised last week. But this idea popped into my mind at the beginning of the week and I couldn't restrain myself from trying it out. Then it ended up coming out so well that I couldn't help but share it a little earlier than later. Hope you don't mind too much!

IMG_6673.jpg

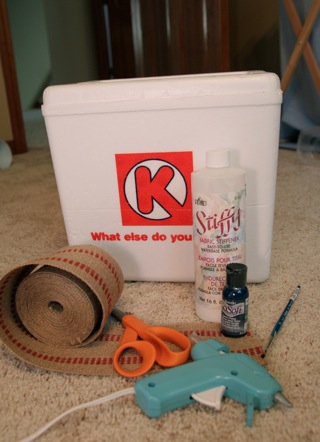
I saw this jute webbing in JoAnns a few weeks ago and just feel in love with the beautiful texture and the fun red thread running throughout. I bought a few yards, unsure of what I would use it for, but knowing that it would end up somewhere. I kept envisioning how cool it would look all intertwined, but just didn't know exactly what I would do with it. Then I remembered this old cooler. You probably have one lying around somewhere in your garage or basement, and if not, check your parents or grandparents' garage or basement-they're the types of things that always seem to be just lying around somewhere. Or buy one at your gas station, they're cheap.

IMG_6587.jpg

I ran lengths of the jute webbing down the sides of the cooler under the bottom and up the other side, keeping it slightly loose the whole time, and secured the ends with pins.

Picnik collage1.jpg

I made sure that the pins were pushed into the cooler at a downward angle as opposed to straight in. This kept them from pulling out as I wove the webbing.

IMG_6599.JPG

I then ran a length of webbing down the shorter side of the cooler, weaving it through the bottom pieces and then up the other side, again, securing with pins.

Picnik collage2.jpg

I took a length of webbing and wrapped it around the outside of the cooler, and trimmed it for length. I then pinned the end underneath one of the pieces of webbing that was running vertically down the cooler, and then weaved it under and over the other pieces until I had worked my way all the way around.

Picnik collage3.jpg

I trimmed the webbing so that both ends would be hidden under the same vertical piece of webbing and pinned them in place.

IMG_6630.JPG

Now that my basket was completely woven, I took the slack out of the lengths of webbing. I started with the vertical pieces, adding a second pin at the top for extra support, pulled each strand until it was taut, and then re-secured the end with pins.

IMG_6618.JPG

I then moved onto the pieces that were running horizontal on the cooler. I grabbed my glue gun, and glued the ends of the horizontal webbing to the vertical strand that they were hiding behind, pulling them taut and trimming as necessary. Now that my whole basket was assembled, I took my glue gun and ran a thin line of glue behind any pieces that were pocketing to get them to lie completely flat.

Picnik collage4.jpg

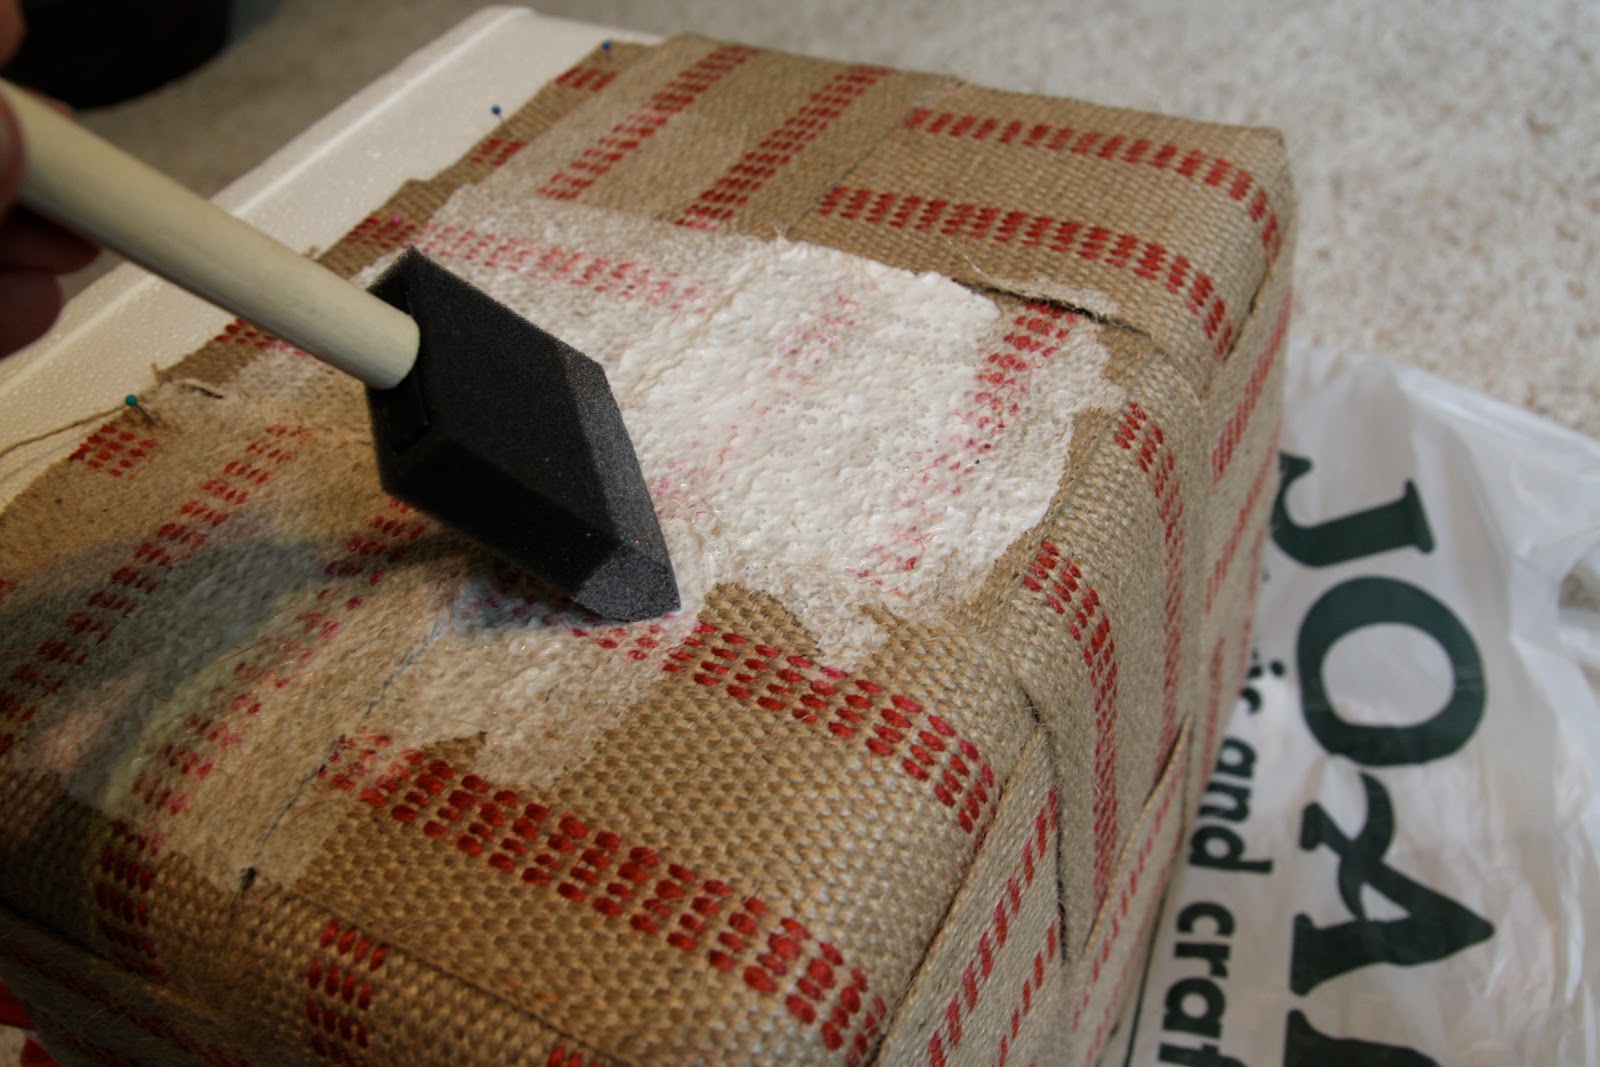
I then got my fabric stiffener and applied a thick layer with a sponge brush. I didn't worry about it soaking through to the bottom layer, I just focused on getting the top layer saturated. I left the top ends (where the pins were) without any stiffener, because I wanted to fold those down later. But everything else got a good dose. (The red dye from the red yarn ran a little bit, so I tried to apply the stiffener in the direction of the pattern, as to not spread red dye over top of the brown webbing.)

IMG_6635.JPG

When everything was dry I discovered that I couldn't pry the cooler out, so I decided to just break it off piece by piece. It was really secure in the bottom corners, and I was worried about warping the now stiffened jute webbing that I had worked so hard on! Luckily I won't miss that cooler.

Picnik collage6.jpg

I left the bottom piece intact, because I want to use the basket as a planter, and want to protect the bottom of the basket from any excess water that runs out of the plants.

IMG_6656.JPG

I layered up a fun red vignette and popped it onto my front porch. Hello fall!

IMG_6663.jpg

The size of the cooler, and therefore the basket, was perfect for 2 small mums, which were perfect for my front porch. But it's lightweight and fun enough to be used in the house as well.

IMG_6660.JPG

In retrospect, had I known that I was going to be throwing the cooler away at the end of this project, I probably would have just covered the entire thing in webbing, hot gluing it onto the cooler as I went, and then I wouldn't have needed any fabric stiffener. But the basket would be larger, and a bit bulkier too. Oh well, just a few more options for you I guess. :)

IMG_6684.jpg

I'll be linking this around to these great parties this week. Check them out for some beautiful fall inspiration.


Visit thecsiproject.com

And check back with us later this week for a great giveaway!

See you next Monday!!


E1025F317CFB5B8E9E5C526E5CC0F475 copy.png

Read more...
Related Posts with Thumbnails