Showing posts with label Costume. Show all posts

Monday, October 10, 2011

Baby Candy Corn Costume

Candycorn label


About a month ago I realized that, now that I have a little girl, I'm feeling the pressure to have a really cute little costume for her for Halloween. This is particularly true since it's her first Halloween, she's still pretty tiny, and obviously has no say in the matter so it is completely momma's pick.

I had planned to purchase Hannah's costume as to alleviate something from my to do list, but I wasn't overly inspired by my choices. So I decided to take a cue from my contributors (Have you seen Tiffany's Tiny Dancer, Patrice's Cupcake or Very Hungry Caterpillar costumes?), and make her something myself.

I had to look no further than my favorite Halloween treat.

173442412 AUAMHNy7 c

source

This was pretty darn easy, folks. It took me about 2 1/2 hours total, which included all ironing, measuring, cutting, and sewing. Unfortunately I didn't take pictures along the way because I was camera-less when I was making it. But it was easy and I'll walk you through.

I started off with a plain white onesie that fit my daughter, and one of her dresses to use as a guide for the costume. I decided that the skirt should be about 10" long so I pulled out my fabric.

Candycorn 6

Measure & Cut Fabric

I purchased a half yard of this orange fabric from JoAnns and decided to use some leftover yellow fabric from my stash.

I cut my orange fabric into a long rectangle, 24" x 8". I didn't have a long enough strip of yellow, so I just cut two 15" x 4" strips and stitched them together to make one long 30" x 4" strip.

Candycorn 5

Hem and Ruffle Yellow Trim

I folded the bottom of the yellow fabric over about 1/8", ironed it down, folded and ironed it a second time, and sewed it down to finish off the bottom hem of the skirt. Then I set my sewing machine to it's longest stitch, tightened the tension and sewed down the length of the fabric, ruffling it slightly.

Attach Yellow to Orange

I laid my yellow tier down next to my orange tier and adjusted the ruffling until they were the same length. Then I pinned the pieces together with the right sides in and sewed them together with a 1/2" inseam.

Candycorn 1

Ruffle Orange

Next I sewed a running stitch down the other side of the orange fabric, setting my tension as tight as it would go so that the orange fabric was very ruffled. I adjusted the ruffled fabric so that it was twice the length of my onesie, folded it in half with the right sides of the fabric facing in, and sewed the ends together.

Attach Skirt to Onesie

For the next part I followed the instructions for the 10 Minute Dress Tutorial. This is my second onesie dress using this method and I have still not managed to do it in anywhere close to 10 minutes, but I'm pretty sure it's a user-error. I still consider myself new to sewing, especially when it comes to sewing with knits. :) I took my time and that seemed to give me more control.

My only modification to this tutorial, is that I wanted the "skirt" part of my dress to start at the bust line instead of the waist line as they show. But once you have your "skirt" you can play around with it on the onesie and see what you'd prefer before you attach it.

Candycorn 2

You're Finished! or Embellish!

As soon as the skirt was attached I just loved this little dress. I squealed, waved it in front of my husband to admire, and texted a picture to my mom and sister. And the next day I embellished it a little. (Sometimes I just can't leave well enough alone!)
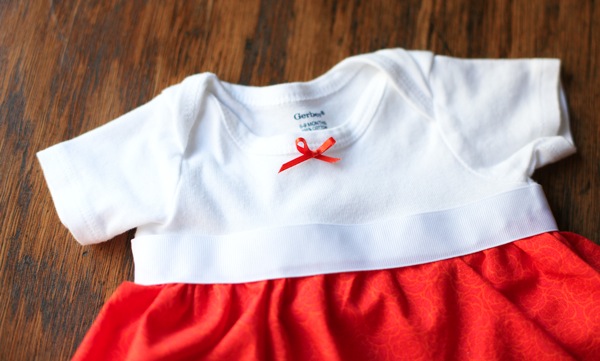
Candycorn 4

I thought the "onesie part" seemed a bit plain compared to the "skirt part." So I pulled out my Ultra Hold Heat N Bond and used it to attach a 1" grosgrain ribbon around the waist. I left the ends unattached in the back for a big floppy bow and hit the ends of the ribbon with a fabric no fray. I also made a tiny bow with orange ribbon and hand stitched it under the collar. Perfect.

Candycorn 7

I used the same yellow and white polka dotted fabric and this tutorial to make these bloomers for Hannah when I was about 6 months pregnant. I was so excited to discover that they still fit! So her costume is set.

Bloomers 1

Now I just need to make the perfect headband. :)

I'll be linking to some great parties this week, feel free to stop by to say hi!

E1025F317CFB5B8E9E5C526E5CC0F475 copy

Read more...

Wednesday, September 21, 2011

Very Hungry Caterpillar Costume

 I had so much fun making my daughter's No-sew Cup Cake Halloween costume last year that I knew I wanted to make my kids costumes again this year. (And I couldn't have been more excited that this year I got to make 2 costumes for my kid(s) plural! :) When it came to the baby's costume, I knew I wanted something super easy to wear and not fussy at all. Well, awhile back I pinned the perfect option! A Very Hungry Caterpillar, as inspired by Sweet Love Creates, found here. Can you find the "pin-spiration?"

Here was the visual I was working with...
While their set is absolutely perfect, it did not fit my budget for costumes, which I have decided should always stay under $20.00. So, I decided to put my crocheting skills to good use and make my own. It is nowhere near as perfect as theirs, but it should do just fine!
I started by picking out some of my favorite soft yarn from a local fabric store. I chose a heavier blend that I knew would keep the baby warm if Halloween turned into a cooler night.  The turquoise was the closest thing I could find to book image with some color variation. All of the greens were just too solid or too thin of a yarn to give me just what I want. I guess the turquoise is just my creative licensing at work!
Since the baby won't be more than a month old on the occasion, I decided to stick with making just a little hat and sack to put the baby in. The sack is nice and tight, like a swaddling blanket, so hopefully the baby will be nice and cozy! I like how the turquoise yarn created its own color bands around the sack. I didn't have to do a thing to make that happen, and it was fabulous.
I wish I could give a state of the art tutorial on how to crochet, but I am just not that adept with my crocheting skills! You can find all of the basics of the stitch here, a simple tutorial I used to refresh some of my skills too. To make the sack and the hat, I followed similar steps to the ones found in this tutorial as well. To make the sack, just make a really long hat!
I'll confess that for the eyes, I just made a long first crochet stitch and hot-glued it into a circle, lime green on the inside and yellow on the outside. For the nose and antennae, I just crocheted a couple of lines and pulled the stitch through the hat to secure them into place.
We were very pleased with the result. I finished the costume in all of two evenings at home, probably under 5 hours all together. The baby will be able to wear his own comfy clothes and we can just wrap him up in his little sack like a warm blanket! The hat will be sure to keep him warm on a cold night too! Now, I just hope when he comes he is standard infant size so it will fit just right. Fingers crossed!

What costumes are you working on this fall? I'd love to see what you have in mind!
Happy Wednesday!

Read more...

Tuesday, October 19, 2010

Tiny Dancer Costume

Big sis is re-using her ballet recital costume for Halloween this year. I thought it would be fun to create a ballet outfit for little sis. First on the list was a tutu. Can't be a ballerina without a tutu, right?

I purchased 1/2 yard of pink tulle, which was much more than I actually needed but left me plenty in case of error. I gathered some pink silky ribbon from my stash, pink thread, pins, a needle, scissors, and my sewing machine and got to work.


I envisioned a simple dainty pink tutu that would not scratch her and would not get in the way for someone to hold her since she is only 2 months old. We'll save the big frilly tutus for later.

I began by measuring one of my baby girl's skirts since she was asleep so I could get an idea of how big to make the waist of the tutu. I went with 15 inches and added 8 more inches for gathering so I cut my tulle to be 23 inches wide.


Next I folded my piece of tulle in half and decided I wanted the tutu 6 inches long so I made that cut.


Next up was the ribbon. I knew there had to plenty of length on each end for tying a bow so I just went 3x the waist size. The waist size was 15 so I cut the ribbon to be 45 inches long.


I lengthened the straight stitch on my machine.


And then I sewed the open ends of my doubled up tulle together. Then I pulled on one side of the thread at one end to gather the tulle together. When it was gathered enough to be 15 inches long, I double knotted each end to keep it in place.


I laid the piece of tulle down on the ribbon measuring to make sure it was the size I needed (15 inches) to fit my baby's waistline.


I then folded the ribbon in half and pinned it over the sewn part of my tulle.


I then sewed at the bottom of the ribbon to attach it to the tulle.


I took my pins out and tied a bow to my liking and cut the ends of the ribbon to be the same length. And there I had a mini tutu.


Now the little ballerina needed a shirt to go with her tutu. I used a plain white onesie from her wardrobe and decided to give it a little flair. I picked some white w/ pink dot material. I wrote "B is for Ballerina" on the computer in pink and printed it off as a mirror image onto iron-on transfer paper. I ironed it on a piece of material and then cut it to the size I needed. I then turned the dial on my machine to zig-zag and sewed the material right onto the onesie.

I actually meant for the material to be straight on the onesie. However, onesies are stretchy and hard to sew on. I did not use anything except a few pins to secure the material to the onesie so it moved on me and came out crooked. I was sad at first but then realized that it added character and looked like a stamp/patch. So, I'll just pretend I planned it that way.

Lesson learned. If you do want things straight when sewing on onesies, I would definitely recommend using heat & bond or something to attach your material first!


Now my tiny dancer costume was coming together.


But it definitely needed something else. I had pink felt and elastic on hand, so I thought a headband would be a great finishing touch.

First, I cut some random flower-like shapes out of my felt in 4 different sizes. Then I cut a long and skinny rounded rectangle. I rolled the rectangle up and put in the middle of the flower. I then threaded my needle and sewed the flower pieces together underneath so you didn't see any stitching. I then cut my elastic to the size I needed for baby's head leaving some extra on each end. I overlapped the ends and sewed the elastic together.

Then I sewed the flower over the sewn ends of the elastic. I didn't use any kind of systematic approach to the sewing, just some random stitches making sure the flower was secure to the elastic.

The final step was to cut some ribbon and glue it over the stitching on the under side of the flower. This hides the stitching and makes it comfy for baby's head.


Baby girl wasn't as excited as I was when I tried her costume on. I added bloomers to cover the snaps on the onesie. I also put tights on her little legs and cut 2 pieces of pink ribbon the size I needed to wrap around and tie on each leg to look like ballet slippers.


So for under $5, my baby girl gets to be a tiny dancer for Halloween! (even if I am the only one who really cares) : ) Now if I could only get my little boy's costume together, we will be all set!

Thanks for stopping by Lemon Tree Creations! I'll be linking this costume to these parties this week!

Happy Tuesday!

Read more...

Thursday, September 23, 2010

No-Sew Cupcake Costume, and a WINNER!

I am pretty excited about this project. I fell in love with this Pottery Barn Kids Cupcake Costume a couple of months ago, but my little bean was too small for it. Also, it was priced right around $60, which was just more than my costume budget could handle. So, I decided to give it a go myself. I didn't sew even an inch of it, and I am pretty happy with the results!

All you will need are these simple materials:
1) 1 yard of pink fleece
2) 1/2 yard brown felt
3) 6-8 pieces of small felt sheets (red, white, brown)
4) ruffled edging
5) scissors
6) hot glue
7) ribbon
= $18.67
The first thing I did was pull some of my daughter's clothes from her closet to get an idea of sizing. I cut the neck outline using the outline of one of her shirts.
Next, I scalloped the edges of the neck piece and added red, brown and white polka dots (with hot glue of course!)
Then I hot-glued the ruffled edging onto the neckline, in a double layer to create the 'topping.'
After I added the ruffle edging, I realized it would be harder to stretch the top layer off and on my daughter's neck. So, I cut a straight seam down the back, and hot glued simple thin ribbon to create a tie.

I made a second neck layer, slightly wider, following the exact same steps. However, I did not glue any ruffled edging on the bottom layer, so I didn't need to create a seam or tie.

The next step was to create the skirt, or 'cupcake and wrapper.' For this piece, I pulled out one of Lola's dresses to figure out a good width and length. I then cut a piece of the brown felt to size, and hot glued the edges together to create a skirt.
I don't have very many pictures of the process, but I cut 7 inch light brown felt strips to glue onto the skirt. These created the wrapper. I glued them on, side by side, in sort of a picket fence pattern.

To finish the skirt, I added a pink trim to the bottom to make it look a little more finished, and added ruffled straps to make it a jumper that Lola could wear, under the two neck pieces. (All pieces were attached with hot glue, of course!)

For the finishing touch, or 'cherry on top' if you will, was a cherry headband. I am still looking for the perfect 'stem,' so if you have any ideas, let me know! For the part I do have, I created a stuffed red felt ball (sealed with hot glue), and wrapped a double ruffle layer around the outside. I then hot glued both pieces to a thick brown headband we already had.

And, wait for it, wait for it...

TA DA!

Our little cherry cupcake. Isn't she a sweetie? I am a little worried that maybe the 'cupcake' part is a little much for the wrapper, but hey, who doesn't like a little extra frosting right? I might be trimming this part down if the perfectionist in me gets a little too loud.

It was hard to get a good picture of the little cupcake, because she was way too busy. But I wanted you to see the little costume in action, so I hope you enjoy what I did manage to capture.


I'll be linking to these parties this week. Hope you will come and link up with us!

NOW, ONTO other news... The Cutting Edge Stencil Giveaway...

And the winner is...
True Random Number Generator 1 140 17 :
Powered by RANDOM.ORG

Jade Cook September 17, 2010 8:07 AM

"LOVE the Diamond Damask & Hourglass Allover. I need something like this for our Master bedroom! This would be perfect!!!!"


Congratulations Jade! Please send me your email address so I can get you in touch with the great people of Cutting Edge Stencils.

Happy Thursday!

Read more...
Related Posts with Thumbnails