Tuesday, August 31, 2010

White Box Transformation

My sister, Beth found this box for me at a garage sale. She could see it's potential and thought I would love this little white box. She was right. It didn't take me long to figure out exactly what I was going to do with it...


I just used pliers to take out the handle and then the little nails were popped out on both sides so the stars and snowflakes could come off. I liked it white so there was no painting involved in this little project. I just purchased some Scrabble letters for $2 on Etsy and super-glued the word DREAM to the box.


It now sits on the bookshelf in my computer/craft/blog spot and I love it! It holds blank note cards and envelopes. Never underestimate the power of a wooden box, right? Merrily, Merrily, Merrily, Merrily, life is but a dream.

Happy Tuesday!

Read more...

Monday, August 30, 2010

Drab to Darling Desk Re-Do

I have mentioned before that I have some pretty incredible thrift stores in my town. I know that it is only by sheer luck that I come across these treasures, and feel it is a duty of mine to bring them straight home, and gussy them up so that they'll reach their full potential. Such was the case with this darling little desk. I have already bought my son a desk (a really incredible old desk, but I'll get to that in a minute,) but this one is one of those super tiny ones, smaller than a kindergardener would use, and perfect for my 2 year old son right now. For only $3 I snatched it right up.

IMG_6249.JPG

First things first, I gave it a really good scrub with a bristled brush and some steel wool. It had a lot of funky cobwebs and rust all over the bottom, and since this is for my son, I wanted those to be good and gone.

The top of the desk was a plastic laminate material that wasn't winning any beauty awards, so I decided to cover it up completely and made the top into a chalk board. I coated the whole top and edges in chalk board paint. I then seasoned the chalk board by rubbing a piece of chalk sideways over the whole top. This ensures that once we start writing words, letters or anything else on top, the lines won't be permanently etched into the paint.

IMG_6252.JPG

My son came out in the middle of this part and assisted in dusting off the chalk. I could barely keep him away the desk, he loved it already!

IMG_6255.JPG

Next step, paint the body of the desk. Something with this many little crevices called for spray paint, and I went with Rustoleum since it has such a high level of protection and stops any more rust from forming.

IMG_6270.jpg

I made sure to tape the desk well, all around the edges of the wood and the metal details. I then started spraying!

IMG_6271.jpg

I did 2 - 3 light coats of paint leaving 10-15 minutes drying time in between coats, then I flipped the desk over to do the bottom and the inside.

IMG_6272.JPG

Looking better already!!

IMG_6280.JPG

I sanded all of the grime off of the wooden seat and back until I was down to the wood. I then tried out this Americana gel stain in Oak.

IMG_6293.JPG

I really wanted to try this stain because it is water-based, and I really hate the fumes of oil based wood stain and the paint thinner that I then have to use to clean my brushes. I also don't ever know what to do with the thinner afterwards, so this let me avoid both of those situations.

IMG_6295.jpg

You'll need to use a different technique than with a oil based stain, where you would paint it on, let it soak in, and then wipe off the excess. For this water based stain, you paint it on a bit at a time, and then wipe over it with a damp cloth to help blend the color until it's as light or dark as you want. It took a few applications to get it just how I wanted, but once I was finished I really loved the warm oak.

IMG_6299.JPG

It needed a little something extra, so I went for a 3. If people ask me, "Why a 3?" I will say, "Oh, because Jayce is the 3rd member of our family!" or something like that. The real reason is, I wanted to put some sort of detail there, and this 3 was the best option in my craft room at the time. Sometimes my details are sentimental, and sometimes they are just completely random!

IMG_6306.JPG

I sealed the wood with a coat of satin polyurethane and I was done!!

IMG_6310.JPG

So?! Better, right?!

IMG_6359.jpg

My son just loves it! Actually, while I was in the backyard cleaning it and it's successor, the neighbors' kids came over and all 3 were fighting over writing on it.

IMG_6329.jpg

And here it is next to the bigger, up next for a re-furb desk. Isn't it tiny? And isn't the big one great?! It has a wooded desktop and a big hollow compartment inside for storage. I feel a responsibility to do this big one just right since it's such a great find, so I'll welcome your suggestions. But for now, we're loving the 2 year old chalkboard version.

IMG_6379.JPG

I'll be linking this up to these great link parties this week. See you next Monday!


DIY Club


E1025F317CFB5B8E9E5C526E5CC0F475.png

Read more...

Friday, August 27, 2010

The Croc Clock

These boots are made for....so many things I say.

I was wondering aimlessly in the thrift stores, as I often do when I found these cute boys Crocs for $3.00. I grabbed them and figured I could do something with them or give them to someone.

Well, they ended up lying around my house collecting dust as most things do until now. My $3.00 became a very handy boot. The clock-boot, the vase-boot, the clock-vase-boot...I think I'm kin to Dr. Seuss with the crazy words I'm making up. Anyway, bear with me on this craft adventure.


All you need is a rain boot, a clock movement kit, some spray paint and some fresh flowers.

First, spray paint the boot to the color of your liking. I used the Krylon spray paint. I'm lovin' the pink..it's so vibrant.


Next, use an exact-o knife to cut a hole in the boot wherever you would like to put your clock. I will be using my boot for a flower vase so the clock will be inserted close to the top so I can add water later!


Put the clock together as the package instructs you to do so. Push it through the hole that you created and add the minute, hour, and second hand. Lastly, add the battery and set the time.


If you are concerned about adding the water to the boot you could consider using an insulator inside the boot (i.e. plastic baggie to hold the water, slim glass container to place the flowers inside and then inside the boot as well.) I live on the edge a little and will try this out for a while so I encourage you to do whatever is comfortable for you. I'm curious to see just how long the battery and the moisture will last.


I placed my boot vase/clock next to my vintage foot measurer I already had, I thought why not. FYI..size 13 little boys shoe. hehe..


This is also a great piece mostly likely going in my classroom, something for a mudroom, a dinner center piece, or if you choose not to use it with the clock and just use it for a vase, it looks great in landscaping, sitting on the patio or in a window seal. Moose loves looking at it!

Hope you enjoy this silly conglomeration of randomness. Thanks for stopping by. I'd love to see what you'd come up with. Link it up to Flickr.

Linking up to these parties as well! Have a great weekend.

Read more...

Thursday, August 26, 2010

A Pair of Pears

A few weeks ago, when posting about my living room redo here, I got many questions about these pears...


Commenters were very flattering when they asked me how I had made them, when in fact I purchased them for an outrageous 5 dollars each (Yikes!). So, I set out to recreate what seemed to be a hit in my living room. Here is the result...


Much of this process will require some ad libbing on your part, but here is the general idea of what I did to create my living room pears.

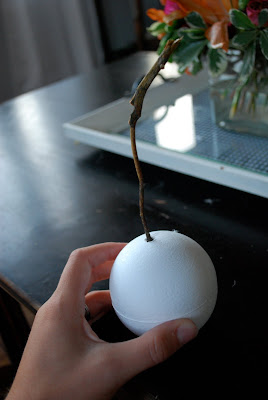
1)Collected my materials: Purchased long, cheap grass reeds at a local craft store (a whopping $1.59 for more than 20!), used styrofoam balls I already had, picked a dead branch of my small magnolia tree, and gathered my hot glue gun and sticks.


2)Hot glued the branch into a hole on my styrofoam ball.


3)Wrapped and glued some pillow stuffing onto the ball and stick, trying to create an ideal shape or outline. (This is probably somewhat unecessary, but it made me feel as though I was wrapping around something?)


4) Hot glued the reeds, which I split in hald to make thinner, onthe the styrofoam ball and began wrapping them up and around the stick like crazy.


5) Continued wrapping and gluing reeds until we acheived full coverage.


And VOILA! We had a pear. The tricky part was getting the pear to stand up. The ones I purchased clearly had some built in weighting system. In the end I manuvered the reeds on the bottom to creat a flat, even surface on which they could stand.


I am very happy with the final product, even if it isn't quite as neat and tight at the original ones I purchased. And I am even happier to have found their current resting place, my new living room bookshelf!


Be honest and let me know what you think! You certainly have the option of painting them to acheive the nice green color the purchased ones had. I opted out because I like the mixture of that natural look! Good luck, and don't forget to link to our flickr account if you try them out yourself. I am sure someone will out do my feeble attempts soon enough!

I'll be linking to these parties this week, Happy Thursday!

Read more...

Tuesday, August 24, 2010

Custom Bedskirt

Today's post is brought to you by Wendy of the Shabby Nest. Who doesn't love Wendy and her Shabby Nest? If you have never visited her, you should definitely make it a point to do so. She has loads of fabulous decorating ideas on a budget! She has been my inspiration for so many things in my home.


Do you want a custom bedskirt, but you don't want to pay custom $$$$? If so, you've come to the right place.


I want my bedding to be easy on my pocketbook, but I want it to look custom. We have been using a fitted sheet to cover our box springs...this is a great option if you want a more clean, contemporary look. But I am going for a more romantic, luxurious look. So I wanted a bedskirt. Because I am aiming for a neutral palette in my bedroom, I wanted to bring in texture. All of the neutral-colored bedskirts I found in the stores were...how shall I put it?...BORING! And the catalogs were a little too pricey for my budget. What's a girl to do?

I went and found some flax-colored linen fabric that I love and made a no-sew bedskirt.

If you want to make your own custom bedskirt, this is what you'll need:

  • Approximately 4 yards of fabric

  • Scissors

  • 2 - 1"x2" wooden boards cut to the length of the bed (approximately 72")

  • 1 - 1"x2" wooden board cut to the width of the bed (I have a king-size bed, mine is cut to approximately 66")

  • measuring tape and pencil

  • staple gun and staples

  • hot glue gun or fabritac

1. Cut the entire length of fabric down the center. Standard fabric widths are between 48" and 56" this will create a drape of 24" to 28" which is perfect for most beds. (Please ignore the ratty carpet in these photos...it is on the list of things to replace.)


2. Take the first board and using a measuring tape, make marks every 8" - these marks will indicate where pleats will be spaced. (You can forego this step if you decide that you want a plain or flat bedskirt. I wanted mine to have a little fulness - but not too much - so I chose to space the pleats 8" apart. You can make them closer or farther apart depending on your personal taste.)


3. Starting at one end, fold the fabric in about 1" and tac the edge to itself using either a glue gun....or if you are glue-gun-challenged like me, you can use fabritac. Same effect no heat. This will create a finished edge.

4. Line the fabric up with the top of the board and staple it.


5. At the next mark, fold the fabric over about 1" to create a pleat. Staple the pleat.

6. Repeat at each remaining mark.


7. I used two rows of staples to make sure the pleats were secure.

8. Once you reach the end of the wood, cut the fabric leaving enough to fold in 1" . Fold...secure edge with glue to create a "hem"...then staple. Fold the bottom up and glue in a hem. I loved the look of the frayed selvedge on my linen (part of that whole texture idea), so I opted not to hem it, but if I decide that the bedskirt starts to look more shabby than chic, I can always glue/hem it later on. (That's the beauty of no-sew!)

9. Repeat process for two remaining boards.

10. Take each board and simply tuck it between the mattress and box springs. That's it!! A custom bedskirt!

This whole project took me less than 1/2 hour and cost me only $20 for the fabric on sale. (I already had the wood - but if you have to purchase wood, it isn't very expensive) Not bad!

Have a lovely Tuesday~

Wendy

Read more...

Monday, August 23, 2010

Prettier Watering Can

IMG_5881.jpg

Ever since I saw this picture in Better Homes & Gardens, I have been on the lookout for a cute little watering can to re-do. I figured that with fall season rapidly approaching, some stores would have their gardening items on sale and I might get a good deal. Luckily, I was right.


happycan.jpg

I found this cute little thing at Joanns last week for 70% off and I snatched it right up.

IMG_5810.JPG

I immediately removed the little springy sunflower, and then got out my spray paint. I went with Krylon's Catalina Mist, and 3 light coats seemed to do the trick.

IMG_5843.JPG

The paper that I was using to cover the can was kind of thick and I knew that it would be more difficult to manage covered in Mod Podge, so I needed my paper to be cut pretty precisely to the shape of the can.  I didn't want to waste any scrapbook paper, so I used a Dollar Store flier to cut out a "pattern" for each half of the can. This actually worked perfectly, because the paper was so thin that I just lined it up against the can, ran my fingernail along the edge, and it trimmed the paper right off. I then cut out my scrapbook paper using the pattern as a guide, lined up the scrapbook paper on the can and made a few little adjustments so that it would fit perfectly.

Picnik collage1.jpg

I used just 2 pieces of scrapbook paper to cover the can. They each started at the handle of the watering can and ended at the spout.

IMG_5840.JPG

I painted a thin coat of Mod Podge on the side of the can, a thin coat on the underside of the scrapbook paper, and then smoothed it onto the can. I went over the paper with a little scraping tool, smoothing out the bubbles and tucking the edges of the paper up under the rim.

Picnik collage2.jpg


The spout was a little bit tricky. I made sure that the first section of scrapbook paper extended about an inch past the spout, and the second section of scrapbook paper stopped just above the middle of the spout. This little bit of overlap ensured that there were no gaps around the spout, and the seams were symmetrical on both sides of the watering can. (Sorry, I'm one of those people that cares about things like that! :)

Picnik collage3.jpg

Now you can relax a little bit, because the hard part is over.

IMG_5847.jpg

If you can't leave well enough alone want a little bit more detail, you could also cut a thin strip to put down the middle of the handles as well.

IMG_5882.jpg

Once the paper was dry I covered it with 2 more light coats of Mod Podge to seal it. I only had the matte finish of Mod Podge, so I put a light coat of satin polyurethane on the whole watering can so that the paper and spray paint would have matching shiny finishes.

IMG_5879.JPG

Well, what do you think? Pretty, huh? And a whole lot cheaper than BH&G's $65 version.

IMG_5878.jpg

I love this little watering can and am excited that it has made it's way into my Etsy shop! Check it out here if you're interested, or make yourself a customized version!

PS-Did you see that Lemon Tree Creations now has a Flickr account? If you have tried one of our tutorials, we'd love to see your finished product!!! Upload your photos here, at Lemon Tree Creations: Tutorials I Tried.

As always, I'll be sharing this project at these really fun link parties. Check out what everyone has been up to!

See you next week!


Visit thecsiproject.com


E1025F317CFB5B8E9E5C526E5CC0F475.png


Read more...
Related Posts with Thumbnails