I had the opportunity to guest post on Infarrantly Creative last week! I was honored and had fun visiting another blog for a day! Thanks again, Beckie.
I wanted to share this project with you all today because my baby is actually 1 year old today! Unbelievable. I am totally in denial. She is my last baby so I am not taking it well. Instead of focusing on this unavoidable fact of life, I keep myself busy with party preparations and we are all happy!
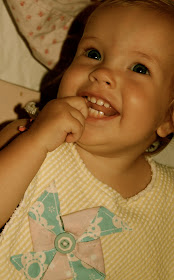
The bib is a big deal for that first birthday. It had to be special and handmade by Momma. With pinwheels as the chosen theme, I created the pinwheel bib...
I began by using a store-bought bib to make a cardstock pattern. I simply traced the bib onto cardstock and then cut it out.
I chose yellow and white seersucker as the fabric for the main part of the bib. I pinned my paper pattern to the fabric and cut it out.
I had a barely used hand towel at the bottom of our linen closet that could be used for the backing. It was freshly washed and just waiting to be made into a bib.
I pinned my paper pattern onto the towel and cut out another bib shape for the back.
Next, I made a square pattern out of paper about 3 1/4 x 3 1/4 size. I chose two other fabrics in party colors and cut out the squares.
I then laid the squares with wrong sides together. I made cuts about 2/3 of the way down diagonally at each corner.
The next step was to sew around all the edges in my square including the cut ones to hold the fabric pieces together.
Now it was time to sew the square onto the front bib fabric. I pinned it into place first.
I then sewed an X in the middle of the pinwheel to keep it securely on the bib.
My next step was to fold every other triangle down to the center. I pinned them in place one at a time sewing around the part of the triangle that was left lying on the bib.
When the triangles were unpinned, they remained loose and open. I then pinned them all into place and sewed a circle around the middle.
I sewed a button in the center to complete the pinwheel top.
I used a thin piece of ribbon to make the stick and sewed right down the middle of it.
I chose a coordinating ribbon to use as my closure for the bib. I pinned it into place before I began sewing the bib pieces together.
I kept the bib right side out and sewed around the edges. Raw edges were the look I was going for and especially since this is a one-time use special occasion kind of bib.
After the bib was all put together, I sewed a coordinating button on one end.
Now the bib could close and stay put on our birthday girl.
The completed bib just made me smile.
Now that my project is complete, I am lovin' the bib but still hatin' the fact that my baby is turning one.
I'll be partying here this week!
Happy Tuesday!


Your fabric pinwheel got my creative wheels turning (no pun intended, really!) in my slow brain this morning. Thanks for the tutorial and happy birthday to your little one!
ReplyDeleteTHAT is just DARLING! I love the chosen colors and the rough texture just adds to the whole package!
ReplyDeleteThat is so lovely. What a cutie!
ReplyDeleteI love it, Tiffany.
ReplyDeleteI've been making paper pinwheels and didn't even think about using fabric. You just blew my mind. Happy birthday to Mia! She is so precious.
A D O R A B L E.......this is so cute!
ReplyDeleteThat picture of Mia with the bib on looks JUST LIKE YOU when you were little. Wow! You seriously need to post your own baby picture next to hers some time.
ReplyDeleteVery cute. Does it wash well?
ReplyDeleteToo flippin' cute Tiffany! I love it. I would love for you to show this off at my Wickedly Crafty Saturdays! http://wiccanmakesometoo.blogspot.com/2011/07/wickedly-crafty-saturdays.html
ReplyDeleteI ADORE this bib!! I featured it on my blog today:
ReplyDeletehttp://www.oopseydaisyblog.com/2011/08/wednesdays-wowzers-wedding-photo-failure.html
Thanks for inspiring!!
~Alison