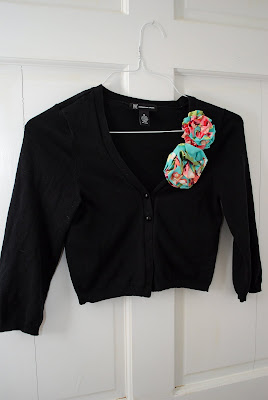
Now, I realize that by no means is this original. There are so many versions of fabric/ flower brooches out there and some MUCH cooler than mine. So, that in mind, this is DEFINITELY a tutorial for beginners like me. People who would love to figure out a quick and easy way to make a little statement piece.
Here is what you do:
1) Cut a piece of fabric at least 2.5 inches wide and 2 feet long. (The wider and longer the strip the fuller/ easier to work with the flower becomes.)
Here is what you do:
1) Cut a piece of fabric at least 2.5 inches wide and 2 feet long. (The wider and longer the strip the fuller/ easier to work with the flower becomes.)

2) Fold the strip in half, inside out and long ways and sew a simple, tight, straight stitch along the outside edge to create a tube.

3) Flip the tube right-side out. (The purpose of these steps before you get to the actual ruffling is to create a finished, thicker ruffle. I hate having edges fraying on a finished fabric project. This creates a smooth, fuller edge as opposed to a frayed, unfinished look.)

4) Next, you will sew the stitch that will be used to gather the ruffle. (After attempting at least 4 other ruffling techniques, this is still the most consistent method for me. It requires a little more time and patience than others, but if done properly it works and produces great results each time.)
To begin, set your top stitch width the highest your machine will go. (My machine goes up to 5.0, I believe some will go up to 6.5 which would be even easier.) I still use a simple straight stitch.
To begin, set your top stitch width the highest your machine will go. (My machine goes up to 5.0, I believe some will go up to 6.5 which would be even easier.) I still use a simple straight stitch.

5) Flatten your tubing out with the seam you created either directly in the center, or slightly off center. (Doing it different ways produces different looks. Centered gives you fuller edges, off center gives you and extra ridge and a little more texture/ visual interest. Also, off center can be easier to pull/ ruffle.)
Sew a wide, straight stitch down the middle of your tubing (no matter how you positioned your seam, make sure you are now stitching down the middle of your flattened tubing, to create equal edging on both sides.)
Sew a wide, straight stitch down the middle of your tubing (no matter how you positioned your seam, make sure you are now stitching down the middle of your flattened tubing, to create equal edging on both sides.)

7) At the other end, begin pulling one thread and cinching your tube slowly down the thread little bits at a time. (You will have to 'test' each thread to see which one pulls the easiest. This is how you know I am a beginner too! I have NO CLUE why one works better than the other, but I haven't found a consistent clue to hang my hat on yet.)
Remember, this will take time and patience. Your fabric should move pretty easily down the thread, but if you put too much tension on your thread you will break it. In the beginning, I broke 1 out of every 3 I made and I thought I might go CRAZY! I have gotten much better since then.
Remember, this will take time and patience. Your fabric should move pretty easily down the thread, but if you put too much tension on your thread you will break it. In the beginning, I broke 1 out of every 3 I made and I thought I might go CRAZY! I have gotten much better since then.

(You will want to gather this ruffle as much as you can until it starts circling around.)
8) Now that the work is over, the fun part begins: Styling your flower. Basically, there is no formula to this. Just fold over one end of the ruffle and begin twisting, gathering and wrapping the ruffle around the center. As you go, either secure your gathers with hot glue or hand stitching. I have used both and prefer the overall look of the hand stitching, but the hot glue holds extremely well, depending on what you are using your brooch for.
10) Finally, attach an alligator clip with hot glue and another fabric circle.

Despite the other great options for fabric brooches/ flowers out there, I LOVE how full and finished these look!

Thanks for joining me for my first attempt at a Shut Up and Sew post. I can't wait to come back and share with you other things I've been making with my new machine!
I'll be linking these parties this week. See you there!
Happy Thursday and Happy St. Patty's Day too!
I'll be linking these parties this week. See you there!
Happy Thursday and Happy St. Patty's Day too!


Wow! That's a nice sewing machine! Plus, it looks like you are a professional seamstress in your pictures. Congrats!
ReplyDeleteMiranda
www.justdrinkacoke.blogspot.com
Very cute! I got a sewing machine for Christmas too and am just starting to use it.
ReplyDeleteLooks great! Just a tip...if you keep your tension high like that and then lengthen your stitch as long as it will go--like a basting stitch, it will gather for you as you stitch it. Then you can still adjust it as you need to, but there's not so much pulling on the threads. I used to ALWAYS break my threads too, but now that I do it this way, I don't. Thanks to blogland!
ReplyDeleteLOVE these. The fabrics you used are beautiful! Thanks. I must try these soon!
ReplyDelete