

Much of this process will require some ad libbing on your part, but here is the general idea of what I did to create my living room pears.
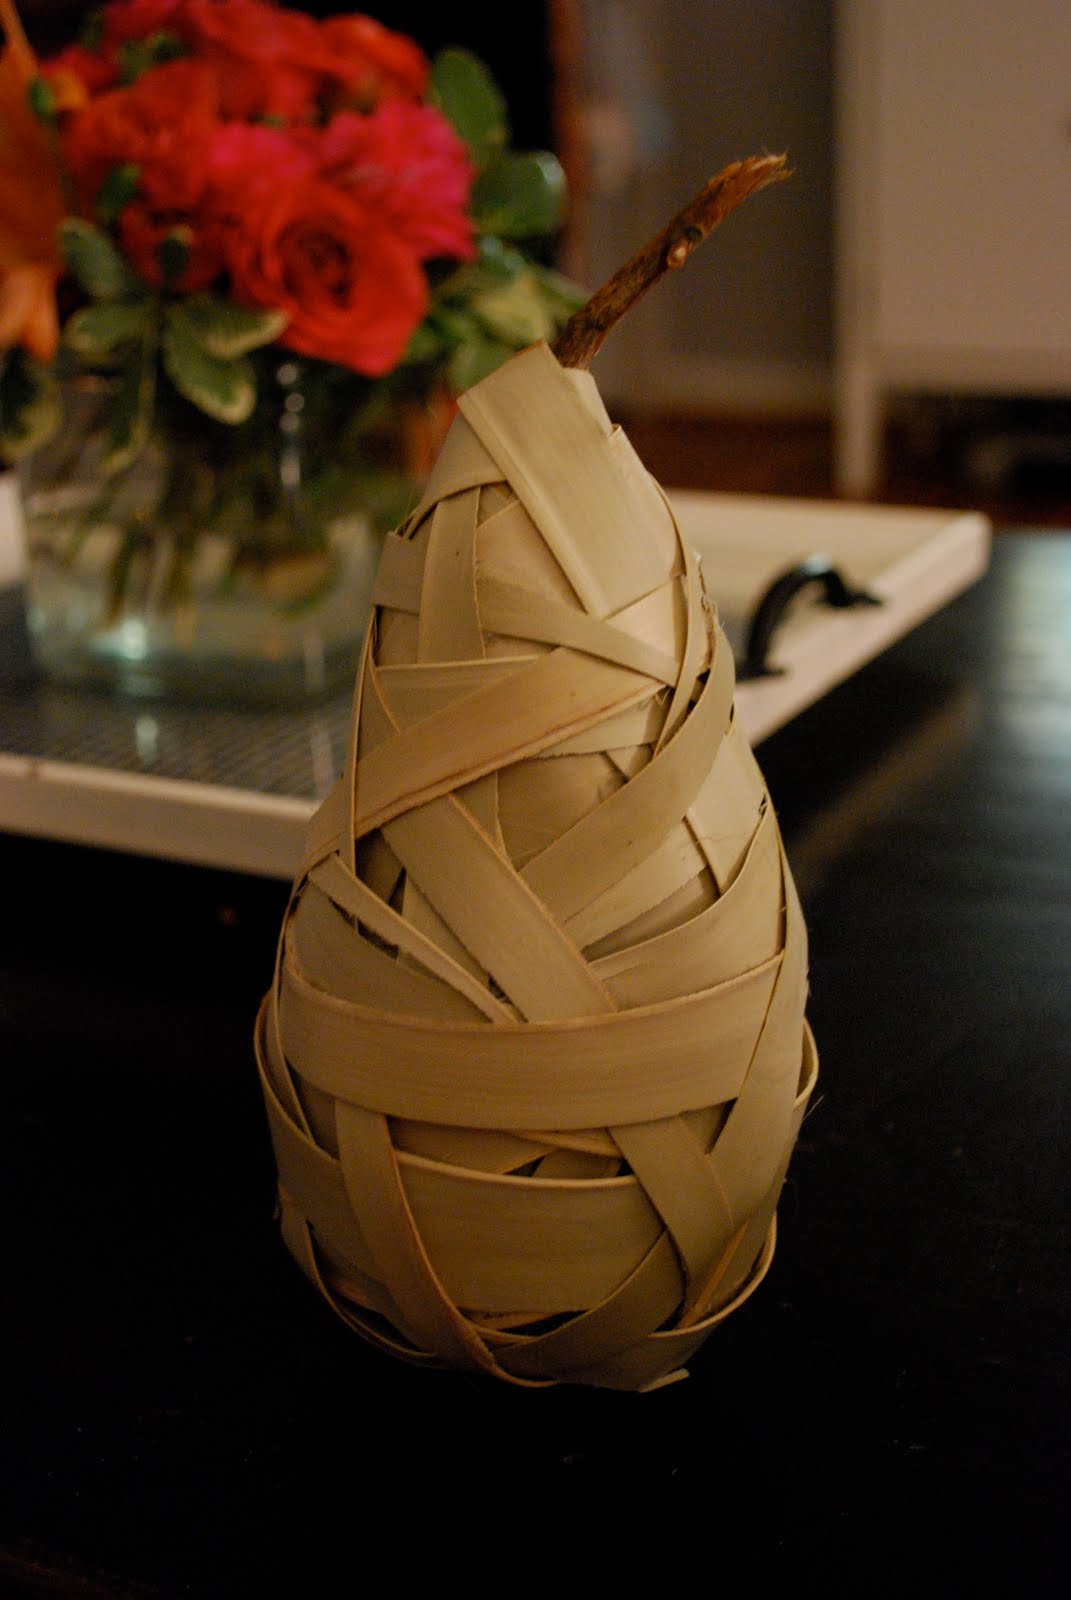
1)Collected my materials: Purchased long, cheap grass reeds at a local craft store (a whopping $1.59 for more than 20!), used styrofoam balls I already had, picked a dead branch of my small magnolia tree, and gathered my hot glue gun and sticks.
1)Collected my materials: Purchased long, cheap grass reeds at a local craft store (a whopping $1.59 for more than 20!), used styrofoam balls I already had, picked a dead branch of my small magnolia tree, and gathered my hot glue gun and sticks.

2)Hot glued the branch into a hole on my styrofoam ball.

3)Wrapped and glued some pillow stuffing onto the ball and stick, trying to create an ideal shape or outline. (This is probably somewhat unecessary, but it made me feel as though I was wrapping around something?)

4) Hot glued the reeds, which I split in hald to make thinner, onthe the styrofoam ball and began wrapping them up and around the stick like crazy.


5) Continued wrapping and gluing reeds until we acheived full coverage.

And VOILA! We had a pear. The tricky part was getting the pear to stand up. The ones I purchased clearly had some built in weighting system. In the end I manuvered the reeds on the bottom to creat a flat, even surface on which they could stand.

I am very happy with the final product, even if it isn't quite as neat and tight at the original ones I purchased. And I am even happier to have found their current resting place, my new living room bookshelf!


Be honest and let me know what you think! You certainly have the option of painting them to acheive the nice green color the purchased ones had. I opted out because I like the mixture of that natural look! Good luck, and don't forget to link to our flickr account if you try them out yourself. I am sure someone will out do my feeble attempts soon enough!
I'll be linking to these parties this week, Happy Thursday!

Genius! It is adorable. Now you got me thinking. I wonder if you could use bias tape? Maybe with fabric stiffener to keep the structure stable?
ReplyDeleteWonderful job.
So cute! I have to do this!
ReplyDeleteYou are so creative, you find a way to make anything! Since I am not that creative I think you should raffle them off ; )
ReplyDeleteWhat a cool project! I wonder if you could glue a couple magnets (the industrial flat disc type) to the bottom of that styrofoam ball for that flatness/weight?
ReplyDeleteHow cute! I'll have to make a couple of these - will be adorable for fall decorations! Thanks for the tutorial.
ReplyDeletePatrice, that is so awesome that you attempted and completely succeeded in recreating these adorable pears! Love your neutral version. So cute. I actually have a pear and an apple just like those in my house. I can't even remember where they came from? Was it Pier 1? Anyway, beautiful job!
ReplyDeletePatrice, I really love the natural color with the vibrant green one. I think this could be done with multiple colors. Thanks for recreating these!
ReplyDeletePS..that book case is awesome..your house is so cozy.
Y'all are craft rock stars! THis is a so cool. I love it! I am featuring this tonight at somedaycrafts.blogspot.com. Great job!
ReplyDeleteoh super cute!! You could totally make apples too and just paint the reeds red or green. I'll definatly be trying this! Thanks!!
ReplyDeleteThe good ideas keep coming! Wow. Thanks for sharing this. What a great idea. Found you via Transformation Thursday at the Shabby Chic Cottage. BUT I was already a follower (:
ReplyDeleteHow clever you are! Now I'm wondering if this could be done with raffia, or jute twine or even strips of book paper or old music sheets mod podged on? Hmmmm. Very interesting.
ReplyDeleteWOW! That's awesome... you rock girl!!! L-O-V-E the pears!!!! My husband will just be thrilled that I have found yet ANOTHER project I have to try!!!! (NOT!!!!) Keep up the good work!!!!
ReplyDeleteI just picked up two of those pairs for a steal at Savers (a local second hand store)! They are cute!
ReplyDeleteLOVE this!
ReplyDeleteParticularly awesome!
ReplyDeleteWhat a great easy craft! I have to save this one for a christmas craft for our mops group! Thanks!
ReplyDeleteWhat a great easy craft! I have to save this one for a christmas craft for our mops group! Thanks!
ReplyDeleteThese are so cute! What an interesting idea! Love it!
ReplyDeleteI love the mixture of the natural color with the vibrant green. I could also see it in that deep plum color of those pears I love so much (but I forgot their name!)
ReplyDeleteWow! That's awesome! I would have never figured that out :)
ReplyDeleteHi! Visiting from Tatertots and Jello. Those pears turned out great and look just as good as your store bought ones!
ReplyDeleteI really like those and they look easy to make.
ReplyDeleteWe have a new Friday link up party dedicated to blog giveaways. Please stop by. Plus we have a great kitchen or laundry backsplash giveaway of our own this week. Jane F.
I love the woven look - I wonder if the original reeds had been soaked in dye or something? Both look great :)
ReplyDeleteWhoa... that is so clever! What a fun and pretty idea. I would love to link to these if you didn't mind.
ReplyDeleteLooks great! Thanks for linking up to the Mad Skills party!
ReplyDeleteSo cute!! Great job and I'm so impressed that you just decided to recreate them and did such a great job
ReplyDelete