I realized just how appropriate this toy would be for her at this age when I noticed her infatuation with the mailman and the envelopes he brings. She loves to check our mailbox on the way in the door to see if any treasures are there. Once I thought of this idea, I decided I would put my novice sewing skills to work to make something we could enjoy for a long while to come.
(And I warn you, my skills are EMBARRASSINGLY novice when it comes to handstitching. Just remember when you look at the pictures that these are all handmade, by MY hand, and are a bit more filled with love than skill!)
First things first, I went crazy at a craft store buying more felt than I could possibly require for a lifetime of projects.
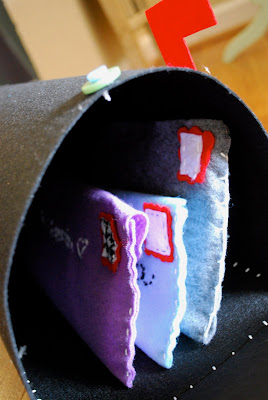
Then, I cut each color I wanted to use to an appropriate envelope size (which was completely eyeballed and never measured, oops!), stitched the sides, and sewed on velcro circles to fasten the envelope together.

Arguably my favorite part of each envelope is the little felt stamp I sewed to the fronts of each!

Next to create the actual mail I printed, that's right, PRINTED! each personalized message directly onto the felt. (Thanks Erin for your printing on fabric inspiration!)

The personalization of this project is really where I had the most fun. Each envelope is addressed to our daughter via a different knickname we all have fun her. The letters inside the envelope each match who is addressed on the outside. In addition, each letter is actually written by either her daddy or I, as something we hope she can someday read and hang onto for a long time to come.
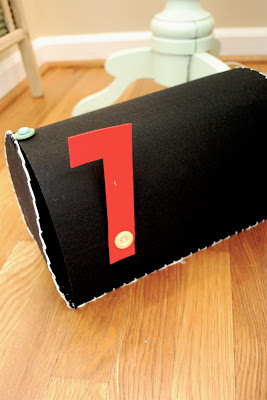
To construct the mailbox I used two stiff pieces of 11x14 black felt. I kept one piece its original size and used the other for the base and end pieces.

I used a button hole stitch to connect the large piece to the base, and continued the stitch to attach the end pieces as well. It went very quickly and created a tight and secure stitch at the same time. Plus, it give the mailbox a certain homemade feel.

To close the mailbox door, I sewed on a double layer of buttons to the top of the mailbox and used elastic string to fasten the door.

For the mailbox flag, I again sewed on a button and then simply cut a slit into the stiff red felt with an exacto knife. This way we have a functioning mailbox flag that my daughter can move up and down.
I would say that I certainly am a rookie with a needle and thread. It's not like I haven't been using them forever, just that I never worked much on perfecting my skill. That being said, the mailbox and mail was put to the final test and approval, and passed with flying colors.
In the end, I didn't really care how straight my stitches were once I saw my little one playing with her new toy. And she could certainly care less too!

While this toy came in cheap, costing less that $10.00 to create, it was a labor of love and something I hope we can enjoy while playing together for years to come. And, with the personal letters, we have a keepsake I plan to hold onto long after my daughter's desire to "play" with it had passed.
I'll being sharing my excitement over my recent sewing success at these great parties this week. I hope you'll stop by and celebrate with us!
Happy Thursday!


this is SOOOO beyond adorable!
ReplyDeletexoxo
bB
LOVE, LOVE, LOVE this, Patrice! Amazing toy for your sweet little girl! It turned out absolutely adorable and I love the personalized letters.
ReplyDeleteI am a sucker for those cute felt stamps in the corner too! So perfect.
I would be so proud of this project! : )
This is too cute. She will have these to cherish for a very long time. I love that you personalized the letters!
ReplyDeleteOoooo, it's SO cute! You did such a great job, it's adorable! And the letters are so sweet!!
ReplyDeleteWhat did you stitch with, yarn? It looks great? I love how chunky and fun it all is, the stamps and names outside are perfect!
Seriously, the cutest thing ever...makes me want to hit Hobby Lobby or JoAnn and choose my felt, even though I promised my husband no more purchases until I finished the plethora of projects I have already begun. I will be saving this project for a future date, a very soon, future date!
ReplyDeleteAbsolutely fabulous! You did an amazing job and it looks like a great toy to play with. I love it!
ReplyDeleteThis is just darling!! So cute!
ReplyDeleteWhat a sweet gift to your daughter... I can see these passed down through many generations... you did a great job on everything. Such a wonderful, creative idea.
ReplyDeleteI am sure the little one is thrilled with her Mommy's talents.
Hugs, Deb
I LOVE THIS! What an amazing idea :)
ReplyDeleteHow. stinkin. cute.
ReplyDeleteThe houndstooth adds a fun punch of print. And I did not know you could print on felt!
TOO CUTE!! This would be an adorable baby shower gift! I love your blog, so adorable! I'm a follower now! Stop by Sassy Sites and say hi! ;)
ReplyDeleteI love the medallions and also the damask pattern, so lovely.
ReplyDeleteGreat idea and so much fun. I love homemade toys.
ReplyDeletePatrice! This is beyond adorable. So stinkin' cute and I'm sure L is enjoying every minute of it! Genius idea.
ReplyDeleteLove it! Not only did the whole thing turn out super cute, but I love the pic of her with her whole face in the mailbox. Awesome.
ReplyDeletethis is absolutely beyond adorable! you all always have the BEST ideas!
ReplyDeleteI'd LOVE to know more about printing on felt!!
ReplyDeleteThat is the sweetest toy I've ever seen. She will LOVE reading that mail over and over as she gets older! I hope you'll stop by my First Pretty Packages Party and share some of your fabulous talent!
ReplyDeleteJust pick up a button for an easy reminder!
www.blackberryvine.blogspot.com
Smiles!!
I love your work, it's so beautiful. I was just surfing around getting ready to write my own post on felt food and came upon your great craft. What a great idea!
ReplyDeletewww.lifeisaparty.ca
thanks for the inspiration,
Dannyelle
i love these!! come on over and link up to MMM :)
ReplyDeleteThat are ADORABLE!!!!
ReplyDeleteThanks for linking up to the Mad Skills party!
ReplyDeleteThanks for linking up to the Mad Skills party!
ReplyDeletePatrice-LOVE this!!!! How clever and personal!!!
ReplyDeleteSo adorable!!! Love how you personalized the envelopes and wrote your baby girl such sweet notes to put in them. Very cute!
ReplyDeleteVisiting from Sugar Bee!
Kara @ mineforthemaking.com
What a great idea! I truly LOVE it!
ReplyDeletePS I'm now following you!
My son would love to play with this mailbox set! I featured you here! So clever!
ReplyDelete