Tuesday, August 23, 2011

My First Roadside Find

We were driving down the road a few weekends ago when my  husband said to me, "That looked like a cool desk" and then continued to drive down the road.  My response was something like, "what???  If it is a cool desk, then you better turn around!"  He did and thank goodness for mini vans because we manuevered a few things and had ourselves a new to us but old beauty of a desk.  


This is what it looked like at first.  I am a lover of old things and typically prefer to keep them "as is".  However, we were just not sure what kind of paint was on top of this desk and it was a MESS so we decided to strip and paint.  


It was going to be a computer desk for our loft area.  We had been wanting a desk exactly like this to open up the space.  I was beside myself with excitement because we had never been so lucky to find treasures on the side of the road before.

My husband was just as excited and got to work right away.  Here are most of the supplies he used on this re-do...


It was beautiful with the paint off and would have been great left just like that.  However, we were also looking to lighten and brighten up the space so we decided to paint it white.


We tried to spend as little money as possible on this re-do so we used the only white paint we had around.  It was simply plain white paint straight from a shelf that had been used on woodwork around our home.


I love the way it turned out.  My husband ended up doing all of the dirty work.  The drawer is my favorite part.  It is a very deep drawer so it can fit a ton of stuff and the handle is just perfect.


There is metal around the bottom of the legs that we left as is.  Love the look against the white and it gives the desk some character.


It is deeper than we probably would have liked but when you get something for free, you just can't complain.


It has some fun holes that give it character too.  My husband used the palm sander off and on along the edges to distress it a bit.


And here she is all prettied up in her new home.  It is amazing what it did for the area.  It feels bigger and brighter.  LOVE it.


Here's to hoping this is the first of many roadside treasures...

Happy Tuesday!

Read more...

Monday, August 22, 2011

Subway Art for the Nursery

Pin It


I wanted to show you one last project for my daughter's nursery before I show you the room as a whole, which I'll be doing next week. Here's a little peek.
Mygirl 1
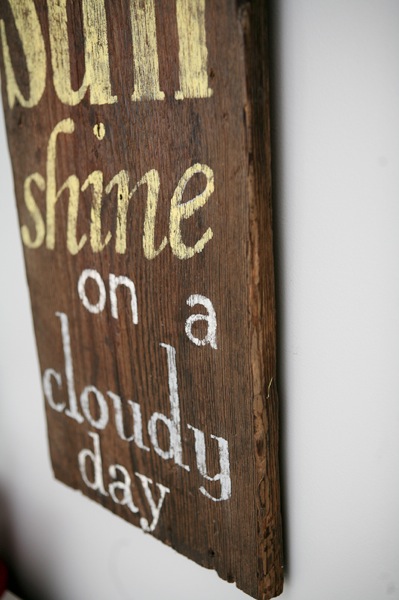
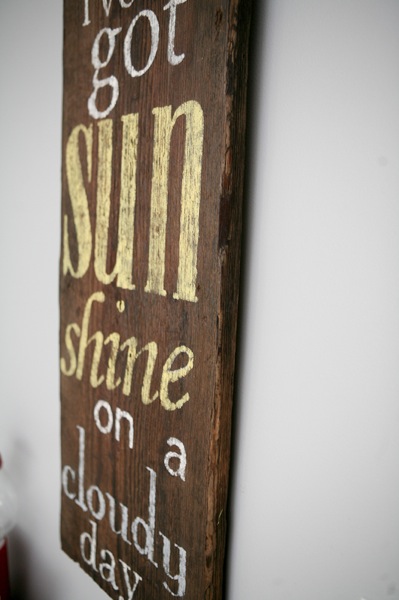
After the sonogram where I found out that I was having a girl, I found myself humming a little song by the Temptations quite often. Can guess which one it is? It became one of the main songs that I sang to my little bump as she grew, and I still sing it to her now. I knew I'd like a little piece of this to make it's way into her nursery, as it expresses how we all feel about her addition to our family and our lives. So this is what I came up with. Do you like it?! Want the details? Read on.
Mygirl 4
I started this project by rummaging through my small stash of wood, where I found a piece of old weathered barn wood that I thought would be perfect. I measured the width and length so that I could see roughly how large the letters needed to be and then turned to my Silhouette.
Screen shot 2011 07 03 at 1 12 27 PM
I browsed the wide selection of fonts available, tried a few of the lyrics in the different fonts until I found a few that I liked, and printed them in black and white on regular printer paper.
Ltc 2
I laid the words out on the wood, picked the fonts that I liked best, went back to the Silhouette and played around with the sizes a bit until everything fit just the way I wanted it to.
Ltc 3
I got some sturdy card stock and cut out each of the words using my Silhouette SD Cutter. I laid them out on the board just to make sure that I had everything exactly where I wanted it to be, and then took a picture that I could reference once I started my stenciling.
Ltc 4399x600
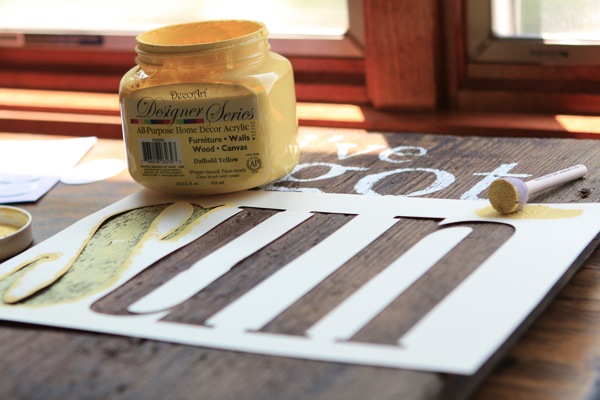
I pulled out my DecoArt paint in Daffodil Yellow and White, a few of the same colors that I used for the damask stencil on my nursery walls, in addition to Americana Paint in Grey Sky.
LTC 15
I used the cut out portion of the card stock as a stencil for this project. I laid it out one line at a time on the board, using my photo as a reference for spacing and centering.
LTC 11
I used this little sponge stencil brush, loaded it with paint, blotted off the excess, and lightly dabbed on the paint.
LTC 12
I wanted a light coverage, so I purposefully didn't work the paint into all of the cracks and crevices of the wood. I removed the stencil and gave the paint about 5 minutes to dry, which was all that it needed. I worked my way down the board, doing one line at a time and was finished in a flash.
LTC 13
There were a few places where the paint coverage was too thick for my liking, so I got a coarse sanding block and lightly sanded in small circles until I got the aged look that I was going for.
LTC 2
I then used my wire brush to scrape some lines into the paint and give it a further distressed appearance.
LTC 1
I sprayed the finished board with a light coat of polyurethane, added hanging wire to the back, and popped it up in the nursery.
Mygirl 3
I love love love it! It is impossible to rock Hannah in her room and not sing this song, and it brings a smile to my face every time I see it. It is one of those rare projects that turned out exactly the way I had pictured it in my head and I'm so happy with it!
Mygirl 2
I love the contrast of the coarse rugged wood and the crisp gray paint on the walls. It is a lovely addition to the nursery and I had the hardest time deciding where to hang it. I'm looking forward to showing it to you next week along with the rest of the nursery. Please stop back and let me know what you think!
I'll be linking to these amazing parties this week, and thanks to all of the wonderful hosts!
Have a great week!
E1025F317CFB5B8E9E5C526E5CC0F475 copy

Read more...

Friday, August 19, 2011

Fun Fair Finds

Have you ever been to the Country Living Fair, my friends?  My Mom, sisters, and I began a tradition last year of spending the day there together to celebrate my birthday.  Okay, so my birthday is not until the end of November but a girl can celebrate early, right?  Actually, what it means is that my Mom gives me money to spend at the fair...

So just for fun do you all want to see the things I got last year?

Here you go...

I found this pink hanky that was perfect for the girls room. I also found these old blocks that I LOVE and they found a home on top of the pink hanky...

I got this page from an old book. Avery loves butterflies so it made me think of her and it was another perfect thing for their room...

I found this adorable old dish towel. I loved that it had a bird on it, loved that it had words on it, loved the colors. I was sold immediately.

I realize I am not an amazing seamstress, by any means. I have SO much to learn but in our "loft" area is where my sewing maching sits. I love the look of old patterns. This was one got me all giddy because it says Simplicity and I am a simple girl. Also, the colors are perfect. It sits on a white shelf on a wall in the "loft". Ah, I wish patterns were still 65 cents...

I found these clear plastic red numbers. I chose the numbers 7, 1, and 5 because Tyson was born on July 15th. They will someday make a home in his big boy room if we are ever brave enough to take him out of his crib...

I got this adorable little flashcard. I loved it because it had a #5 on it and we are a family of five. I also loved it because it was birds and it would look cute in the girls room...

I was so excited to find some older bingo cards. LOVE them. I think one of them will end up in a frame in our living room and I am not sure what will become of the others. I am sure I will think of something...

Two of my favorite things are these sweet dresses. One is intended for baby dolls and the other was for my baby Mia (before she grew out of it). 

Look at the details on this dress. Almost makes me drool. I LOVE it. And it was only $2.00!

One booth was selling pieces of old crates. I fell in love with this Sunkist Oranges sign. I told my sister and Mom I would buy it if it were $5 or less. It was $5 and all mine! 


I found this cute hanger.  I know it is not actually old but it was painted a cute blue and stamped with numbers so how could I pass it up?  It holds pictures nicely which was a bonus.


And last but not least, you know that I couldn't leave without purchasing a jar. I looked all day long and found this beauty at one of the last booths. A woman can't have enough jars, in my opinion!  It holds all my scrabble tiles now.

And there you have it, all my fun goodies from the fair. I wanted several other things but realized I can just make them for much cheaper. Love being inspired. It was such an amazing day.

Now just a few more weeks until I get my hands on some more goods!  

Happy Friday!

Read more...

Thursday, August 18, 2011

Whimsical Clock Revamp

Lemon Tree Creations is excited to welcome another guest blogger today, Pam from Be Colorful. In addition to making her house just plain beautiful, Pam spends a lot of time taking ordinary objects and making them beautiful with colorful and whimsical custom paintings. I hope you enjoy what Pam has to share with us today!

BeColorful's Take On A Stick's Inspired Clock

  Betsy's clock discover knob 
Me? A guest blogger?
Who would have thought?
:)
It has been on  my bucket list for awhile now but to be able to do this  for such a respected blog is truly humbling.
Thank you so much for the opportunity.
I describe myself as color evangelist and I relish the idea of mixing pattern and color in painted pieces and re-purposed items. So, that seemed like the obvious type of post to write today.
Recently I had a friend ask me to paint a clock she had purchased as a wedding gift.
She was very specific in that she wanted something in the Stick's vibe.
If you are unfamiliar with Sticks it is a company that does amazing one-of-a-kind painted furniture and accessories in a very distinctive style.
It was fun to try my hand at this.
This is the clock as it was handed over to me last month.
IMG_3305
 It was a great piece even with the missing knob.
The flat surfaces made for a relatively easy design layout.
I also liked that it was painted black. I did not prime this piece because I like the look of the black peeking through just a bit when I pull the brush through the paint.
I will have to give it several layers of top coat, though, to protect it.
I haven't done that yet. I'm letting everything cure first.

I started by painting the top
  IMG_3383
 Then I worked out the sides.
IMG_3389
IMG_3390
 My friend had a number of elements that she wanted incorporated into the face view of the clock, including the names of the bride and groom, the wedding date, and words that were significant to the bridal couple.
This is what I came up with.
IMG_3386
IMG_3385
IMG_3384
 This piece was perfect to pull in that surprise element I so love.
The clock opens up and is also a jewelry box.
How great is that?
So I stayed with the love theme and this is what will greet the bride when she pulls on that discover knob
IMG_3391
 and then again when she opens the drawer down below.
IMG_3392
 I hope she likes it.
I thought it was fun and definitely unique.
Thank you again for the opportunity to guest blog.
To see the site that inspired this piece click here.
Their work is absolutely amazing.
xoxo,
P

Thanks Pam! I love how unique this bridal gift is, I think we are all a little more inspired to get out our paint brushes now!

Read more...
Related Posts with Thumbnails