Saturday, April 23, 2011

Cutting Edge Stencil Winner

It's time to reveal the lucky Cutting Edge Stencil Winner!

Lucky number 56,

Screen shot 2011 04 23 at 7 44 57 AM

Lauren!

Screen shot 2011 04 23 at 7 47 00 AM

Lauren, please send me an email and we can get the details all set up for you to receive your stencil. Congratulations!!

Also, have you entered to win a FREE Freschetta Simply Inspired Pizza?! Get all of the details and enter here.

5434808636 98c65a2e37

Happy weekend!!

E1025F317CFB5B8E9E5C526E5CC0F475 copy

Read more...

Product Review and Giveaway: Freschetta Simply...Inspired Pizza

This post brought to you by FRESCHETTA®. All opinions are 100% mine.


Freschetta came to LTC with this great opportunity to review one of their FRESCHETTA® Simply…Inspired™ pizzas.


I decided to try the Harvest Supreme. When they said the flavor starts from the toppings to the bottom that was NO understatement!


The power of the sundried tomatoes, spinach, and feta cheese with the zesty red sauce...MMMM. The combination only left me wanting to get back in my car and head to my local market! The FRESCH-TASTE SEAL packaging helped lock in the vibrant flavors but still used 30% less packaging material.


Luckily, they have a total of eight flavors I can try out by putting one my grocery list for next time!


Harvest Supreme


Classic Bruschetta


Hawaiian Style


Classic Bianco


Farmers Market Veggie


Rustic Pepperoni Pomodoro


Southern BBQ Recipe Chicken


Tuscan Farmhouse


Now the good news for YOU! A chance to win your own coupon for a FREE Freschetta Simply... Inspired Pizza and a bamboo cutting board!


You know the drill!


1. Like Freschetta Simply...Inspired Pizza on Facebook. They are offering weekly giveaways and other great prizes for the rest of the year, and will soon be offering the opportunity to download a $2 off coupon there as well!


2. Leave a comment letting us know which Pizza you have tried and what you thought of it.


3. Become a Follower of Freschetta Simply...Inspired Pizza on Twitter @FreschettaSI.


Submissions will close Friday, April 29 at midnight. A winner will be announced the following morning!


Good Luck!


Visit Sponsor's Site

Read more...

Friday, April 22, 2011

T-Shirt Pom Poms

I've been wanting to make these super cute t-shirt pom poms for quite some time now. Unfortunately, I haven't really had a chance to make them and I haven't had much luck finding good tutorials to follow...until now.

As I was searching through some of my favorite blogs as I often do, I found this oh so simple tutorial here.


After following the steps I created this Easter wreath for my front door!


I really thought this was a great way to celebrate Easter as well as Earth Day!

I used a couple of my old shirts for the project, some scrapbook paper for the bunny silhouette and I covered the wreath with awesome printed packaging tape that you can purchase now in various prints!

This was by far one of the easiest projects yet!


Don't you just love the vibrant colors! It makes me feel so springy inside!


I also created extra pom poms for other parts of the house.


This would also be great for pom pom garland, place settings or topiary trees (which I attempted, but I need a new strategy..they were really heavy and kept falling over...boo..).

Thanks for stopping by, I'll be partying at these great linky sites!
Happy Friday, Happy Earth Day and Happy Easter Weekend!


Don't forget to check back tomorrow!
Enter to win a giveaway from Freschetta Pizza!
You won't want to miss it!


Read more...

Thursday, April 21, 2011

Rhinestone Birds: Silhouette Project and a Great Deal!!

This month I had the opportunity to play around with the Silhouette Rhinestone Starter Kit.

And let me tell you...this kit is chalk FULL Of everything one could need to create a rhinestone masterpiece! I followed a few easy steps given in the starter kit to make some fun rhinestone birds and a spring memo board.

First, I went to the Silhouette Studio Store and purchased a sweet rhinestone bird template. (Though the started kits comes with a ton of great templates too.)

I then followed Silhouette's starter kit's easy directions to load the paper into the printer...

Brush the rhinestones in place...

Use transfer tape to adhere the birds...

Place the bird on my fabric...

Iron...

And admire...

I then made them into a tri-frame memo board for my kitchen following the steps I used in this earlier tutorial.


It was way easier than I expected it to be, and I love the results. The rhinestones are so secure too. I wouldn't be at all concerned to use them for clothing now, and I after finding a fun mustache template on the studio store, I think I have some plans for a little shirt for my daughter!


If you have ever bought from Silhouette before, you already know that they are
regularly running great deals. Well, this week is no exception!
April 21st-26th they are running a great promotion!!


A Silhouette SD, The Rhinestone starter kit, 3 additional packs of rhinestones, And 1 Pick Me Up tool

ALL FOR $229!

This Rhinestone Bundle includes:

The Silhouette SD

2 sheets of rhinestone template material

2 sheets of rhinestone transfer tape

2 rhinestone backing boards

1 rhinestone placement brush

1 CD of rhinestone images

1 pack of clear 10ss rhinestones

1 pack of clear 16ss rhinestones

1 pack of clear 20ss rhinestones

1 pack of pink 10ss rhinestones

and

1 Pick-Me-Up tool

This is an incredible deal worth $125 in savings!

All you have to do is visit the Silhouette website and look for the Rhinestone Stone Bundle.

Then, click on the special bundle icon and enter the promo code: LEMON to get your great deal!

Be sure to take advantage of this great deal before April 26th!


Also, this week ALL rhinestone products are on sale for 30% off!!


Happy Thursday!

Read more...

Wednesday, April 20, 2011

Cutting Edge Stencils Giveaway

***This giveaway is now closed.***

You know that we love Cutting Edge Stencils around here.

My most recent project was to spruce up the walls if the nursery with this lovely Damask Kerry stencil, which I showed you on Monday here. Isn't it fun?!

Nursery 31

I still just can't get enough of it. Bright, fun and sweet. I'm so happy every time that I step in the door!

Nursery 13

But there are tons of great designs to choose from!! I often feature the allover patterns, so I thought I'd choose from a few of the

There's this Chrysathemum Grande.

Flower stencil large stencils

This adorable Freedom! stencil. (How cute is this nursery?!)

Nursery decor bird stencils

I love this fun Zinnia Grande stencil as well.

Zinnia stencil flower

If you haven't been to Cutting Edge Stencils' website in a few months, you really need to go look again. They've just added tons of new stencils in the last month or so and I'm sure you will love them!

Okay, ready for the giveaway? You'll have 3 chances to win!

1.) Become a follower of Lemon Tree Creations (or let us know that you are one).

2.) Like us on Facebook or follow us on Twitter. Leave a comment to let us know you've done so.

3.) Go to Cutting Edge Stencils website, browse around and tell us your 2 favorites. Good luck choosing just 2!!

The giveaway will close on Friday night at midnight and the winner will be announced on Saturday morning. Good luck!!

E1025F317CFB5B8E9E5C526E5CC0F475 copy

Read more...

Tuesday, April 19, 2011

Silhouette Project-Graphic Dishtowels

I have another project for you using the images from the Silhouette Studio.  I showed you my Spring Greeting Cards several weeks ago using some fun images.  New images are added all the time to the Studio and there are some seriously fabulous ones!  

I used Erin's method of printing on fabric that she shared with us in this post.  So fun.  I used a light layer of spray adhesive to adhere my fabric to a piece of cardstock.  


I found two kitchen images that I loved, positioned them on the computer to be the size I wanted and filled in with the color black.

I stuck the cardstock with attached fabric into the printer and hoped for the best.


I was thrilled when it came out perfectly.


I had picked up some of these Ikea dishtowels for .49 cents a piece a few months ago.  You can't find a dishtowel cheaper and they were just begging for a fun image to be added to them.


I ironed them first, of course.


I cut out my images, placed my piece of fabric on the dishtowel, and pinned it in place.


I used black thread and hand stitched around the border of the fabric piece to secure it to the dishtowel.


I was super excited to see the finished product.


I tried them out in a few different places around the kitchen.


Love these images, especially the mixer.  I could go crazy doing this.  I like the simple black & white going on here but now my mind is spinning with ideas of blue images on a floral background and red images on a ticking stripe.  Oh, the possibilities...


***Disclaimer: These are to be used for decoration only.  Images printed on fabric will disappear when washed.***

If you haven't already, you really should check out the Silhouette Studio.  You do not have to own a Silhouette machine to do this project or to be a part of the Silhouette Studio.  So much fun to be had.

If using the Silhouette machine, you could try their fabric interfacing and have a cut-out image on a dishtowel or you could use their heat transfer paper to iron your images right on.

I will be partying on these blogs this week!

Happy Tuesday!

Read more...

Monday, April 18, 2011

Damask Stenciled Nursery Walls

You already know how I'm a huge fan of Cutting Edge Stencils and their incredible product, and I have a major love for damask print. So upon discovering that we would be converting my office into a nursery for a little lady, I immediately hopped on over to Cutting Edge's site to finalize my choice for a damask print for her walls.

(Here's a peek - the view from the crib! :)

Nursery 11

I was surprised (and thrilled) to discover that several more damask options had just been added in the past few months!! Now I had even more choices in my quest for beautiful walls, and it didn't take me long to settle on this LOVELY Damask Kerry stencil. (I also found out that the new stencils are named after each of the girls who work at Cutting Edge, isn't that sweet? :)

Damask stencil 5

I have lots of pretty and bright colored fabric that I want to use in the nursery, so I decided to go with a cool soothing gray as a more neutral background. I chose Gray Clouds from Sherwin Williams, and enlisted my lovely mother to help transform the room from Office Orange to Nursery Neutral.

Before, with paint samples.

April2 30

After. Ahhhhhh.

Stencil 18

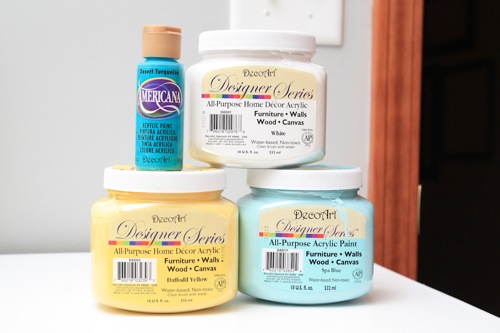
Then came the fun paint. I used this line of Designer Series All-Purpose Home Decor Acrylic Paint from DecoArt, in White, Daffodil Yellow, and Spa Blue, along with their acrylic paint in Desert Turquoise. I just LOVED them!! Let me tell you, these went on perfectly!! The paint was thick enough that it only took 2 coats to get the coverage that I wanted - even when going to a lighter color!! It had practically no fumes so was perfect for an indoor painting project, particularly by a pregnant lady. It also dried really quickly, so I was able to work my way around the room pretty fast. What more could you want in a paint? Particularly when it comes in such beautiful colors as these!
Paint 1

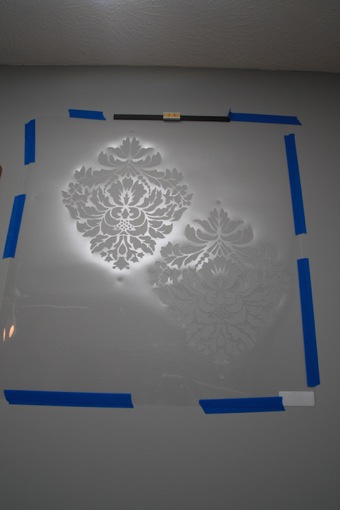
I also got to use this fabulous clip on stencil level, which you can also purchase through Cutting Edge Stencil's site. You just clip it to the top of your stencil and it ensures that the pattern is level. This was such a huge time and headache saver!! I would constantly have been stepping back from the wall, arms crossed, trying to figure out if any of the damasks were crooked. I am too much of a perfectionist to not be driven crazy by an uneven design and I'm glad this kept me from having to endure that!! :)

Stencil 5Stencil 6

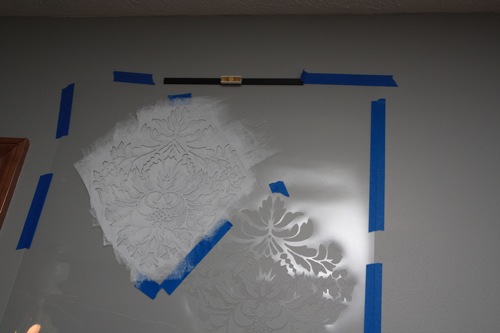
Since the damask design has so many tiny and intricate details, I decided to use a tacky stencil adhesive to ensure that it laid flat on the wall and stayed in the exact same spot as I painted.

Stencil 14

(A note about stencil adhesive: The fumes are kind of strong, so spray your stencil outside or in another room before sticking it to the wall. If you spray it indoors you'll want to do so over some sort of drop cloth, because if it gets on your carpet it feels so nasty!!)

Stencil 99

I poured my paint into a "paint tray," had an extra paint tray with paper towels on it to roll of the excess paint, and got to work.
Stencil 7

Then I did it again...

Stencil 15

and again...

Nursery 2

You get the idea.

Nursery 4

I loved this project because I could do it a little at a time over a course of a few days. The damask pattern is relatively small, so I would paint one or two when I had the chance, and then store the stencil until the next time that an opportunity arose.

Stencil 1

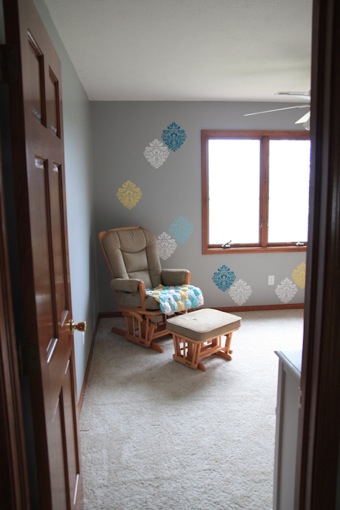
I didn't want a full pattern on the wall, just little pops of color and a pretty design here and there.
Nursery 25

I tried to make it completely random, but in the end I could not fight my need for symmetry. I might have been able to pull it off if there wasn't a window in the center of the wall, but all that I could think was that I needed the sides to be mirror images of one another. I did mix up the colors a little bit though, which I thought was something.

Nursery 20

I just love it!! Every time that I go upstairs for any reason, I stop in the room, glance around and smile. I'm sure that is partially to do with it being a nursery, but still, it is pretty sweet looking isn't it?!

Nursery 12

I kept my stenciling on the feature wall until I get the rest of the decorations settled and put up. But it was so easy with such a sweet impact that I wouldn't be surprised if I sprinkled a few more around the room before it's finished. I can't wait to show you the rest of the details!

Nursery 7

Would you like to try out one of Cutting Edge Stencil's new designs? Stop back by on Wednesday because we'll be giving one away for free!! Yay!!

Happy Monday!!

E1025F317CFB5B8E9E5C526E5CC0F475 copy

Read more...
Related Posts with Thumbnails