Monday, November 22, 2010

Gift Idea: Pizza Shop

This week on Lemon Tree Creations we're sharing some of our gift ideas. I wanted to share this little gift that my 2 year old son will be receiving this Christmas, a pizza shop.

IMG_8477.JPG

My son just loves pizza. (It's a good thing too, because pizza nights have been a tradition between my husband and I since the old days when we they were pizza and Arrested Development nights.) Anyway, this summer we found Jayce a little kitchen with a bin full of dishes at a yard sale, and the first thing that he decided to make and serve to us all was pizza. Ever since then I've had in my mind that I need to make him a little pizza shop, and I finally did.

First off, I bought a plain red kid's apron at JoAnn's and decorated it with Silhouette's heat transfer material. Now he is officially the pizza shop chef.

IMG_8064.JPG

I followed this tutorial for making a Lily Bean felt pizza. The only thing that I did differently was make my toppings a single layer that did not need to be sewed. (I tried to do it the way that she instructs, but I just couldn't pull off sewing little circles. I decided to let myself off the hook.)

feltpizza.jpg

Next I made him some uncooked pizza dough. I traced a salad plate (8 inches in diameter) onto the felt with a sharpie to get a nice circle, and then sewed around the line. I left a 3 inch strip open, trimmed the fabric around the circle, turned it inside out and used fabric glue to glue the opening shut. I would DEFINITELY recommend sewing before cutting out the circle. I tried it both ways and it's much easier to guide the fabric through the sewing machine when you have some excess to hold onto.

IMG_8393.JPG

IMG_8440.JPG

Next I got some mozzarella-colored yarn and made some shredded cheese.

IMG_8459.jpg

IMG_8468.JPG

I cut two 6 inch circles out of red felt. These would be the sauce. I also picked up 2 of these tins, perfect for my little chef to cook his pizza in! (I found these at the first thrift store that I went to, so just keep your eye out if you might make a little pizza shop someday. There are still plenty of days before Christmas!)

IMG_8483.JPG

Next up was the pizza toppings. I went pretty basic: pepperoni, mushrooms, and green peppers. I found a small cupcake pan at the thrift store that was perfect for housing the toppings and made them easily accessible to the chef.

IMG_8437.JPG

I had a few empty spice containers which quickly became pizza shop spice containers! I simply peeled off the old labels, made a few very basic labels on my computer, and printed them onto 2 inch by 4 inch shipping labels. It was the perfect fit. I filled the olives jar with some large wooden beads that I had on hand, and the spices jar will be filled with some small beads and the top taped shut. Just enough to make a fun rattling sound when when the chef is spicing up his pizza.

IMG_8446.JPG

IMG_8448.jpg

The final touch? A pizza box!!

IMG_8453.JPG

No, I did not make this, but I'm sure that if you tell the pizza person at the drive through window that your kid loves to play pizza shop, and could you please have an empty pizza box for him to play with, that he'll oblige as easily as ours did. He will likely oblige more quickly than your husband will when you send him out for pizza and explain this scenario to him right as he's going out the door. I'm just saying.

IMG_8450.jpg

There you have it! A fun little pizza shop for your little one to enjoy.


Also, Tiffany is contributing a tutorial today over at KoJo Designs "Gifts for Guys" series, so head over and check her out! You're sure to find some inspiration for the big and small men in your life.


I'll be linking to these great parties this week! Hope everyone has a wonderful Thanksgiving!!

E1025F317CFB5B8E9E5C526E5CC0F475 copy.png

Read more...

Saturday, November 20, 2010

Winner!

The winner of the Cutting Edge Stencil giveaway is...


#12 - A City Girl

Congratulations, A City Girl! Please send us your information and we will pass it on to Cutting Edge!

Thanks for playing! And don't worry if you didn't win this time because Lemon Tree will have more wonderful giveaways in the future! Stay tuned!

Happy weekend!

Read more...

Friday, November 19, 2010

Cover-Me Up Aprons!


A few years back I was given this adorable dish washing liquid bottle apron. I have cherished it so, as it sits on my counter top in the sun...slowly fading away and getting older just as I am. I got anxious as I thought about sharing it with you and pulled out some fun fabric to create one for you.


All I did was create a similar template by tracing the one I had. Next, I measured around the apron and cut my ribbon for the trimming.


Lastly I drug out my trusty hot glue gun and began going to town. (For those of you lucky "fellas" that sew I guess you could do that...but I will just get a new blister for the team)


Ta-dah! Yet another one of my bottles don't have to be cold.. he.he.

I was thinking this could add to the list of gifts that I shall make for Christmas this year...what a fun way to give all those lotions away, or now I can maybe start making some aprons for other random bottles that sit around the house...hmm...wine even.I'd love to see your aprons show up on Flickr!

Thanks for stopping by. Have a great Thanksgiving! Check out these parties this week..I know I will!

Read more...

Thursday, November 18, 2010

Ribbon Christmas Tree Decor

I start to get very excited this time of year, don't you? It's the time when I can start to think about how I am going to decorate for my favorite holiday this year. I get excited over the slightest bit of holiday cheer around here! Well, one night recently I got the urge to create something Christmas-y. Not having a specific idea, or having purchased any supplies recently, I gathered up everything I could find in my ribbon and fabric box, along with an old empty red frame and got to work.
First, I used the glass from the frame to cut out a piece of 5x7 cardstock as a backing for whatever I was about to do.
Then, I hot glued some of my favorite black gingham fabric to the card stock.
Next, I cut ribbon into little slices and folded them in half, securing the cut ends together with a dot of hot glue.
I glued folded ribbon pairs onto the gingham backing in the iconic Christmas tree branch shapes, until I had a full tree.
Then I simply added a little red bow as a tree topper and I was done!
I spent absolutely NO money, and have a happy little tree to adorn some lucky shelf in my house. This being my first little Christmas decoration this year gets me all excited to do more and more. A little Christmas tree may be making an appearance in my dining room this week, despite my husband's obvious chagrin. Oh, and wouldn't these look fabulous sewed onto a sweet bib or onesie for Christmas? How about a forest of ribbon trees on a big girl shirt? I might have to get my needle and thread out and pull something together for one of my daughters Christmas outfits, if you come up with something great, be sure to link it to our Flickr page, on the sidebar!

I'll be linking to these parties this week. Hope to see you and your inspiring holiday ideas there!

Happy Thursday,

Read more...

Wednesday, November 17, 2010

FREE Canvas Offer!!

I am SO excited to tell you about this great deal!!

I have mentioned before that my husband and I lived in Scotland for a few years while he did his PhD. We had an amazing time and have incredibly fond memories of our life there. I've had in my mind that I want to get one of our pictures from our time there blown up and give it to him for his office.

That time is now.

Canvas People are currently offering an incredible deal on their canvases. You can get an 8x10 canvas print FOR FREE!! 

You only pay for shipping!

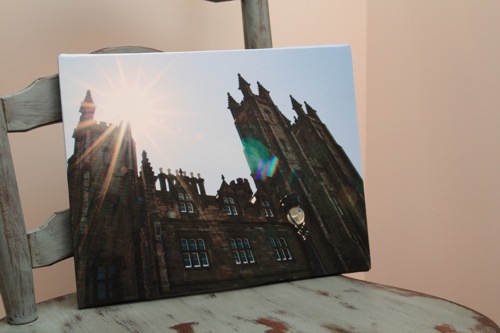
I had to try it out. Here is the result.

This is my favorite picture of the school where Chris studied, complete with yummy sun flare peeking over the back. I love it!! It brings back so many good memories!

IMG_8406.JPG

The colors on the photo turned out great and the picture wraps around the edge of the canvas, which I love. It seems much more like a finished piece that way, no need for framing or anything additional.

IMG_8417.JPG

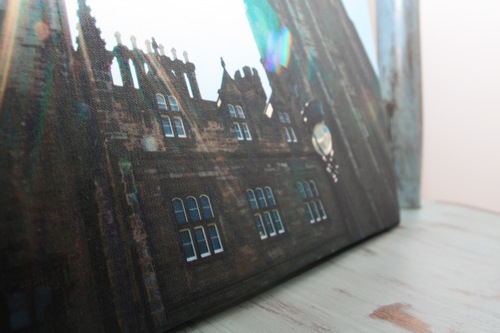
It also has this great canvas texture. Love!

IMG_8422.JPG

We had recently ordered some family pictures from a photographer and when I received the 8x10, I thought to myself, "It's just a little too small!" Luckily you do have the option to upgrade your canvas from an 8x10 to an 11x14 for only $9.99, and I decided to do this.

(My 8x10 family picture in front of the 11x14 canvas. A HUGE difference, right? Well worth the $9.99.)

IMG_8414.JPG

The best part of all? My husband LOVED it!! He kept talking about it the night that I gave it to him, which is just so rewarding for us gift givers. :)

Now I can't stop thinking about who else might love to have a favorite photo blown up and canvas-wrapped for Christmas!!

Grandparents? Yes. Aunts? Uncles? Me? Yes, yes, yes.

What photo would you use for this great deal?

A sweet moment with the kids? An unforgettable trip? A rare capture of the whole family looking towards the camera with smiles? Your family Christmas photo?

Do you want to try it?! You know that you do!

Just click here to turn that perfect picture into the perfect Christmas present, or your new favorite part of your decor.

I'm not sure how long this offer will last, so click over and order your print now!

And let us know when you get yours! We'd love to see your best and most canvas worthy photos! :)


E1025F317CFB5B8E9E5C526E5CC0F475 copy.png

Read more...

Tuesday, November 16, 2010

Cutting Edge Tree Stencil & A Giveaway!

I was so excited to get my hands on the Large Tree and Birds Stencil from Cutting Edge. The original plan was for it to go in the girls room but the wall quickly filled up in there so I moved on to plan B. Sometimes I love plan B!

I used this white all-purpose home decor acrylic from DecoArt. It was perfect for the project.

And I love the mini foam roller that comes with the stencils! Again, perfect for the job!


I actually completed this tree in one naptime which was awesome! The large tree comes in 2 parts so I began by leveling and taping the bottom part of the tree. So easy.

Then the real fun began...the painting. I started rolling away and in no time the bottom part was done and I was taping up the top part. I have no pictures of this because I got way too excited and forgot! I get a little crazy during my projects! Ha.

I barely used any paint on my brush as the instructions note and it came out perfectly! I didn't even have any smudges! It was seriously so quick and easy.


Before I knew it, there was a perfect white tree on the wall in our "loft" area upstairs. I was so very excited about it and so proud that I did it without any assistance from my husband!


The large tree stencil comes with a separate bird stencil full of different birds. I found two that were perfect for what I wanted.

I stenciled them above and on either side of the tree. I had been looking for a place to hang some of my daughter's artwork! She has been taping her papers all over the house so this would be the perfect spot to showcase her special drawings.


A screw was placed right under the bird's feet to look like the bird was carrying the twine. I tied twine around each screw and hung up some of our favorite art and pictures of the kids with clothespins.


This is the area in the house where I do my blogging, crafting, and sewing. The tree gave this area just the right touch and makes it feel so cozy and peaceful. I love it and so do my kids!


Cutting Edge offers a large variety of awesome stencils for you to choose from and now is your chance to win one!

Look at what you could do with this cool Chandelier Stencil. How fun is that?


And you can make a beautiful design like this with the Parsley Blooms Wall Pattern Kit...


To enter this giveaway simply visit Cutting Edge and comment letting us know what your very favorite stencil is.

For an extra entry, you can "like" Lemon Tree Creations on facebook and comment letting us know.

The winner will be announced on Saturday.

I will be joining these parties this week! Thanks for stopping by!

Happy Tuesday!


This giveaway is now closed! Thanks for participating. Stay tuned for future giveaways on Lemon Tree Creations!

Read more...

Monday, November 15, 2010

Sweet and Salty Snack: White Chocolate Popcorn

Last weekend I had the honor of throwing a shower for a good friend. But I had a bit of a dilemma when I was trying to decide what to make. It was an open house shower with 600-ish people invited, so I wanted something that was good, but wouldn't break the bank or take me forever to make. I found the perfect solution-white chocolate popcorn.

IMG_8389.JPG

I started off with the following ingredients.

(Did you know that you can make popcorn in a paper bag in the microwave? It's true, and a great way to make popcorn exactly the way that you want it.)

IMG_8243.JPG

I put 1/4 cup of un-popped popcorn kernels in a brown lunch bag with a few shakes of salt, squeezed out most but not all of the air, and then taped it shut.

I then put the bag in the microwave and followed the normal protocol about cooking it until a few seconds went by without any popping. The magic number for my microwave was 2 1/2 minutes, but you can experiment a bit.

(The bag on the left is un-popped, the bag on the right is full of popped popcorn.)

IMG_8246.JPG

When the popcorn had cooled a bit, I spread it out on a sheet of parchment paper and melted down my white chocolate.

IMG_8226.JPG

I then lightly drizzled the white chocolate over the popcorn, moving my spoon quickly back and forth to shake the chocolate off in light strips.

IMG_8236.JPG

I let the chocolate glob on some pieces, and others just had a light drizzling.

IMG_8235.JPG

While the chocolate was still melted, I got my sprinkles and sprinkled them generously over the popcorn. I went with blue because it was a baby shower for a little boy, but this is easily customizable to any holiday or decor that you can match sprinkles to. Alternately, you could use some white chocolate melts and some colored chocolate melts to add a bit of color, and draw people's attention to the fact that this is more than the normal popcorn.

IMG_8239.JPG

I let the chocolate cool and then broke it apart into small clusters.

IMG_8242.JPG

This is such a great treat! It has that perfect blend of sweet and salty, filling without being calorie-heavy, easy to make and relatively inexpensive, especially in large quantities!!

IMG_8391.jpg

Would this popcorn make a great treat at your next party or get together? Try it out, you won't be disappointed!!

Have a great week!!

E1025F317CFB5B8E9E5C526E5CC0F475 copy.png

Read more...
Related Posts with Thumbnails