Friday, August 20, 2010

We're On Flickr!

Hey everyone!

As we approach the 6 month anniversary of Lemon Tree Creations, we are so grateful to our readers for continuing to come back and see what we're up to each week, offer feedback and encouragement, and share in our overall excitement. We also LOVE to receive comments, links to blog posts, or emails with pictures of the things that you have made based on a tutorials or posts that we have shared.


flickr-yahoo-logo.png.v3.png


We want to give you guys the chance to show off these items to one another, so we've created a Flickr group. It's called Lemon Tree Creations: Tutorials I Tried. Click here to check it out and upload your photos.


We will periodically go through the photos and put some of them on the blog to show other LTC readers, so be sure to get yours on there for a chance to be featured on the blog!


All the best!


E1025F317CFB5B8E9E5C526E5CC0F475.png

Read more...

Thursday, August 19, 2010

Dining Room Update

Many of you won't remember a much early post I had about my small house. I posted here a few months ago about how I added personal touches to my small house to make it feel more like home. Well, since then many, many spaces in my home have slowly been transformed into a completely new rooms. My new favorite in the house is my dining room.

It started out like this...


And now looks like this...


To transform the space I simply...

1) Introduced the farm table. It is an antique piece my husband bought from a local shop. AKA the best birthday present ever! It was a steal too. You might not being seeing it now in its final form, as we plan to replace the casters and clean it up a bit. I hope to retain as much of the original charm as possible.


2) Upholstered and painted white our old wooden Ikea chairs. This cost less than $10.00 per chair, and made quite a difference I think. (You can see the process I used here.)


3) Added a few finishing touches...
...place settings

...new drapes


...and some artwork.


And that was it. It was a cheap and easy fix. It was inspired by the farm table, and pulled together with items I already had around the house. The art work and curtains were stolen from my old living room, seen here. The chairs were simply re-purposed. Maybe this will inspire you to freshen up an old room too. Anyone have any ideas?


I'll be linking to these parties this week. Happy Thursday!

Read more...

Tuesday, August 17, 2010

Felt Bird Pin

My name is Kristen and I am guest blogging for Tiffany this week so that she can spend time with and enjoy the new addition to her family. This is my first attempt at blogging but I have loved making things and decorating for as long as I can remember. The project I am sharing with you is one I have been making for years. I love giving them as gifts or to decorate with. Just know I cannot sew whatsoever so if I can do this anyone can!


The materials you will need:


Sheet of Felt


Scrap Fabric


Wooden Bird Stencil (sold at Michael’s)


Needle & Thread


Small Button


Pin Back


Batting


Marker (for tracing bird)


Scissors


First trace the bird onto the felt twice so that you have a front and back piece then cut them out. Make sure they match up evenly trimming off any excess felt.


Secondly, cut a wing from the scrap fabric then stitch onto what will be the front of the bird. Also attach your button in place for the eye.


Then take what will be the back of the bird to attach the pin. I also cut a small piece of felt to act as reinforcement where the pin will be, put this on the inside so it will not be seen.


Now that everything is attached it is time to start sewing the bird body together. I start at the bird’s back near the tail and work around the tail. Once you get all the way around the tail you can begin filling it with batting. I use a skinny object to push batting into the tail more easily. The wooden tool that comes with your batting works best for this. Continue working around the bird adding more batting as you go. I do not know much about sewing but make sure the stitches are close enough together so that batting will not come through.


You are left with a precious hand stitched bird to wear or give as a gift.

Possible variations are to make them into ornaments for baby shower gifts by adding a string for hanging instead of using the pin. You could also change the colors to make them into Christmas ornaments. I have also used the horse and alligator wooden stencils to make ornaments for kids, although they are a bit more intricate. Owl pins are also very cute using this method…

Thanks to Lemon Tree for allowing me to guest post and especially to Tiffany for not only asking me but for being such a big inspiration and encouragement. Hope to see you again soon when I finally get my blog up and running!


Kristen

Read more...

Monday, August 16, 2010

Long Necklace Holder

2010_02_08_6418_thumb[1].jpg


I had a cute necklace holder a few years ago that broke, and a new one has been on my shopping list ever since. I have looked at several in different stores but never found one that I like or that would accommodate my looong necklaces. Those are the ones that have been tangled up in my drawer and really need to be managed in the first place, so that’s the priority. Last week, Chris ended up detangling a knot of necklaces while I finished getting ready to leave the house, and I decided that I would just take matters into my own hands and make one for myself.


I made it a priority to get to the thrift store on the day that the artwork was 50% off, and walked home with this cool frame for about $5. I removed the glass, picture and matting and pulled out some old foam board that I had never used. I cut the foam board, wrapped it in some heavy burlap, and hot glued the edges around the back.


2010_02_08_6434_thumb.jpg


I picked up some padded hooks from Walmart for about $1. They started off white, which was just a little too stark for the frame, so I spray painted them beige and then rubbed on a little wood stain. This was a better color but left them tacky and messy, so I put a coat of matte Mod Podge and they sealed up nicely.


2010_02_08_6390_thumb[1].jpg


I wanted the hooks to be exactly 2 inches apart, so I got out the measuring tape and marked the back of the foam board in pen before I twisted the hooks through. I put 2 smaller hooks at the end of the row for shorter necklaces, and 2 at the bottom for bracelets.


2010_02_08_6427_thumb.jpg


I love it! Of all of the things that I have made, this was certainly the easiest. A perfect combination of cheap, fast, functional and pretty. A+. I'll be linking it to these great parties.


2010_02_08_6432_thumb[1].jpg


Also, thanks to everyone who gave me such great feedback a few weeks ago about my Barn Wood and Stencil Art!! You guys are too sweet! I just found out today that it made it into the Top 12 over at the The DIY Club, and I'm so excited about it!


IMG_5001.jpg


If you have the chance, head on over to The DIY Club and check out some really cool projects. And if you feel like voting, check out #32, the Barn Wood Stenciled Art. Just a suggestion. :)


Have a great week and I'll see you next Monday!!


E1025F317CFB5B8E9E5C526E5CC0F475.png


Read more...

Friday, August 13, 2010

School Supply Box

Even though schedules are hectic this time of year and new routines form, I always try to revamp my classroom for some reason? (boredom I guess) Little projects here and there make my day a little more cozy by having something crafty lying around. (it also helps having my fellow blogger Patrice down the hall as well)

Not long ago, I met a lady in Michaels Craft Store who gave me this wonderful idea. So, I thought I'd share it with you... (ma'am if I knew your name I'd give you credit..thanks so much!)


All you need is a plastic container with multiple compartments, various coordinating school supplies, ribbon, scrapbook paper, and some glue dots.


Once you've selected your coordinating supplies, I then choose the scrapbook paper based on the supplies.


Next, measure the lid of the container.


Divide the lid in three sections. I have the gingham and the floral pattern in the larger areas and used the pink piece as a divider.


Now..putting the box together!
Cut a piece of ribbon that goes around the box and makes a nice size bow in the front. Secure the bow with glue dots or two-sided tape.

Next, go back and apply your paper with the adhesive on top of the ribbon.


Then, add the supplies in the compartments.


Last, decorate the top of your supply box by using flowers, buttons, birds, or any other decorative materials your heart desires. I adore my box. (see below)


I also thought this would be a great idea for a little girls jewelry box, a baby girl's hair bow box, an earring box for myself :), or just for organizing my buttons and small materials at home.

I will be linking up to these parties this week!

Read more...

Thursday, August 12, 2010

Push Pins and Pencils Bouquet

For those of you new and old that don't know, I am a teacher. While teaching summer school makes me feel like I have been going NON-stop for the past year, I still became appropriately excited and anxious for back to school time and new school supplies. In fact I am always this way. One of my favorite movies is probably You've Got Mail if for no other reason than this line: "I love the smell of New York in the fall. If I knew your name and address I'd send you a bouquet of freshly sharpened pencils." LOVE IT! Ever since I saw it the first time, I have desperately wanted someone to do that very thing for me. I think I would pass out in happiness!

Anyway, it gave me an idea when I was thinking of something cute to give a great teacher (and even better friend!) on the first day of school. I decided I wanted to create something using some of my favorite school supplies and this is what I came up with:


The best part: It was super easy to create and functional too! All I needed was a few simple supplies.


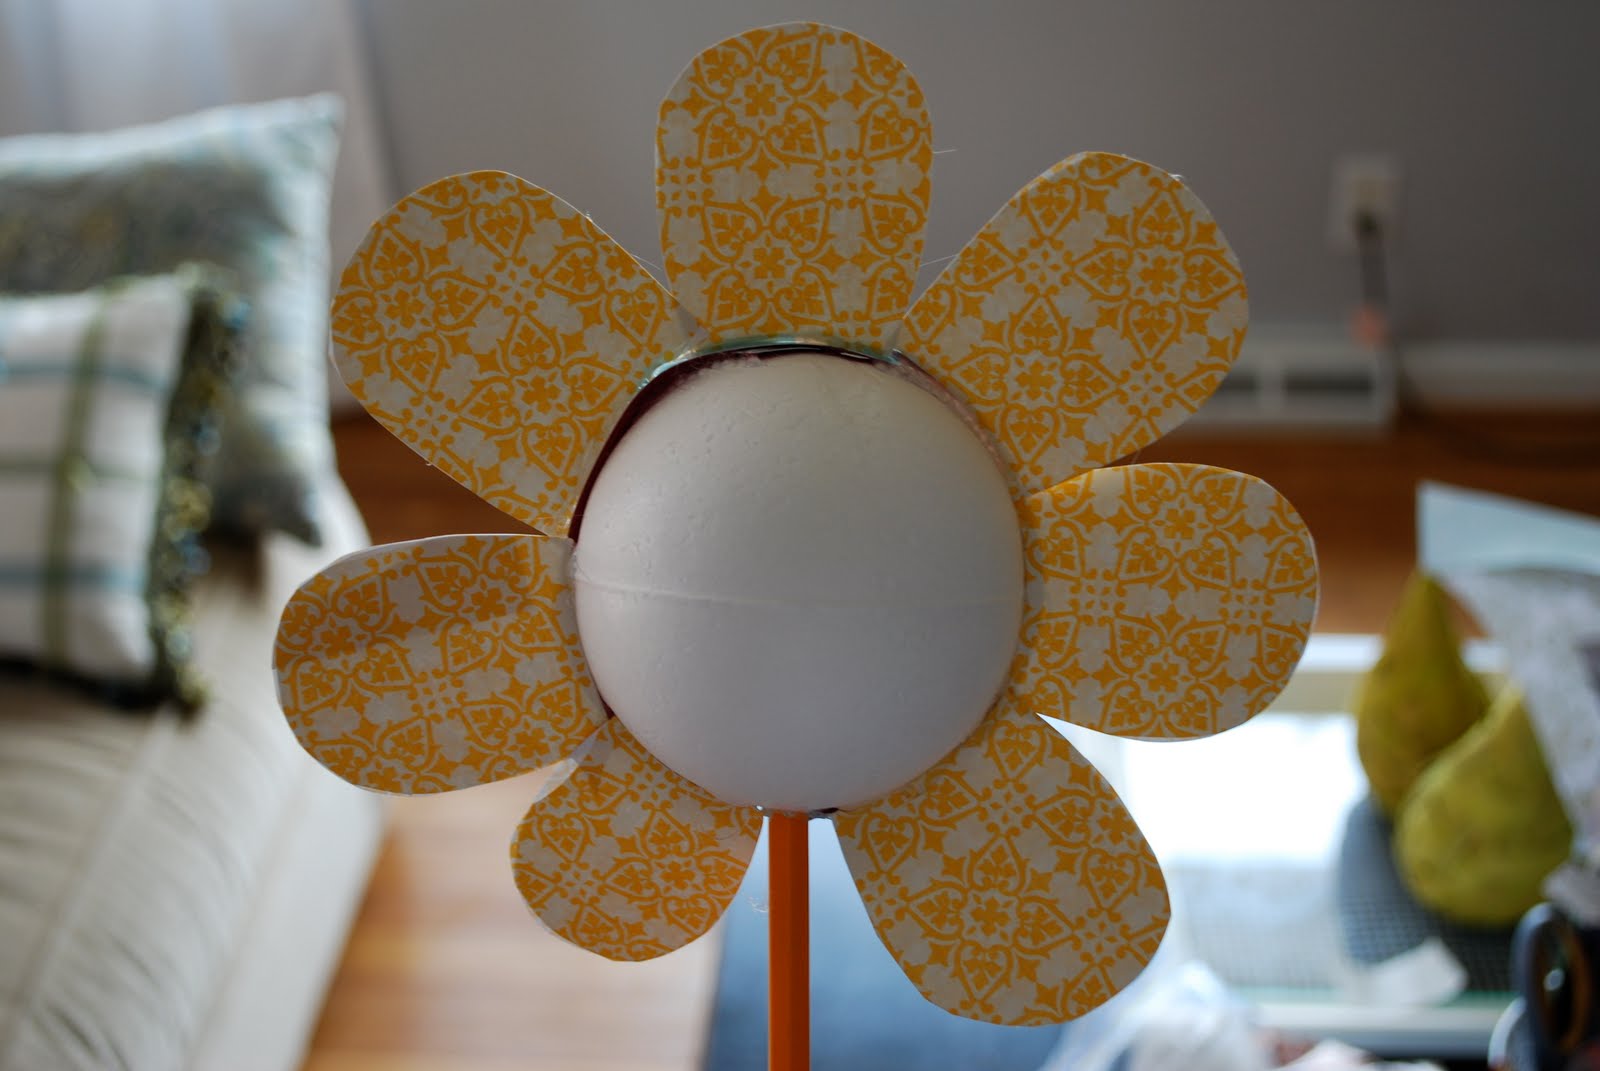
First I cut some petals out of scrapbook paper (I recommend double sided so that you don't have to glue 2 together like I did.)


Next, I glued the petals onto a Styrofoam ball (with hot glue.) Oh, and see that stem? It is a freshly sharpened pencil!


Then I used an assortment of push pins to create the center part of the flower. I just pushed them into the styrofoam in a circular pattern.They are easy to pull out and replace later. And trust me, as a teacher you might just have a LOT of push pins lying around.


Next I hot glued matching buttons to the very center of the push pin flower. It didn't take more than 10 on each side.


When I was done with the flower part, I moved on the pot. I quickly used an ordinary black paint pen to initial the pre-painted pot.


To "plant" my flower I just filled a skinny ceramic vase with some of my favorite BIC markers and stuck the pencil stem in the center. (And of course tied on the cutest bow I could find as a nice 'finishing touch!')


Finally, I attached a personalized note for 'ms. johnson,' or as you know her 'Jessica who posts on Fridays.' We just so happen to be fellow teachers and bloggers. Aren't I lucky to get to work with such wonderful people all the time?


And that is it, I was done! In less than 1 hour and at a reasonable price I had a personalized gift I could be happy with. Do you know any teachers whose days you can brighten? Trust me, they are working over time as they go back to school to make sure everything goes as planned, and they would love to know they are appreciated!


Hope you are motivated to put those extra school supplies to good use this week! Come by tomorrow to see another great way you can use supplies to brighten someone's day. I'll be linking to these great parties this week.

Oh, and stop by the CSI Back To School Challenge to find me too!

Visit thecsiproject.com

Happy Thursday and Back to School Time too!

http://thecsiproject.com" target="_blank">http://thecsiproject.com/wp-content/uploads/2010/05/top-10-Project-150-thecsiproject.com_.png" alt="Visit thecsiproject.com" /a>


(Side note: I will finally be uploading my dining room makeover and answering some questions about my new farm table next week, so stay tuned...)

Read more...
Related Posts with Thumbnails