Friday, April 30, 2010

School Bus Party

Since my son Will's birthday falls in September, we decided his 3rd birthday party should be school buses. After all, what 3-year-old boy doesn't love that big old yellow bus? We used to count them each morning on my way to work.

I must say we had lucked out with the weather for Will's 1st and 2nd birthday parties. Unfortunately, the weather did not cooperate for this party and since our house is the size of a shoe box, we opted for the clubhouse at my parents' condo (aka: lots of golf wallpaper and decor-not exactly the kid-friendly look I was going for, but, hey, it kept us dry!).


I'm a total closet lover of all things "school"--there's nothing better than a fresh box of crayons and sharpened pencils (oh, and whatever happened to those amazing Trapper Keepers??-I soooo loved them!). So planning this school bus party was a blast. The goodie bags held new crayons with a coloring page, a school bus book complete with real wheels (I bought them at my beloved Target dollar bins a year in advance!), magnetic numbers (from Michael's dollar bins--those bins are dangerous for my wallet!), and miniature wooden alphabet blocks for the little ones. I decorated with mini buses, an easel, a Little People bus, bus books, a pop-up bus tent outside (found it at a garage sale for $5!!), and all things in that "school bus yellow" color. I desperately wanted to hang my signature Chinese lanterns, but seeing that this clubhouse had a million rules (all with fines attached), I didn't dare take the risk of putting small holes in the ceiling or door frames.


I decided to be economical and make my own invitations. Over the past summer, I used the amazing Cricut machine (so jealous of those who own one--oh, the possibilities!) to cut out these school bus invites. I found this verse to put on the front: "Look who's turning three! Come take a ride on the bus with me!" and added a brad to attach the back which had the necessary info using "lunch and recess" time as the beginning and end as well as "bus stop" for the location (that had to be changed last minute). I also made coordinating thank-you notes with this same school bus attached to brown cardboard paper cards.


We probably had about 60 people including kids (we have large extended families), so we kept the food cafeteria-style. I made school signs designating the food, lunch bags for the kids including: apple, lunch-size bags of chips, pb & j sandwiches, and of course a Twinkie, and a tub with milk. We also had lunch meat trays and your usual party lunch food. The kids seemed to love the chips and school bus-shaped cookies most!


We kept the kids busy with a Pin-the-Wheel-on-the-Bus game, school bus pinata (that was quite a site watching them bat at this giant bus), and coloring pictures. It was definitely a good time had by all (even our 6-week-old daughter seemed to enjoy it!).

If you love(d) to play school as a kid, give this party a try! I'll be linking to these great parties this week, so don't forget to check them out! Have a great Derby weekend!


Thursday, April 29, 2010

Shutters Memo Board

I am going to be honest, this latest project threw me for a loop. I came out of our local Habitat Restore with some great miniature indoor shutters, but couldn't think of a thing to do with them!


I have seen awesome tutorials on making shelves, mail racks, jewelry stands, wall hangings, etc. with them; but nothing seemed to fit into my style or tickle my fancy. I half-contemplated just sitting them around for interest, but quickly decided they were too "cookie cutter" and not vintage enough for that. So, after racking my brain for awhile, I just pulled out all the materials I could think of and started winging it. I have mixed emotions about the results, so I am definitely going to need some opinions on this one!

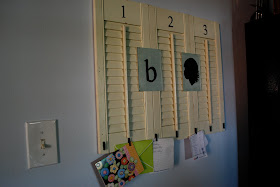
Without further ado, here are my new shutters:


First, I decided it was only natural to number my shutters. I mean, I really do number everything, as I will show you next week! I used the easy pencil mark transfer with simple Times New Roman numbers. I used acrylic paint to make them black.


Next, I secured the shutters with hot glue. Then, before adding the final elements, I came up with a cheater hanging solution. I was out of picture hooks, so I just screwed in a tiny screw and pulled out my handy picture wire. It hangs very well this way!


To make my shutters semi functional, I added scrap booking clothes pins to the bottom of the front to make it into a memo board. They now hold mail, notes, grocery lists, or whatever else.


The final elements I added were a silhouette and a monogram. I painted both on teal polka dot scrapbook paper that fits into almost every color theme in the house since I am already extremely non committal about where it should hang. I then mounted them behind glass and hot glued them into place. I can't figure out what to call this look, but I kind of like it. Also, it was my first attempt at a silhouette, so don't laugh at me. My sweet little girl looks cute even in black and white though, that's for sure!


So, in the end, old shutters+hot glue= kitchen memo board (for the moment, could possibly also = future craft room memo board, future kids room memo board, well you get the picture!)


Here it is in the kitchen entry way. Sorry about the picture quality, my kitchen is incurably dark. Well, at least until I knock out the entire back wall and make it completely glass... oh Matt...


I'll be linking to these parties this week. Hope to see you there!


Wednesday, April 28, 2010

What I like about Wednesday

May is upon us, with that being said: Mother's day is around the corner, spring cleaning begins (which if you're like me you haven't really started yet), and the school year is wrapping up!

Fortunately, we have ladies in the world like Amy at Living Locurto . Amy Locurto is a designer and the owner of Atomic Egg and co-founder of I Heart Faces.
As one of her followers, I have been inspired by her works and feel fortunate to find that her art blog supplies easy access to her works with the push of a button and some card-stock. She regularly updates her blog with oh so cute free labels, cards, calendars, meal plans and other helpful stuff (personal use only of course).


For example, this is a cute (free) Mother's Day Card. Amy also has a note card and bookmark in that style.


I love, love this clever cover for Ziploc baggies. Too cute. (for Easter she had the cutest bunny patterns ever. I printed and made them with my niece...loved them!)


How easy would this be? Teacher Appreciation week is just around the corner. What a great idea.


Yeah, I may be to old for this, but I totally printed these out and immediately hung them in my now organized closet. I always lay my clothes out the night before, so thanks to Amy I can easily plan for the entire work week. Living Locurto is Living Easy!


Thanks for stopping by and don't forget to check out Patrice's project tomorrow!

Tuesday, April 27, 2010

giant ruler growth chart

I am pretty excited about this project mainly because it was made entirely from leftovers. I love when that works out.

We had remaining bead board from our nook project (which I will share with you next week). It was just leaning against the wall in the garage begging to be used for something. I saw a jumbo ruler growth chart in a Pottery Barn Kids magazine awhile back. It was a traditional looking ruler and I loved it, but didn't love the price so never even considered the purchase.

So, here is the story of how that tall and skinny leftover piece of bead board became a giant ruler growth chart...


My husband first cut the piece for me to the size I requested. We kept the width at 9" and then cut it off at 5 1/2 feet. I wanted the growth chart to go to 6 feet and be 6 inches off the ground so 66 inches was the answer.

Next, I got out our ol' rusty can of white paint that has been used for more projects than I can remember. I gave the piece a fresh coat of white paint...


Then I measured and marked every inch down the board...


I visited my sticker stash and found my favorite font of letters to use for my stencils. I used the outlines of numbers 1-5. I also used dashes, letter l & i, as well as exclamation point outlines to mark the inches and feet. I used a large line to mark each foot, a medium line to mark each 1/2 foot, and the smallest line to mark every inch...


I got out my black acrylic to paint the numbers and lines. I carefully painted inside the stencils with just one full coat...


This way of doing stencils is not full-proof so my trusty white paint had to make an appearance again for a bit (or a whole lot) of touching up...


Next up were a couple coats of clear spray paint applied to the ruler for protection...


Jason hung it up in the kitchen using a black screw in each corner...


I was so excited and loved it immediately. The little man was also excited and happy to get measured...


The final touch was printing off a black & white picture of each member of the family in a 2 x 3 size and using tape to apply them to the ruler. Because of the clear coat on top, the tape easily can come off at any point so the pictures can be changed periodically without effecting the paint on the ruler...


I was excited to include the littlest member of the family on our new growth chart using an ultrasound photo. My pregnancy book says our little one should be approximately 12 inches long at this point...


I was so happy with the finished product. Now we have an interactive growth chart that the kids can have fun with. I just know Avery is going to try and measure everyone that comes over.


I spent about a week on this project because I took my time and enjoyed the process instead of rushing through it (as I typically do). I love that it fits right into our kitchen and that it was essentially free! Who doesn't love a free project? I love that the kids love it and will learn from it. I love that it is another place to put pictures of their smiling faces and to watch our little blessings grow!

I will be linking up to these parties this week! Join in and visit for some fun inspiration from some fabulously creative minds!

Happy Tuesday! See you next week.

Monday, April 26, 2010

Pearl Adorned Paper Blossoms

il_430xN.136324078

I made these little paper blossoms a few months ago and have been toying around with them ever since, trying to decide which wreath, box or other item to attach them to.  I finally decided that they were cute enough to make a simple little display of their own.  What do you think?


I started off by taking one of the books that I use for all of my book page crafts and cutting out a bunch of circles in various sizes.  I made sure that the circles were very rough so that piling them on top of one another would be more interesting-looking, meaning that some that were more oval than circular, and several had straight edges or points.  Once I had a good stack of circles, I grabbed my brown stamp pad and inked the edges.

2010_03_15_7259

I then stacked a pile from largest to smallest, trimming up a few circles and sliding some of the “petals" out of the center a bit to make them stand out more.  I poked a hole through the center of the flower and twisted the different circles around until I liked the arrangement.

2010_03_15_7263

I then removed the push pin and replaced it with a brad to secure the blossom.  I also added a little pearl embellishment to the brad to dress it up a bit.

 2010_04_25_8775

I wanted to blossom to have a little bit of a 3-dimensional aspect to it, so I took a few of the blossoms, cut a tiny slit from the edge to the center, pulled the two pieces together until they overlapped slightly, and glued them together with a glue stick.  This gave that layer of the flower the slightest “cone” look and made the whole blossom pop.

2010_04_25_8779 2010_04_25_8782 

I used the same technique with the blue blossom, I just cut out circles of a scrapbook paper that I love in addition to the book pages.  Since the scrapbook paper was sturdier than the book pages, I crinkled the edges of the biggest blossom between my fingers just to give it a little bit more of a ruffled look.

il_fullxfull.136324136

I then pulled out an old round frame that I had picked up at a yard sale, covered some cardboard in linen and popped it into the frame.  I hot glued the blossoms and little pearl embellishments on for stems. 

il_fullxfull.136324095


Ta da!  Very easy and very cute, I wish I had thought of this earlier, these have been sitting unused in my craft room forever!!

il_430xN.136323955 

I am linking this project to these fantastic blogs.  Please take a moment to scroll around and see all of the talent and great ideas that are willingly shared by these ladies!


Also, be sure to stop back by next week as we’ll each be revealing some of our best home solutions.


Have a great week!


Friday, April 23, 2010

Roadside to Gardenside


I was lucky enough to find this 1950's style ice cream parlor chair on the side of the road. My first thought was "this would look great in my backyard" so I threw it in the back of my jeep.


I first used a wire brush to knock off any unwanted dirt and old paint and of course to add more scratches to the vintage style I was looking for.


Next, I measured and cut a piece of plywood to fit inside of the seat (which was a 13 inch circle). Luckily the original seat supports were there and the plywood laid right in place.


Once I made sure it fit, I cut the inside circle that supports the pot. Be sure to cut the inner circle smaller than the top of the pot.
After I cut the circle out I treated the wood with a primer and sealer since it would be wet with water on most days.


I chose to paint my flowerpot white, choose the color that suits you. Think about the possibilities for the chair as well.


So if you happen to see this or anything similar on the side of the road or at a yard sale, stop and grab it! It would look great in any flower garden, in your back yard, or on your deck!

I am linking up to these great parties. Check them out!